New Leads
This guide covers managing leads, including creating New Leads, managing Lead Stock, handling Duplicated Leads, adding New Leads, and Uploading Leads. If you notice discrepancies between this guide and the product, please report them to ensure corrections.
New Leads
Overview
The New Leads section shows all leads that have recently entered the CRM and have not yet been assigned to a salesman. Leads arrive here from multiple sources automatically.

How Leads Enter the System
Leads can come into the New Leads section through:
- Manual entry — added one by one via Add New Lead
- Bulk upload — imported via Excel or CSV file
- Facebook Integration — leads from Facebook ads flow in automatically
- Landing Page — leads submitted via your website landing page
- Third-party integrations — for example, Zapier (useful for platforms without direct integration, such as Snapchat)
What You See in the New Leads List
Each lead shows the following columns:
| Column | Description |
|---|---|
| Name | Full name of the lead |
| Email address (may be system-generated) | |
| Mobile | Contact number including country code |
| Info | Additional notes or tags |
| Who Added | Which user or integration created this lead |
| Lead ID | The marketing campaign ID attached to the lead |
| Date | Date and time the lead was created |
| Assign To | Button to assign the lead to a salesman |
Available Actions
- Search — find a lead by name, mobile, or email.
- ALL dropdown — filter by lead source or type.
- Export — download the list.
- Merge — combine duplicate leads.
- Sorting Method — sort by different criteria.
- Assignment — assign selected leads in bulk.
Available Filter Options
| Filter | Description |
|---|---|
| Lead Code | A unique identifier for each lead, used for quick reference. |
| Creator | The user who created or added the lead to the system. |
| Country | Filters leads based on phone number country code. |
| Lead Origin | Where the lead came from (e.g., Add New, Upload, Facebook, Landing Page). |
| Campaigns | Filters leads linked to specific marketing or sales campaigns. |
| Sources | Filters leads linked to a specific source such as WhatsApp or Facebook. |
| Leads ID | Filters based on specific marketing info / Lead ID. |
| Lead Types | Filters by lead type (e.g., Lead, Broker Lead, Broker Request, CIL). |
| Branches | Filters leads associated with specific company branches. |
| Broker | Filters leads linked to specific brokers. |
| Broker Agents | Filters by agents working under a broker. |
| Projects | Filters leads associated with specific projects. |
| Tag | Filters by tags or labels applied during data entry. |
| Age | Filters by age or age group, if collected. |
| Purpose | Filters by the lead's stated purpose (e.g., inquiry, purchase intent). |
| Segment | Filters by market segment or demographic group. |
| Gender | Filters by gender, if that information is collected. |
| Contact Tools | Filters by contact method used (e.g., phone, email, WhatsApp). |
| Reply Option | Filters by the lead's preferred reply method. |
What to Do with New Leads
- Review the lead information.
- Click Assignment to assign the lead to a salesman.
- Once assigned, the lead moves to that salesman's My Leads → Fresh Leads tab.
Key Things to Know
- Leads stay in New Leads until they are assigned.
- After assignment, they disappear from this view and appear in the salesman's My Leads.
- If using Zapier for a platform like Snapchat, leads will still land here the same way as any other source.
Leads Stock
Overview
Lead Stock contains leads that have been withdrawn from a salesman — either manually, automatically, or because they were unassigned. Think of it as a holding area for leads waiting to be redistributed.

How Leads End Up in Lead Stock
A lead moves to Lead Stock when:
- It is manually withdrawn from a salesman by a manager.
- It is automatically withdrawn based on time rules configured in Sales Settings → Withdraw.
- It is unassigned from a salesman without being reassigned to someone else.
What You See in the Lead Stock List
| Column | Description |
|---|---|
| Name | Full name of the lead |
| Mobile | Contact number |
| Created By | Who originally created the lead |
| Lead ID | Marketing campaign ID |
| Creation Date | When the lead was first created |
| Latest Sales Agent | The last salesman this lead was assigned to |
| Last State | The state the lead was in before being withdrawn |
| Un-Assignment Date | When the lead was withdrawn |
| Un-Assigned By | Whether withdrawal was Manual or Automated |
| Assign To | Button to reassign the lead |
| History | Button to view the full interaction history of this lead |
Lead Stock vs Leads Returned
There are two views within Lead Stock:
- Leads Stock — standard withdrawn/unassigned leads.
- Leads Returned — leads that were specifically withdrawn and are awaiting review. These show additional details including who the lead was withdrawn from and the last action taken. You can Assign them or Ignore them.
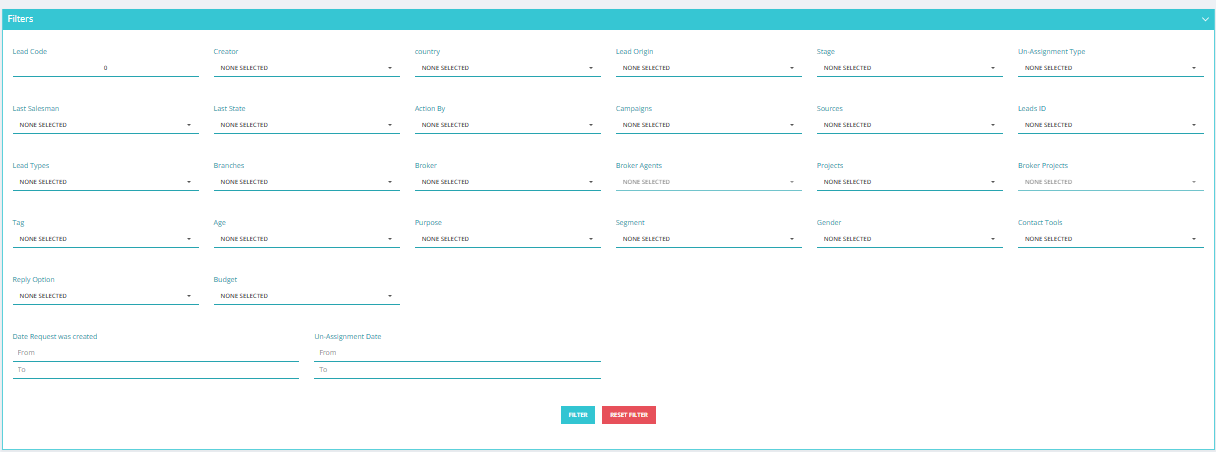
Available Filter Options
| Filter | Description |
|---|---|
| Lead Code | A unique identifier for each lead, used for quick reference. |
| Creator | The user who originally created the lead. |
| Country | Filters leads based on phone number country code. |
| Lead Origin | Where the lead came from (e.g., Add New, Upload, Facebook). |
| Stage | Filters leads by their current reservation/sales stage. |
| Un-Assignment Type | Filters by how the lead was unassigned (manual or automated). |
| Last Salesman | The last salesman this lead was assigned to before withdrawal. |
| Last State | The state the lead was in before being withdrawn. |
| Action By | Filters by the user who last took action on the lead. |
| Campaigns | Filters leads linked to specific marketing campaigns. |
| Sources | Filters by lead source (e.g., WhatsApp, Facebook). |
| Leads ID | Filters based on specific marketing info / Lead ID. |
| Lead Types | Filters by lead type (e.g., Lead, Broker Lead, Broker Request, CIL). |
| Branches | Filters leads associated with specific company branches. |
| Broker | Filters leads linked to specific brokers. |
| Broker Agents | Filters by agents working under a broker. |
| Projects | Filters leads associated with specific projects. |
| Broker Projects | Filters leads linked to broker-specific projects. |
| Tag | Filters by tags or labels applied to the lead. |
| Age | Filters by age or age group, if collected. |
| Purpose | Filters by the lead's stated purpose. |
| Segment | Filters by market segment or demographic group. |
| Gender | Filters by gender, if collected. |
| Contact Tools | Filters by contact method used (e.g., phone, email, WhatsApp). |
| Reply Option | Filters by the lead's preferred reply method. |
| Budget | Filters by the lead's budget range. |
| Date Request was created | Filter by the date the lead was originally created (From / To). |
| Un-Assignment Date | Filter by the date the lead was withdrawn (From / To). |
Available Actions
- Assignment — reassign a lead to a salesman.
- Export — download the list.
- Merge — merge duplicate leads.
- Sorting Method — sort by different criteria.
- History — view full lead history before reassigning.
Key Things to Know
- Lead Stock is different from New Leads — these leads have already been in the system and were previously assigned.
- Always check the Last State and History before reassigning to understand why the lead was withdrawn.
- You can automate redistribution using Rotation Settings (see Sales Settings → Rotation).
Duplicated Leads
Overview
The Duplicated Leads screen shows leads that someone attempted to add more than once. Instead of creating a duplicate record, the system flags it here for review.
Duplication is detected based on mobile number.

The Duplication Warning
When a user tries to enter a mobile number that already exists in the system, they see this warning on the lead creation page:
⚠️ Number is Duplicated!!

This prevents the duplicate from being accidentally saved as a new lead.
How It Works
When a duplicate lead is submitted (via upload, manual entry, or integration), the system:
- Does not add it as a new lead — it sends it to the Duplicated Leads screen instead.
- Shows it here as a notification only alongside the existing lead record.
- Displays the new information so you can review and decide what to do.
You can then decide what to do with it.
Available Filter Options
| Filter | Description |
|---|---|
| Lead Code | A unique identifier for each lead, used for quick reference. |
| Salesman | Filters by the salesman currently assigned to the lead. |
| Assigned From | Filters by who the lead was assigned from. |
| Teams | Filters leads associated with specific teams. |
| Creator | The user who originally created the lead. |
| Country | Filters leads based on phone number country code. |
| Lead Origin | Where the lead came from (e.g., Add New, Upload, Facebook). |
| Stage | Filters leads by their current reservation/sales stage. |
| Campaigns | Filters leads linked to specific marketing campaigns. |
| Sources | Filters by lead source (e.g., WhatsApp, Facebook). |
| Leads ID | Filters based on specific marketing info / Lead ID. |
| Lead Types | Filters by lead type (e.g., Lead, Broker Lead, Broker Request, CIL). |
| Branches | Filters leads associated with specific company branches. |
| Broker | Filters leads linked to specific brokers. |
| Broker Agents | Filters by agents working under a broker. |
| Projects | Filters leads associated with specific projects. |
| Broker Projects | Filters leads linked to broker-specific projects. |
| Tag | Filters by tags or labels applied to the lead. |
| Age | Filters by age or age group, if collected. |
| Purpose | Filters by the lead's stated purpose. |
| Segment | Filters by market segment or demographic group. |
| Gender | Filters by gender, if collected. |
| Contact Tools | Filters by contact method used (e.g., phone, email, WhatsApp). |
| Reply Option | Filters by the lead's preferred reply method. |
| Assignment Type | Filters by how the lead was assigned. |
| Budget | Filters by the lead's budget range. |
| Date Request was created | Filter by the date the lead was originally created (From / To). |
| Date action was created | Filter by the date an action was logged on the lead (From / To). |
| Date action is taking place | Filter by the scheduled date of an action (From / To). |
| Assignment Date | Filter by when the lead was assigned (From / To). |
| Duplication Date | Filter by when the duplication was detected (From / To). |
Actions You Can Take
Merge
Combine the new information with the existing lead record. For example, if a lead previously listed Cairo as their location but the new entry shows New Cairo, you can merge to update the record with the latest info.
Assign / Reassign
You can assign or reassign the existing lead to a different salesman directly from this screen — without needing to go to the lead's full profile.
Ignore
If the duplicate entry is irrelevant or incorrect, leave it without taking action.
Filters Available
You can filter duplicated leads by date, source, salesman, and other criteria.
How to Enable Duplication Detection
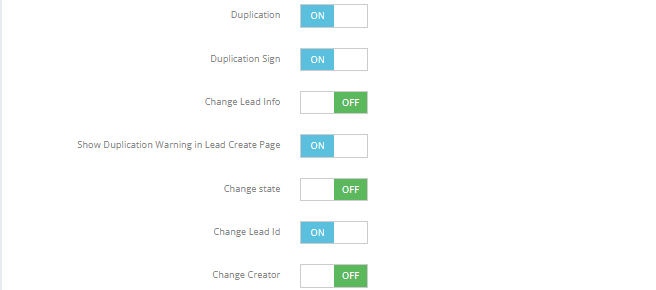
Go to Settings → Sales Settings → Add Lead & Duplication and enable the following options as needed:
| Option | What It Does |
|---|---|
| Duplication | Sends duplicate leads to this screen instead of adding them again |
| Duplication Sign | Adds a visual badge on duplicate lead records |
| Change Lead Info | Updates the existing lead's info with the new data automatically |
| Show Duplication Warning on Lead Creation Page | Shows "Number is Duplicated!!" warning when a duplicate mobile is entered manually |
| Change State | Updates the existing lead's state if the duplicate has a different state |
| Change Lead ID | Updates the Lead ID if the duplicate carries a different one |
| Change Creator | Updates the lead's creator when a duplicate comes from a different source |
Key Things to Know
- Duplication is based on mobile number only — same number = duplicate.
- The duplicate record is shown for information purposes — it is not added to the system.
- Regularly reviewing this screen keeps your lead data clean and avoids double-assigning the same contact.
Add / Upload New Lead
Overview
Use this to add a single lead manually into the CRM.
How to Add a New Lead
- Go to Sales Module → New Leads → Add New Lead.
- Fill in the lead details:
- Name — Full name of the lead. (Required)
- Mobile — Must include the country code. Example:
201017601513for Egypt. (Required) - Email — If the lead has no email, the system can generate a fake one automatically (see tip below). (Required)
- Lead ID — Select from the dropdown list. You can also add Lead IDs from the Marketing Module. (Required)
- Fill in any additional optional or custom fields as needed.
- Click Add.

💡 No email? Go to Sales Settings → Add Lead & Duplication and enable Generate Fake Email. Set a fake domain (e.g.,
company.com) so the system auto-fills the email field. This helps distinguish real emails from system-generated ones.
Submission
Once all required fields are completed:
- Click Submit to save the lead.
- If the Create a Client Profile option is selected, a complete client profile will be created alongside the lead entry.
- If the mobile number is flagged as a duplicate and duplication settings are enabled, the lead will not be saved — it will be sent to the Duplicated Leads screen instead.
- If no email is provided, a fake email will be generated automatically upon submission to ensure the lead entry is complete.
Adding Custom Fields to the Lead Form
You can add custom fields to the Add New Lead screen to capture additional information specific to your business.
Steps to Add Custom Fields
- Go to Setup → Fields Setup.
- Click Add New.
- Configure the field:
- System Form — Set to True to make this field appear on the Add New Lead form.
- Field Name — Enter a name (e.g., Passport Number, Customer Preferences).
- Data Type — Select the appropriate type (text, number, date, etc.).
- Set as Unique — Enable this to prevent duplicate entries for that value (e.g., National ID, Passport Number).
- Save the field. It will now appear on the Add New Lead form for all new entries.
Field Options
- Required Fields — Configure whether the custom field is mandatory before the lead can be submitted.
- Field Behavior — Control whether the field is visible, editable, or used for reporting purposes.
Key Things to Know
- The Lead ID is selected from a dropdown — the values come from the Marketing Module.
- The mobile number must include the country code .
- After saving, the lead appears in New Leads and can be assigned to a salesman.
Upload Leads
Overview
Use this to import multiple leads at once using an Excel (.xlsx) or CSV file. This is the most common method when receiving bulk leads from marketing campaigns.

How to Upload Leads
- Go to Sales Module → New Leads → Upload Leads.
- You will see the CRM's field mapping screen — it lists all available CRM fields.
- Prepare your Excel or CSV file and map each column to the correct CRM field. For example:
- Your column
Client Name→ CRM fieldName - Your column
Sales→ CRM fieldAssign
- Your column
- Upload the file.
- The system will process the file and either confirm success or generate an error sheet.
Critical Field Requirements
These two fields cause the most upload failures — pay close attention:
Salesman Name (Assign field)
- Must be written exactly as it appears in the CRM — same spelling, same capitalization, same spacing.
- Do not use nicknames, abbreviations, or extra spaces.
- How to find the correct name: Check the CRM user list before filling this column.
| ❌ Wrong | ✅ Correct |
|---|---|
ahmed |
Ahmed Mohamed |
Ahmed M. |
Ahmed Mohamed |
ahmed mohamed (trailing space) |
Ahmed Mohamed |
Lead ID (Marketing Info)
- This value is generated in the Marketing Module — copy it from there directly.
- The Lead ID is always required — the upload will fail if this column is missing or incorrect.
- How to get it: Go to Marketing Module → find your campaign → copy the Lead ID.
Mobile Number
- Must include the country code with no spaces or symbols.
- Example for Egypt:
201017601513
Reading the Error Sheet
If your upload has errors, the system automatically downloads an error sheet showing exactly which rows failed and why.
| Error | Cause | Fix |
|---|---|---|
| Salesman not found | Name doesn't match CRM exactly | Copy name from CRM user list |
| Lead ID not recognized | Wrong or missing ID | Copy correct ID from Marketing Module |
| Invalid mobile number | Missing country code or wrong format | Use format: 20XXXXXXXXXX for Egypt |
| Missing required field | A mandatory column is empty | Fill in all required fields |
⚠️ Fix all errors in the file before re-uploading — not just the first one.
Tips to Avoid Errors
- ✅ Copy the Salesman Name directly from the CRM user list — never type it manually.
- ✅ Get the Lead ID from the Marketing Module and type it exactly as it appears — never guess it.
- ✅ Always include the country code in the mobile number column.
- ✅ Review the full error sheet after each upload and fix everything before re-uploading.
What Happens After a Successful Upload
- Leads are created in the system and appear in New Leads.
- If a mobile number already exists in the system and duplication settings are enabled, that row will be sent to the Duplicated Leads screen instead of being created as a new lead.
- If no email is provided for a lead, a fake email will be generated automatically if that setting is enabled in Sales Settings.
Custom Fields in the Upload File
If your admin has added custom fields to the lead form (via Setup → Fields Setup), these fields may also be available as columns in the upload mapping screen. Map them the same way as standard fields — match your Excel column to the correct CRM field name.