1. Sales Module
Sales Module — Manage your entire sales pipeline from lead creation to deal closure. Covers lead management, assignment, states, actions, uploads, settings, and performance reports.
New Leads
This guide covers managing leads, including creating New Leads, managing Lead Stock, handling Duplicated Leads, adding New Leads, and Uploading Leads. If you notice discrepancies between this guide and the product, please report them to ensure corrections.
New Leads
Overview
The New Leads section shows all leads that have recently entered the CRM and have not yet been assigned to a salesman. Leads arrive here from multiple sources automatically.

How Leads Enter the System
Leads can come into the New Leads section through:
- Manual entry — added one by one via Add New Lead
- Bulk upload — imported via Excel or CSV file
- Facebook Integration — leads from Facebook ads flow in automatically
- Landing Page — leads submitted via your website landing page
- Third-party integrations — for example, Zapier (useful for platforms without direct integration, such as Snapchat)
What You See in the New Leads List
Each lead shows the following columns:
| Column | Description |
|---|---|
| Name | Full name of the lead |
| Email address (may be system-generated) | |
| Mobile | Contact number including country code |
| Info | Additional notes or tags |
| Who Added | Which user or integration created this lead |
| Lead ID | The marketing campaign ID attached to the lead |
| Date | Date and time the lead was created |
| Assign To | Button to assign the lead to a salesman |
Available Actions
- Search — find a lead by name, mobile, or email.
- ALL dropdown — filter by lead source or type.
- Export — download the list.
- Merge — combine duplicate leads.
- Sorting Method — sort by different criteria.
- Assignment — assign selected leads in bulk.
Available Filter Options
| Filter | Description |
|---|---|
| Lead Code | A unique identifier for each lead, used for quick reference. |
| Creator | The user who created or added the lead to the system. |
| Country | Filters leads based on phone number country code. |
| Lead Origin | Where the lead came from (e.g., Add New, Upload, Facebook, Landing Page). |
| Campaigns | Filters leads linked to specific marketing or sales campaigns. |
| Sources | Filters leads linked to a specific source such as WhatsApp or Facebook. |
| Leads ID | Filters based on specific marketing info / Lead ID. |
| Lead Types | Filters by lead type (e.g., Lead, Broker Lead, Broker Request, CIL). |
| Branches | Filters leads associated with specific company branches. |
| Broker | Filters leads linked to specific brokers. |
| Broker Agents | Filters by agents working under a broker. |
| Projects | Filters leads associated with specific projects. |
| Tag | Filters by tags or labels applied during data entry. |
| Age | Filters by age or age group, if collected. |
| Purpose | Filters by the lead's stated purpose (e.g., inquiry, purchase intent). |
| Segment | Filters by market segment or demographic group. |
| Gender | Filters by gender, if that information is collected. |
| Contact Tools | Filters by contact method used (e.g., phone, email, WhatsApp). |
| Reply Option | Filters by the lead's preferred reply method. |
What to Do with New Leads
- Review the lead information.
- Click Assignment to assign the lead to a salesman.
- Once assigned, the lead moves to that salesman's My Leads → Fresh Leads tab.
Key Things to Know
- Leads stay in New Leads until they are assigned.
- After assignment, they disappear from this view and appear in the salesman's My Leads.
- If using Zapier for a platform like Snapchat, leads will still land here the same way as any other source.
Leads Stock
Overview
Lead Stock contains leads that have been withdrawn from a salesman — either manually, automatically, or because they were unassigned. Think of it as a holding area for leads waiting to be redistributed.

How Leads End Up in Lead Stock
A lead moves to Lead Stock when:
- It is manually withdrawn from a salesman by a manager.
- It is automatically withdrawn based on time rules configured in Sales Settings → Withdraw.
- It is unassigned from a salesman without being reassigned to someone else.
What You See in the Lead Stock List
| Column | Description |
|---|---|
| Name | Full name of the lead |
| Mobile | Contact number |
| Created By | Who originally created the lead |
| Lead ID | Marketing campaign ID |
| Creation Date | When the lead was first created |
| Latest Sales Agent | The last salesman this lead was assigned to |
| Last State | The state the lead was in before being withdrawn |
| Un-Assignment Date | When the lead was withdrawn |
| Un-Assigned By | Whether withdrawal was Manual or Automated |
| Assign To | Button to reassign the lead |
| History | Button to view the full interaction history of this lead |
Lead Stock vs Leads Returned
There are two views within Lead Stock:
- Leads Stock — standard withdrawn/unassigned leads.
- Leads Returned — leads that were specifically withdrawn and are awaiting review. These show additional details including who the lead was withdrawn from and the last action taken. You can Assign them or Ignore them.
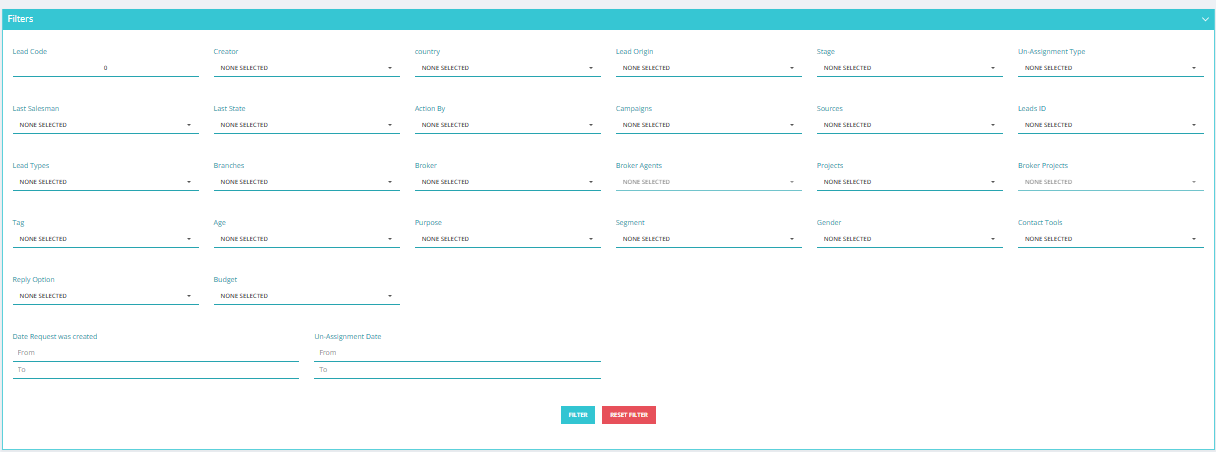
Available Filter Options
| Filter | Description |
|---|---|
| Lead Code | A unique identifier for each lead, used for quick reference. |
| Creator | The user who originally created the lead. |
| Country | Filters leads based on phone number country code. |
| Lead Origin | Where the lead came from (e.g., Add New, Upload, Facebook). |
| Stage | Filters leads by their current reservation/sales stage. |
| Un-Assignment Type | Filters by how the lead was unassigned (manual or automated). |
| Last Salesman | The last salesman this lead was assigned to before withdrawal. |
| Last State | The state the lead was in before being withdrawn. |
| Action By | Filters by the user who last took action on the lead. |
| Campaigns | Filters leads linked to specific marketing campaigns. |
| Sources | Filters by lead source (e.g., WhatsApp, Facebook). |
| Leads ID | Filters based on specific marketing info / Lead ID. |
| Lead Types | Filters by lead type (e.g., Lead, Broker Lead, Broker Request, CIL). |
| Branches | Filters leads associated with specific company branches. |
| Broker | Filters leads linked to specific brokers. |
| Broker Agents | Filters by agents working under a broker. |
| Projects | Filters leads associated with specific projects. |
| Broker Projects | Filters leads linked to broker-specific projects. |
| Tag | Filters by tags or labels applied to the lead. |
| Age | Filters by age or age group, if collected. |
| Purpose | Filters by the lead's stated purpose. |
| Segment | Filters by market segment or demographic group. |
| Gender | Filters by gender, if collected. |
| Contact Tools | Filters by contact method used (e.g., phone, email, WhatsApp). |
| Reply Option | Filters by the lead's preferred reply method. |
| Budget | Filters by the lead's budget range. |
| Date Request was created | Filter by the date the lead was originally created (From / To). |
| Un-Assignment Date | Filter by the date the lead was withdrawn (From / To). |
Available Actions
- Assignment — reassign a lead to a salesman.
- Export — download the list.
- Merge — merge duplicate leads.
- Sorting Method — sort by different criteria.
- History — view full lead history before reassigning.
Key Things to Know
- Lead Stock is different from New Leads — these leads have already been in the system and were previously assigned.
- Always check the Last State and History before reassigning to understand why the lead was withdrawn.
- You can automate redistribution using Rotation Settings (see Sales Settings → Rotation).
Duplicated Leads
Overview
The Duplicated Leads screen shows leads that someone attempted to add more than once. Instead of creating a duplicate record, the system flags it here for review.
Duplication is detected based on mobile number.

The Duplication Warning
When a user tries to enter a mobile number that already exists in the system, they see this warning on the lead creation page:
⚠️ Number is Duplicated!!

This prevents the duplicate from being accidentally saved as a new lead.
How It Works
When a duplicate lead is submitted (via upload, manual entry, or integration), the system:
- Does not add it as a new lead — it sends it to the Duplicated Leads screen instead.
- Shows it here as a notification only alongside the existing lead record.
- Displays the new information so you can review and decide what to do.
You can then decide what to do with it.
Available Filter Options
| Filter | Description |
|---|---|
| Lead Code | A unique identifier for each lead, used for quick reference. |
| Salesman | Filters by the salesman currently assigned to the lead. |
| Assigned From | Filters by who the lead was assigned from. |
| Teams | Filters leads associated with specific teams. |
| Creator | The user who originally created the lead. |
| Country | Filters leads based on phone number country code. |
| Lead Origin | Where the lead came from (e.g., Add New, Upload, Facebook). |
| Stage | Filters leads by their current reservation/sales stage. |
| Campaigns | Filters leads linked to specific marketing campaigns. |
| Sources | Filters by lead source (e.g., WhatsApp, Facebook). |
| Leads ID | Filters based on specific marketing info / Lead ID. |
| Lead Types | Filters by lead type (e.g., Lead, Broker Lead, Broker Request, CIL). |
| Branches | Filters leads associated with specific company branches. |
| Broker | Filters leads linked to specific brokers. |
| Broker Agents | Filters by agents working under a broker. |
| Projects | Filters leads associated with specific projects. |
| Broker Projects | Filters leads linked to broker-specific projects. |
| Tag | Filters by tags or labels applied to the lead. |
| Age | Filters by age or age group, if collected. |
| Purpose | Filters by the lead's stated purpose. |
| Segment | Filters by market segment or demographic group. |
| Gender | Filters by gender, if collected. |
| Contact Tools | Filters by contact method used (e.g., phone, email, WhatsApp). |
| Reply Option | Filters by the lead's preferred reply method. |
| Assignment Type | Filters by how the lead was assigned. |
| Budget | Filters by the lead's budget range. |
| Date Request was created | Filter by the date the lead was originally created (From / To). |
| Date action was created | Filter by the date an action was logged on the lead (From / To). |
| Date action is taking place | Filter by the scheduled date of an action (From / To). |
| Assignment Date | Filter by when the lead was assigned (From / To). |
| Duplication Date | Filter by when the duplication was detected (From / To). |
Actions You Can Take
Merge
Combine the new information with the existing lead record. For example, if a lead previously listed Cairo as their location but the new entry shows New Cairo, you can merge to update the record with the latest info.
Assign / Reassign
You can assign or reassign the existing lead to a different salesman directly from this screen — without needing to go to the lead's full profile.
Ignore
If the duplicate entry is irrelevant or incorrect, leave it without taking action.
Filters Available
You can filter duplicated leads by date, source, salesman, and other criteria.
How to Enable Duplication Detection
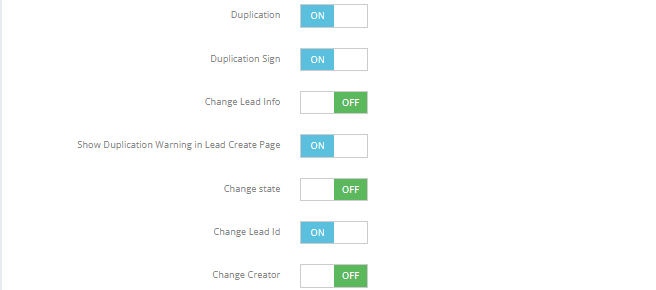
Go to Settings → Sales Settings → Add Lead & Duplication and enable the following options as needed:
| Option | What It Does |
|---|---|
| Duplication | Sends duplicate leads to this screen instead of adding them again |
| Duplication Sign | Adds a visual badge on duplicate lead records |
| Change Lead Info | Updates the existing lead's info with the new data automatically |
| Show Duplication Warning on Lead Creation Page | Shows "Number is Duplicated!!" warning when a duplicate mobile is entered manually |
| Change State | Updates the existing lead's state if the duplicate has a different state |
| Change Lead ID | Updates the Lead ID if the duplicate carries a different one |
| Change Creator | Updates the lead's creator when a duplicate comes from a different source |
Key Things to Know
- Duplication is based on mobile number only — same number = duplicate.
- The duplicate record is shown for information purposes — it is not added to the system.
- Regularly reviewing this screen keeps your lead data clean and avoids double-assigning the same contact.
Add / Upload New Lead
Overview
Use this to add a single lead manually into the CRM.
How to Add a New Lead
- Go to Sales Module → New Leads → Add New Lead.
- Fill in the lead details:
- Name — Full name of the lead. (Required)
- Mobile — Must include the country code. Example:
201017601513for Egypt. (Required) - Email — If the lead has no email, the system can generate a fake one automatically (see tip below). (Required)
- Lead ID — Select from the dropdown list. You can also add Lead IDs from the Marketing Module. (Required)
- Fill in any additional optional or custom fields as needed.
- Click Add.

💡 No email? Go to Sales Settings → Add Lead & Duplication and enable Generate Fake Email. Set a fake domain (e.g.,
company.com) so the system auto-fills the email field. This helps distinguish real emails from system-generated ones.
Submission
Once all required fields are completed:
- Click Submit to save the lead.
- If the Create a Client Profile option is selected, a complete client profile will be created alongside the lead entry.
- If the mobile number is flagged as a duplicate and duplication settings are enabled, the lead will not be saved — it will be sent to the Duplicated Leads screen instead.
- If no email is provided, a fake email will be generated automatically upon submission to ensure the lead entry is complete.
Adding Custom Fields to the Lead Form
You can add custom fields to the Add New Lead screen to capture additional information specific to your business.
Steps to Add Custom Fields
- Go to Setup → Fields Setup.
- Click Add New.
- Configure the field:
- System Form — Set to True to make this field appear on the Add New Lead form.
- Field Name — Enter a name (e.g., Passport Number, Customer Preferences).
- Data Type — Select the appropriate type (text, number, date, etc.).
- Set as Unique — Enable this to prevent duplicate entries for that value (e.g., National ID, Passport Number).
- Save the field. It will now appear on the Add New Lead form for all new entries.
Field Options
- Required Fields — Configure whether the custom field is mandatory before the lead can be submitted.
- Field Behavior — Control whether the field is visible, editable, or used for reporting purposes.
Key Things to Know
- The Lead ID is selected from a dropdown — the values come from the Marketing Module.
- The mobile number must include the country code .
- After saving, the lead appears in New Leads and can be assigned to a salesman.
Upload Leads
Overview
Use this to import multiple leads at once using an Excel (.xlsx) or CSV file. This is the most common method when receiving bulk leads from marketing campaigns.

How to Upload Leads
- Go to Sales Module → New Leads → Upload Leads.
- You will see the CRM's field mapping screen — it lists all available CRM fields.
- Prepare your Excel or CSV file and map each column to the correct CRM field. For example:
- Your column
Client Name→ CRM fieldName - Your column
Sales→ CRM fieldAssign
- Your column
- Upload the file.
- The system will process the file and either confirm success or generate an error sheet.
Critical Field Requirements
These two fields cause the most upload failures — pay close attention:
Salesman Name (Assign field)
- Must be written exactly as it appears in the CRM — same spelling, same capitalization, same spacing.
- Do not use nicknames, abbreviations, or extra spaces.
- How to find the correct name: Check the CRM user list before filling this column.
| ❌ Wrong | ✅ Correct |
|---|---|
ahmed |
Ahmed Mohamed |
Ahmed M. |
Ahmed Mohamed |
ahmed mohamed (trailing space) |
Ahmed Mohamed |
Lead ID (Marketing Info)
- This value is generated in the Marketing Module — copy it from there directly.
- The Lead ID is always required — the upload will fail if this column is missing or incorrect.
- How to get it: Go to Marketing Module → find your campaign → copy the Lead ID.
Mobile Number
- Must include the country code with no spaces or symbols.
- Example for Egypt:
201017601513
Reading the Error Sheet
If your upload has errors, the system automatically downloads an error sheet showing exactly which rows failed and why.
| Error | Cause | Fix |
|---|---|---|
| Salesman not found | Name doesn't match CRM exactly | Copy name from CRM user list |
| Lead ID not recognized | Wrong or missing ID | Copy correct ID from Marketing Module |
| Invalid mobile number | Missing country code or wrong format | Use format: 20XXXXXXXXXX for Egypt |
| Missing required field | A mandatory column is empty | Fill in all required fields |
⚠️ Fix all errors in the file before re-uploading — not just the first one.
Tips to Avoid Errors
- ✅ Copy the Salesman Name directly from the CRM user list — never type it manually.
- ✅ Get the Lead ID from the Marketing Module and type it exactly as it appears — never guess it.
- ✅ Always include the country code in the mobile number column.
- ✅ Review the full error sheet after each upload and fix everything before re-uploading.
What Happens After a Successful Upload
- Leads are created in the system and appear in New Leads.
- If a mobile number already exists in the system and duplication settings are enabled, that row will be sent to the Duplicated Leads screen instead of being created as a new lead.
- If no email is provided for a lead, a fake email will be generated automatically if that setting is enabled in Sales Settings.
Custom Fields in the Upload File
If your admin has added custom fields to the lead form (via Setup → Fields Setup), these fields may also be available as columns in the upload mapping screen. Map them the same way as standard fields — match your Excel column to the correct CRM field name.
My Leads
The My Leads module is a centralized hub where you can manage all your leads. After creating a lead and assigning it to a specific individual, it is sorted into one of several tabs based on its state. If no state is selected during lead creation, the lead is automatically placed in the Fresh Leads tab.
My Leads
Overview
My Leads is your personal workspace in the CRM. It shows all leads currently assigned to you, organized into tabs based on their state.
If you are a manager, you can also see leads assigned to your team members based on the hierarchy tree.
Lead Tabs
| Tab | Description |
|---|---|
| Favorite | Leads you marked as favorite for quick access. Cannot be deleted. |
| Fresh Leads | Newly assigned leads with no state selected yet. Cannot be deleted. |
| VIP / Urgent | High-priority leads requiring immediate attention. |
| Pending | Leads awaiting a response or next step. |
| Following | Leads being actively followed up. |
| Planned Meeting | Leads with an upcoming planned meeting. |
| Meeting | Leads currently in or recently had a meeting. |
| After Meeting | Leads in the follow-up stage after a meeting. |
| Not Interested | Leads that showed no interest. |
| Unreachable | Leads that cannot be contacted. |
| Done Deal | Leads successfully converted to a sale or reservation. |
| Cancelled | Leads where the deal or interaction was cancelled. |
| Low Budget | Leads whose budget doesn't match available offerings. |
| All Leads | Full view of all your leads regardless of state. Cannot be deleted. |
How States Work
- When you update a lead, you select a state from the dropdown.
- The lead automatically moves to the matching tab.
- If no state is selected when assigning, the lead goes to Fresh Leads.
Visibility Based on Hierarchy
- Managers see leads for themselves and all users under them in the tree.
- Regular salesmen see only their own leads.
Common Features Across All Tabs
Every tab has the same top bar with:
- Search bar — find a lead by name, mobile, or email.
- Bulk State Move — change the state of multiple leads at once.
- Export — download the lead list.
- Show Delayed Leads — filter overdue leads (not available in Fresh Leads tab).
- Sorting options:
- Old to Recent by Next Action
- Recent to Old by Next Action
- Old to Recent by Created Date
- Recent to Old by Created Date
Tab Management
- You can delete any tab except Favorite, Fresh Leads, and All Leads.
- Custom states can be added via Setup → List Setup → Add New State.
- Select State Group
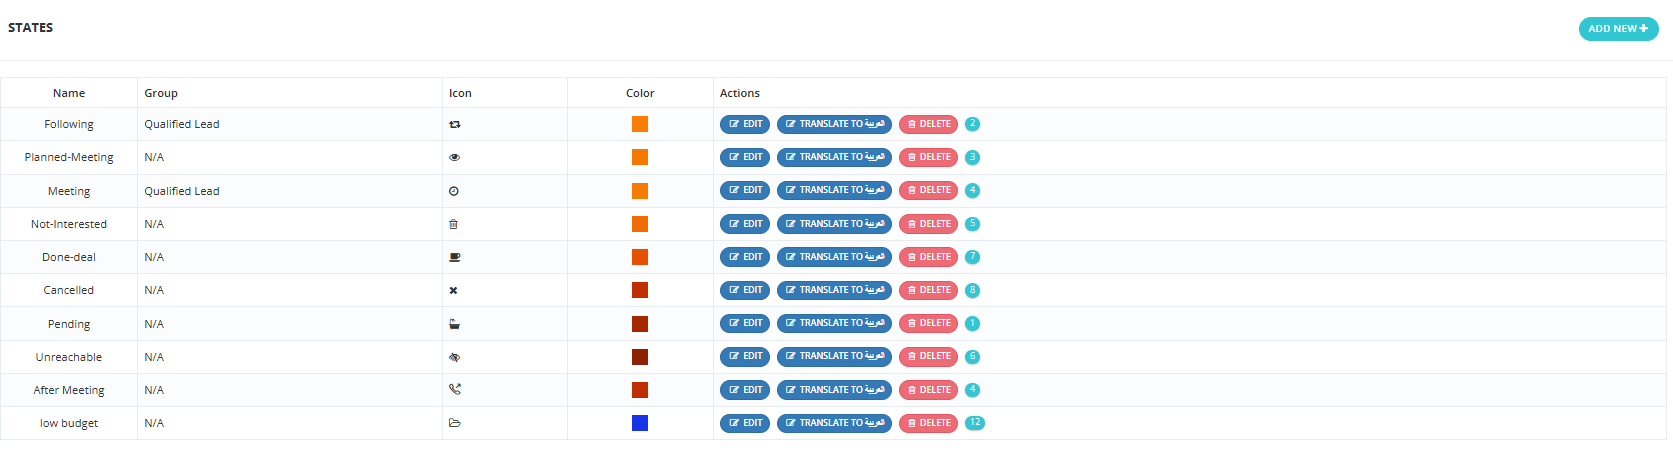
Creat State Group
- Setup → State Group → Add New.

Available Filter Options (All Tabs)
You can filter leads within any tab using the following fields:
| Filter | Description |
|---|---|
| Lead Code | A unique identifier for each lead. |
| Salesman | Filters by the assigned salesman. |
| Assigned From | Filters by who the lead was assigned from. |
| Teams | Filters leads associated with specific teams. |
| Creator | The user who originally created the lead. |
| Country | Filters based on phone number country code. |
| Lead Origin | Where the lead came from (e.g., Add New, Upload, Facebook). |
| Stage | Filters by current reservation/sales stage. |
| Campaigns | Filters leads linked to specific marketing campaigns. |
| Sources | Filters by lead source (e.g., WhatsApp, Facebook). |
| Leads ID | Filters based on specific marketing info / Lead ID. |
| Lead Types | Filters by lead type (e.g., Lead, Broker Lead, Broker Request, CIL). |
| Branches | Filters leads associated with specific company branches. |
| Broker | Filters leads linked to specific brokers. |
| Broker Agents | Filters by agents working under a broker. |
| Projects | Filters leads associated with specific projects. |
| Broker Projects | Filters leads linked to broker-specific projects. |
| Tag | Filters by tags or labels applied to the lead. |
| Age | Filters by age or age group, if collected. |
| Purpose | Filters by the lead's stated purpose. |
| Segment | Filters by market segment or demographic group. |
| Gender | Filters by gender, if collected. |
| Contact Tools | Filters by contact method used (e.g., phone, email, WhatsApp). |
| Reply Option | Filters by the lead's preferred reply method. |
| Assignment Type | Filters by how the lead was assigned. |
| Budget | Filters by the lead's budget range. |
| Date Request was created | Filter by lead creation date (From / To). |
| Date action was created | Filter by when an action was logged (From / To). |
| Date action is taking place | Filter by the scheduled action date (From / To). |
| Assignment Date | Filter by when the lead was assigned (From / To). |
| Duplication Date | Filter by when a duplication was detected (From / To). |
Lead Action Filter
Overview
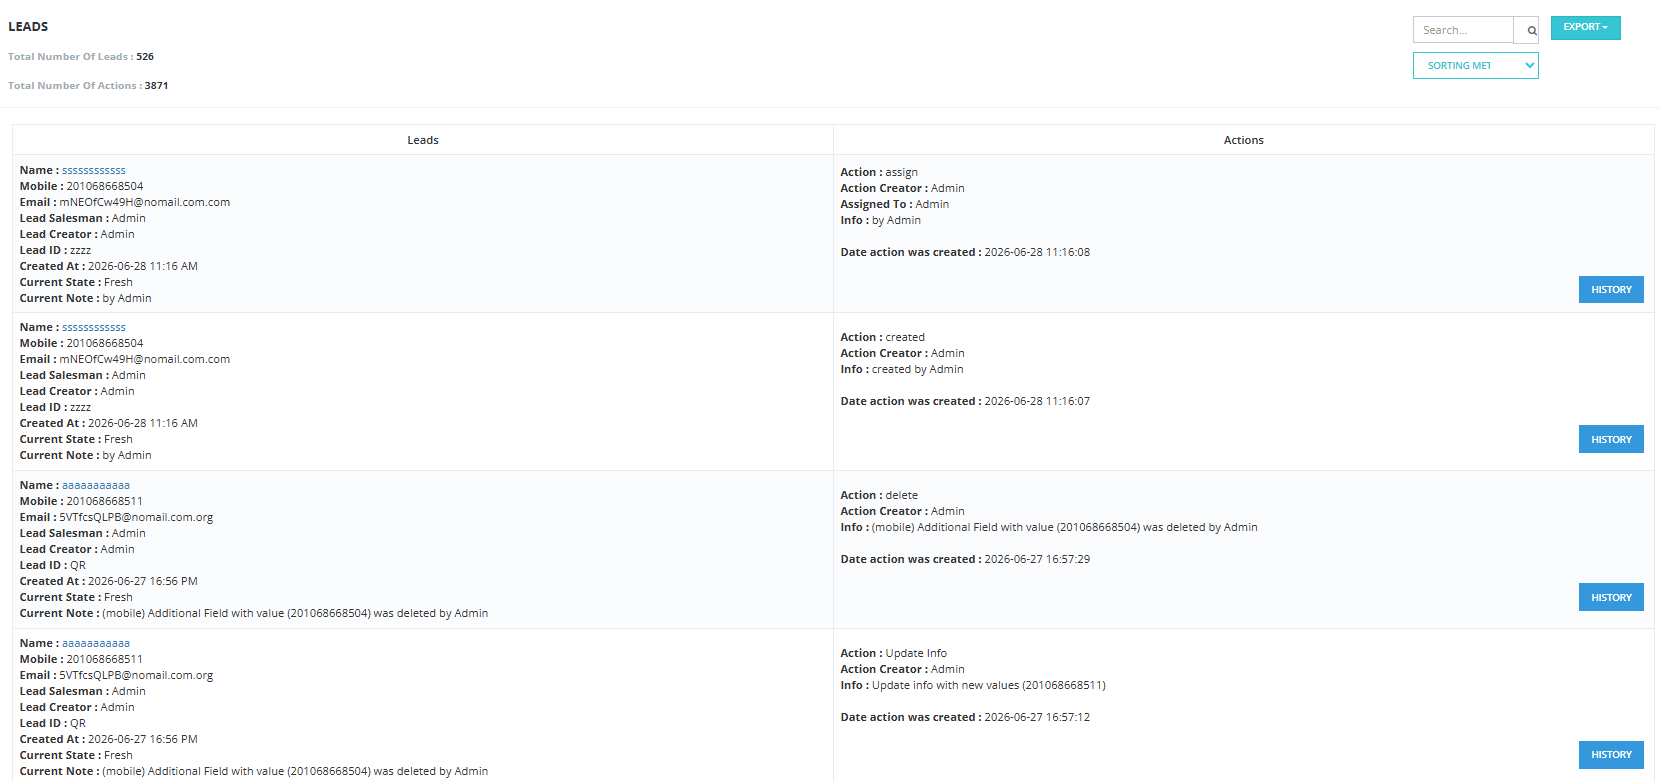
The Lead Action Filter is a monitoring tool that lets managers track what actions their salesmen are taking on leads — who did what, when, and how many actions were completed.
What It Shows
- Total number of leads in the system.
- Total number of actions taken across all leads.
- A detailed list of each lead with:
- Lead name, mobile, email
- Assigned salesman
- Lead creator
- Created date
- Current state
- Action taken (e.g., WhatsApp, Call, Check-in)
- Who performed the action
- When the action was done
How to Use It
- Go to Sales Module → My Leads → Lead Action Filter.
- Apply filters to narrow down results by salesman, date range, action type, or state.
- Review the action log.
Key Insight — Actions vs Leads Count
The number of actions can be higher or lower than the number of leads.
- A salesman with 5 leads but 10 actions has been actively following up.
- A salesman with 5 leads but 0 actions has not contacted any leads yet.
- If a lead shows in All Leads but not here, it may have been deleted/moved to trash.
Available Filter Options
| Filter | Description |
|---|---|
| Creator | The user who created the lead. |
| Current Salesman | The salesman currently assigned to the lead. |
| Affected Salesman | The salesman affected by the action. |
| Assigned From | Who the lead was assigned from. |
| Actions | Filter by specific action type (e.g., call, WhatsApp, check-in). |
| Tag | Filter by tags applied to the lead. |
| Leads Creator | The original creator of the lead. |
| Lead ID | Filter by specific marketing info / Lead ID. |
| Sources | Filter by lead source. |
| Lead Types | Filter by lead type. |
| Reply State | Filter by the reply status of the action. |
| Broker | Filter by broker linked to the lead. |
| Broker Agents | Filter by broker agent. |
| Assignment Type | Filter by how the lead was assigned. |
| State | Filter by current lead state. |
| Lead Origin | Filter by where the lead came from. |
| Date Request was created | Filter by lead creation date (From / To). |
| Date action was created | Filter by when the action was logged (From / To). |
| Date action is taking place | Filter by the scheduled action date (From / To). |
| Assignment Date | Filter by when the lead was assigned (From / To). |
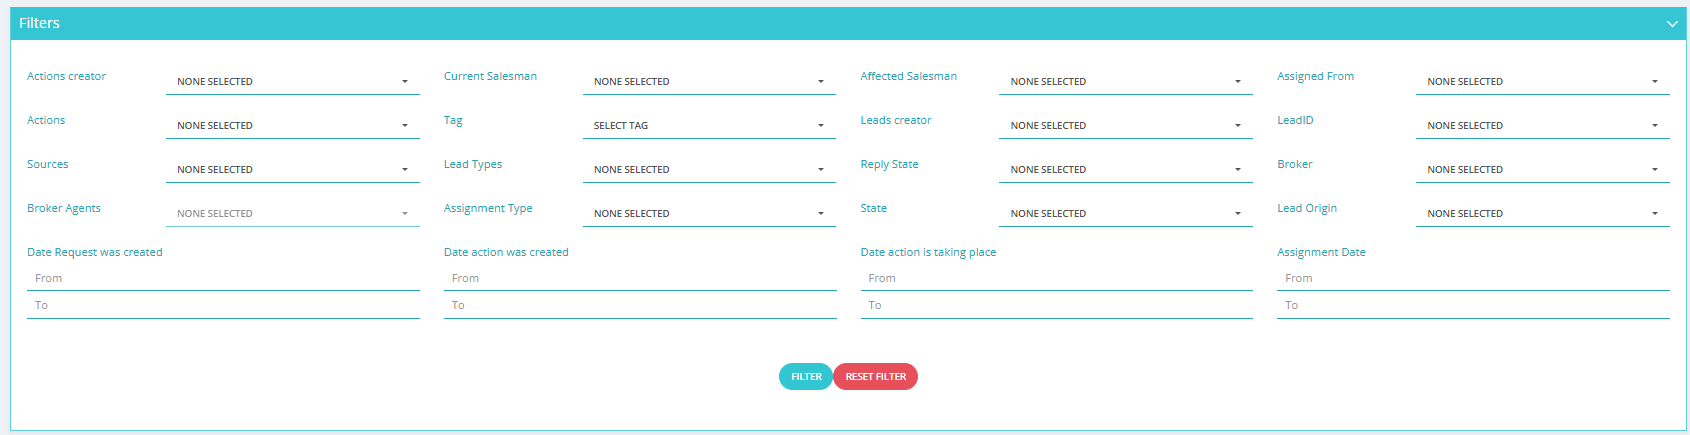
Available Options
- Sort by different criteria to organize the action log.
- Export the action report for external use or reporting.
- History button on each lead — shows the full interaction log for that specific lead.
- Search bar — find specific leads or actions quickly.
Key Things to Know
- This tab is primarily used by managers and team leaders for performance monitoring.
- It is useful for identifying inactive leads or salesmen who haven't logged any actions.
- Use it alongside the Dashboard for a full picture of team performance.
Dashboard / My Calender
Dashboard
Overview
The Dashboard gives you a real-time overview of your sales team's performance and lead activity for the current day and month.
What You'll See on the Dashboard
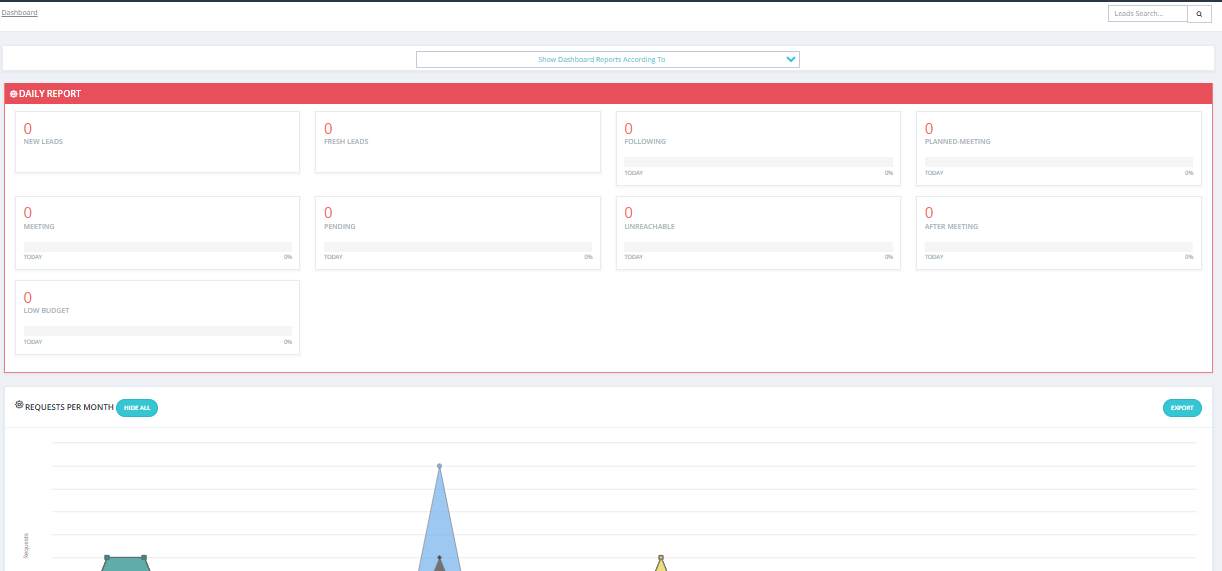
Daily Report
Shows a summary of leads and their states for today. It displays how many leads are in each state and which ones require an action today.
- If you are a manager/parent, you can see leads for all users under you in the hierarchy tree.
- If you are a regular user, you will only see your own leads.
💡 Only States that have a Next Action Date set will appear highlighted. States without a next action date will not show up in the daily view.
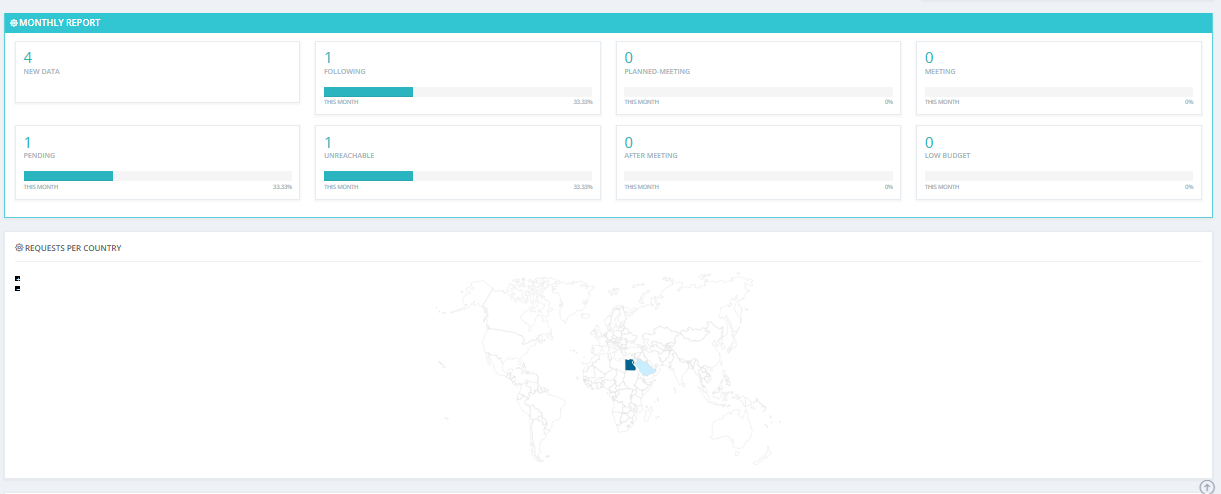
Monthly Report
Same as the daily report but calculated from day 1 to day 30 of the current month.
- If you are a manager/parent, you can see leads for all users under you in the hierarchy tree.
- If you are a regular user, you will only see your own leads.
Request Per Country
Shows where your leads are coming from geographically — for example, Egypt, Kuwait, and so on.
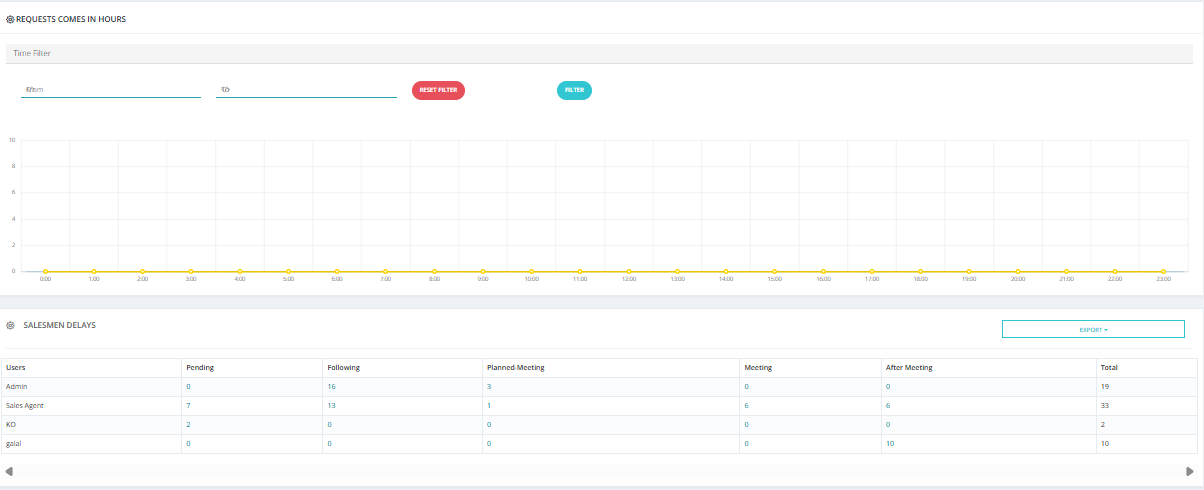
Delayed Leads Section
Displayed at the bottom of the dashboard. Shows which salesmen have delayed leads — leads that are overdue for action.
- If you are a manager/parent, you can see delays for all users under you in the hierarchy tree.
- If you are a regular user, you will only see your own delays.
You can click on any state in the dashboard to be taken directly to that filtered view automatically.
Key Things to Know
- The dashboard is read-only — you cannot take actions directly from here.
- Use it as a daily check-in to spot overdue leads and team performance at a glance.
- Clicking on a state card will redirect you to My Leads with an automatic filter applied.
My Calander
Overview
My Calendar gives you a visual timeline of your scheduled lead actions — upcoming tasks, follow-ups, and any delays — organized by date.
Calendar Tabs
The calendar has three tabs:
| Tab | Description |
|---|---|
| Leads | Shows scheduled next actions for your assigned leads. |
| Tasks | Shows any tasks assigned to you across the system. |
| Broker | Shows broker-related activities. This tab only appears if you have activity in the Brokerage Module — if you have no broker activity, it will not show up. |
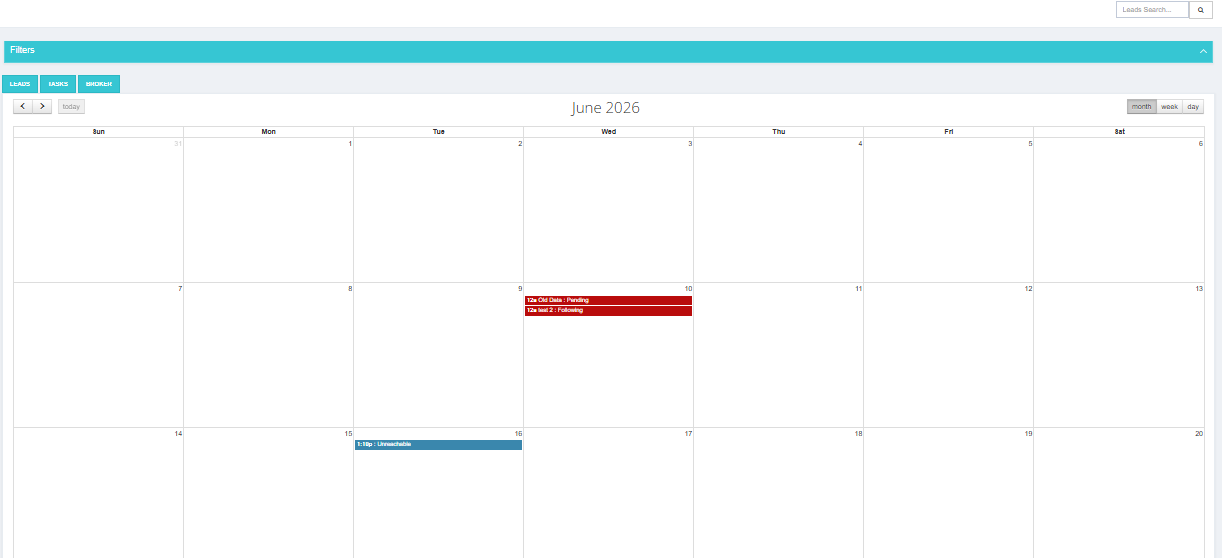
What You Can See
- Upcoming actions — lead follow-ups and tasks scheduled for future dates.
- Past actions — what was scheduled previously, including any overdue items.
- Delayed leads — leads where the next action date has passed without being completed.
How to Use It
- Go to Sales Module → My Calendar.
- Browse by month, week, or day to see what's scheduled.
- Click on any item to go directly to that lead.
Key Things to Know
- The calendar is based on the Next Action Date set on each lead.
- If a lead has no next action date set, it will not appear in the calendar.
- Use the calendar as a daily planning tool to prioritize which leads to contact.
Sales Settings
Add Lead & Duplication
Overview
This settings page controls how leads are created and how the system handles duplicate entries.
Add Lead Settings
| Setting | Description |
|---|---|
| Show (select) in country code menu | When ON, a blank "select" option appears in the country code dropdown. |
| Unable to Copy Lead Number | When ON, users cannot copy the lead's mobile number from the CRM. |
| Generate Fake Email on Lead Creation | When ON, the system auto-generates an email if none is provided. |
| Fake Email Domain Name | The domain used for fake emails (e.g., godzilla.com). Helps distinguish real emails from generated ones. |
| Request Tags | Define tags with colors applied to leads. Example: VIP in red #ff0000, Urgent in dark red #b00404. Click + Add New Tag to add more. |

Duplication Settings
Listed in order as they appear in the system:
| Setting | Description |
|---|---|
| Duplication | When ON, duplicate leads go to the Duplicated Leads screen instead of being added again. |
| Duplication Sign | Adds a visual badge on lead records flagged as duplicates. |
| Change Lead Info | When ON, the existing lead's info is updated automatically with the new duplicate's data. |
| Show Duplication Warning on Lead Creation Page | Displays "Number is Duplicated!!" when a duplicate mobile number is typed during manual lead creation.
|
| Change State | When ON, the existing lead's state is updated if the duplicate carries a different state. |
| Change Lead ID | When ON, the Lead ID is updated if the duplicate has a different one. |
| Change Creator | When ON, the creator field is updated if the duplicate comes from a different source. |
Other Settings on This Page
| Setting | Description |
|---|---|
| Send view unit email via agent's email | Emails about unit views are sent from the agent's email address. |
| Leads History Sorting (Descending) | Lead history is shown newest first. |
State Action
Overview
This page controls how lead states behave — what fields are required, when check-ins are needed, and how state changes work.
Settings Reference
| Setting | Description |
|---|---|
| Done Deal State | Defines which states are considered eligible to mark a lead as Done Deal. |
| Done Deal Line Mandatory to Reservation Phase | When ON, a lead must be in Done Deal state before it can move to reservation. |
| Keep Reassigned Leads in the Same State | When ON, reassigned leads stay in their current state. When OFF, they go back to Fresh Leads. |
| States That Don't Require Time and Date in Next Action | For these states, the salesman can log a next action without setting a date/time. |
| States Require Check-in | A check-in must be logged when the lead is in one of these states. |
| States That Require Contact Tool Field | The contact method field (call, WhatsApp, etc.) is mandatory in these states. |
| States That Require Reply Option Field | A reply option must be selected in these states. |
| States That Require Segment Field | The segment field is mandatory in these states. |
| States That Require Age Field | The age field is mandatory in these states. |
| States That Require Purpose Field | The purpose field is mandatory in these states. |
| States That Require Gender Field | The gender field is mandatory in these states. |
| Select State Require Feedback | Feedback is mandatory when moving a lead to these states. |
| Set Next Date Limitation | Configures date constraints for next actions in selected states. |
| Show Reply Options in Next Action | When ON, reply options appear in the next action form for selected states. |
| States for Setup Meetings Location and Contact Guests | These states allow setting a meeting location and adding guest contacts. |
| Set No-Action State Visible | When ON, the "No-Action" state becomes visible to users. |
| Require Check-in Before State Move | When ON, a check-in must be completed before changing a lead's state. |
| Show Lead Info in Call Center Export | When ON, lead details are included in call center export files. |
| Lead Sorting Method | Sets the default sorting order for leads across tabs. |


Notifications
Overview
This page controls when and how the system sends email and in-app notifications related to leads.
Notification Settings
| Setting | Description |
|---|---|
| Send Email on Lead Creation | Sends an email automatically whenever a new lead is created. |
| Notify Time Before (in hours) | Sets how many hours in advance a reminder notification is sent before a scheduled action. |
Delay Notifications
Delay notifications alert managers when a lead has gone too long without action.
⚠️ How Delay and Withdraw work together: The delay timer starts first — once a lead becomes delayed (no action taken within the configured hours), the system begins sending delay notifications. After that, the Withdraw timer kicks in and the lead gets pulled from the salesman and moved to Lead Stock. In other words, delay notifications are the warning, and withdraw is the consequence. Make sure the delay hours are set to less than the withdraw hours in Withdraw Settings so the salesman gets notified before the lead is taken away.

| Setting | Description |
|---|---|
| Delays (Notification Triggers) | Select which lead states trigger a delay notification. |
| Delays (Email Notifications) | Select which states trigger a delay email notification. |
| Within (hours) | How long a lead can be inactive before the first notification is sent. Default: 1 hour. |
| Notification to Managers After (hours) | How long before the manager is also notified. Default: 2 hours. |
💡 Delay notifications repeat every 30 minutes. If set to 2 hours, the system sends 4 notifications total before stopping.
Sales Assignment Email Notifications
| Trigger | Who Gets Notified |
|---|---|
| New lead assigned | Salesman + their manager |
| Assigned salesman completes an action | Manager only |
| Another user takes action on the lead | Salesman + their manager |
Rotation
Overview
The Rotation feature automates how leads are distributed across the sales team. Instead of manually assigning each lead, the system can rotate leads evenly or based on conditions.

Rotation Options
| Option | Description |
|---|---|
| Rotation All Users | Rotates leads among all active salesmen. |
| Rotation Management | Rotates leads to specific users only (selected manually). To configure which users are included, go to Setup → Rotation Management. |
| Rotation 24 Hours | Runs the rotation continuously, 24/7, including outside working hours. |
Lead Rotation Types
| Type | Description |
|---|---|
| Rotate Unassigned Leads | Automatically assigns leads that have no salesman assigned. |
| Rotate Withdrawn Leads | Reassigns leads that were withdrawn back into the sales pipeline. |
| Rotate New Leads | Distributes newly created leads evenly among the team. |
Rotation Conditions
You can add custom conditions to control how leads are rotated:
| Condition | Description |
|---|---|
| Type | The category or type of lead to rotate. |
| Item Value | The specific value to match. |
| Salesman | Which salesman receives these leads. |
| Role | Rotate based on user role. |
| Quota | How many leads each salesman receives per rotation cycle. |
| Interval | Time interval between each rotation assignment. |
Working Days
Configure which days of the week rotation is active to match your team's schedule.
Key Things to Know
- Rotation runs automatically based on the rules you configure — no manual action needed.
- Leads go to the salesman's Fresh Leads tab after rotation.
- Use Rotation Management if you want to control exactly who receives which leads.
Withdraw
Overview
The Withdraw settings control when leads are automatically taken back from a salesman due to inactivity. Withdrawn leads move to Lead Stock and can be reassigned.
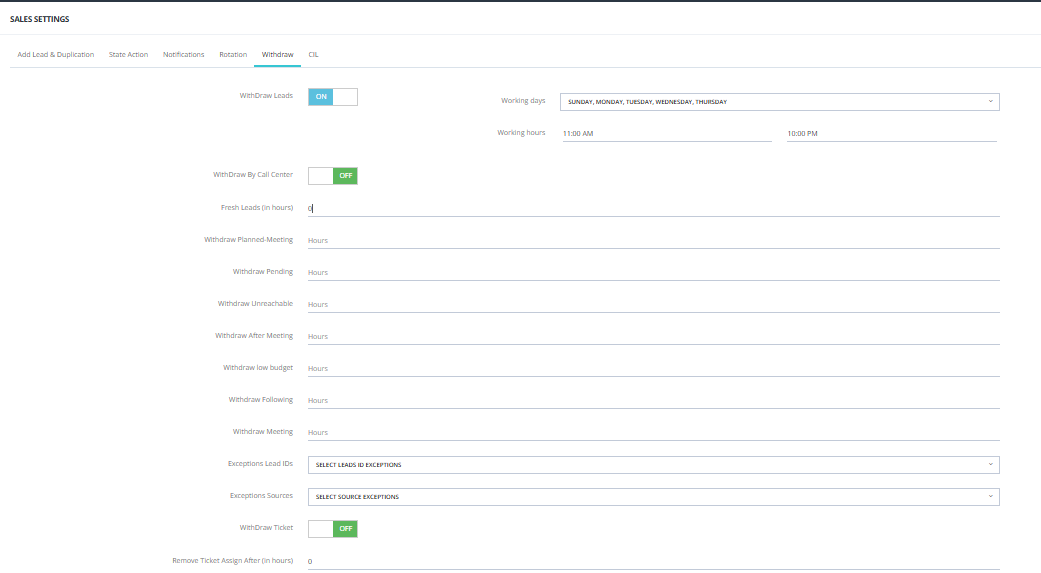
Main Switch
| Setting | Description |
|---|---|
| Withdraw Leads | Master ON/OFF switch for the entire withdraw feature. |
| Working Days | Which days of the week the withdraw rules apply (e.g., Sunday–Thursday). |
| Working Hours | The time window during which withdraw rules are active (e.g., 11:00 AM – 10:00 PM). |
Withdraw Settings
| Setting | Description |
|---|---|
| Withdraw by Call Center | When ON, allows the call center team to manually withdraw leads from salesmen. |
| Fresh Leads (in hours) | How long a lead can sit in Fresh Leads without action before being withdrawn. |
Withdraw by State
Set specific withdrawal timeframes per lead state. Leave blank to disable withdrawal for that state.
💡 Only states that have a Next Action Date set will appear here. States without a next action date will not show up in this section.
💡 Only states that have a Next Action Date set will appear here. States without a next action date will not show up in this list.
| State | Setting |
|---|---|
| Planned Meeting | Hours of inactivity before withdrawal. |
| Pending | Hours of inactivity before withdrawal. |
| Unreachable | Hours of inactivity before withdrawal. |
| After Meeting | Hours of inactivity before withdrawal. |
| Low Budget | Hours of inactivity before withdrawal. |
| Following | Hours of inactivity before withdrawal. |
| Meeting | Hours of inactivity before withdrawal. |
Exceptions
| Setting | Description |
|---|---|
| Exceptions Lead IDs | Leads with these Lead IDs will not be withdrawn, even if inactive. |
| Exceptions Sources | Leads from these sources will not be withdrawn automatically. |
Ticket-Related Withdraw
| Setting | Description |
|---|---|
| Withdraw Ticket | When ON, leads associated with a support ticket can be withdrawn. |
| Remove Ticket Assignment After (hours) | How long before the ticket assignment is removed automatically. |
How Withdraw Works with Delay Notifications
The system follows this sequence:
- Lead becomes inactive (no action taken).
- Delay notifications start firing — alerting the salesman and manager (configured in Notifications Settings).
- Once the withdraw timer expires, the lead is automatically withdrawn and moved to Lead Stock.
💡 Set your delay hours to be less than your withdraw hours so the salesman gets a warning before the lead is taken away.
Key Things to Know
- Withdrawn leads move to Lead Stock — they are not deleted.
- From Lead Stock, they can be reassigned manually or via Rotation.
- Withdraw rules only apply during the configured working days and hours.
- Use Exceptions to protect important lead sources or campaigns from being auto-withdrawn.
CIL
Overview
CIL (Client Information Letter) settings control how and when CIL reminders are sent to clients and brokers.
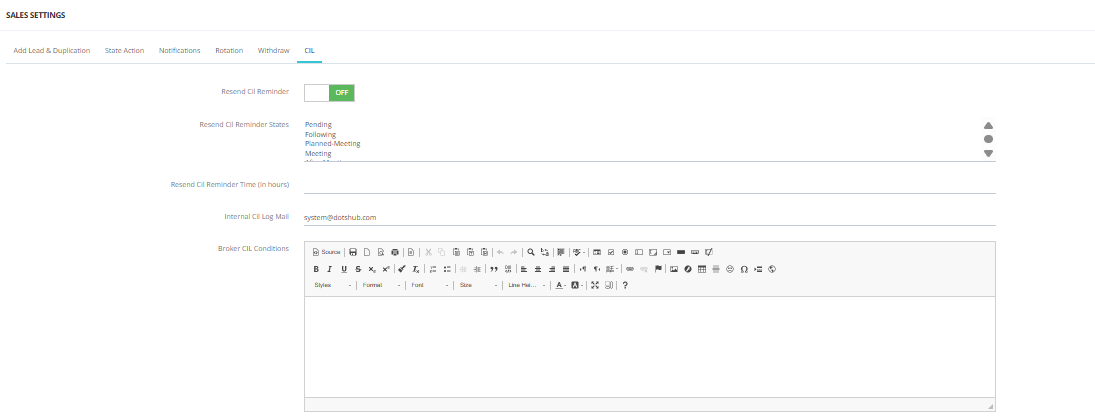
CIL Settings
| Setting | Description |
|---|---|
| Resend CIL Reminder | When ON, the system automatically resends CIL reminders. |
| Resend CIL Reminder States | Select which lead states trigger a CIL reminder resend. |
| Resend CIL Reminder Time (in hours) | How many hours after the original CIL before the reminder is resent. |
| Internal CIL Log Mail | Sends an internal email log when a CIL is issued. |
| Broker CIL Conditions | Defines the conditions under which a CIL is sent to brokers. |
Sales Reports
Sales Reports
Sales Reports
Overview
The Sales Reports section gives managers a detailed view of team performance, lead distribution, and sales activity. All reports can be exported for external use.
Available Reports
1. Salesmen According to States
Shows how many leads each salesman has in each state (Fresh, Pending, Following, Planned-Meeting, Meeting, After Meeting, Not-Interested, Unreachable, Done-deal, Cancelled, Low Budget).
Also shows:
- Closing Ratio — percentage of leads converted to Done Deal.
- WithDraw — total leads withdrawn from each salesman.
- Two views: Salesmen with Permission (your tree only) and All Salesmen (Tree View).
Filters: Date Request was created, Date action was created, Date action is taking place, Assignment Date, Assignment Type, Salesman, Lead Types, Broker, Teams.
2. Salesmen According to States (Graph)
Same data as the report above but displayed as a horizontal bar chart — one bar per salesman, color-coded by state.
You can select a specific state to highlight on the chart using the State dropdown, then click Show on Chart.
Filters: Date range, Salesman, Teams.
3. Salesmen According to Salesman
A detailed action-level report showing what each salesman did and when — filtered across multiple date types and assignment info.
Filters: Date Request was created, Date action was created, Date action is taking place, Assignment Date, Assignment Type, Salesman, Lead Types, Broker, Teams.
4. Salesmen Leads States According to Lead ID
Shows lead state distribution per Lead ID (campaign/source) — useful for tracking which campaigns are generating quality leads.
Columns: Salesman, Fresh, Pending, Following, Planned-Meeting, Meeting, After Meeting, Not-Interested, Unreachable, Done-deal, Cancelled, Low Budget, All, Closing Ratio.
Filters: Lead IDs, Date range (From/To), Salesman, Lead Types, Broker, Teams.
5. Salesmen Actions According to States
Shows the total number of actions each salesman took per state — not lead count, but action count.
Useful for measuring how actively salesmen are engaging with leads in each stage.
Filters: Time range, Teams, Salesman, Contact Tools, Reply Options, App Links, Created/Token Place, Assignment Type, Assignment Date, Lead Types, Broker.
6. Salesmen Actions According to Contact Way
Breaks down each salesman's actions by contact method — Phone, Email, WhatsApp, Visit, INS, or Without Contact Tool.
Also shows Reply Options used per contact method (e.g., Replied, Switched Off, No Answer, Wrong Number).
Filters: Time range, Teams, Salesman, Contact Tools, Reply Options, Lead Types, Broker.
7. Salesmen According to Unit Steps
Tracks each salesman's leads across the reservation pipeline stages: Hold → Reservation → Confirm Reservation → Down Payment → Confirm Down Payment → Contract → Delivery → Total.
Filters: Date range, Salesman, Teams.
8. Salesmen According to State Groups
Groups leads into Qualified vs Uncategorized buckets across salesmen — with a Grand Total (GT) per group.
💡 Default view is the current month. Use filters to extend the date range.
Filters: Date range, Salesman, Lead Types, Broker, Teams.
9. Branches Summations
Shows a financial summary per branch — useful for multi-branch operations.
Columns include: Calls, Refund Count, Refund, Reservation Count, Paid/Unpaid Reservation, Reservation total, Down Payment Count, Paid/Unpaid Down Payment, Down Payment total, Contract Count, Paid/Unpaid Contract, Contract total, Down Payments & Contracts total.
Filters: Time range (From/To), Teams, Salesman.
10. Salesmen Summations
Same financial summary as Branches Summations but broken down per salesman instead of per branch.
Shows total Down Payments and Contracts count and value at the top, with per-salesman breakdown below.
Filters: Time range (From/To), Teams, Salesman.
11. Salesmen According to Salesman (Detailed)
A granular report showing each salesman's lead activity — how many leads they have, actions taken, and performance metrics broken down per salesman.
📋 Screenshot not available — content based on report name and navigation.
12. Salesman Performance
Tracks overall performance metrics per salesman over a selected time period — useful for periodic reviews and KPI tracking.
📋 Screenshot not available — content based on report name and navigation.
13. Salesman Call Logs
A log of all calls made by salesmen — showing who called, which lead was contacted, when the call happened, and the outcome.
📋 Screenshot not available — content based on report name and navigation.
Common Features Across All Reports
General Settings
Overview
General Settings is where the system-wide configuration lives — company identity, communication providers, notification rules, backup settings, and shared lookup values used across modules.
Company Identity
| Setting | Description |
|---|---|
| Site Name | The name of the CRM instance — appears in system emails and the browser tab. |
| Company Address | The company's registered address. |
| Logo | The company logo displayed in the system and on generated receipts. Must be an image file. |
| Tab Icon | The browser tab favicon. Must be a 16×16 px image file. |
Document Fonts
| Setting | Description |
|---|---|
| Download Documents Font Regular | The regular weight font used when generating downloadable documents (contracts, reservation forms, etc.). |
| Download Documents Font Bold | The bold weight font used in generated documents. |
SMS Configuration
| Setting | Description |
|---|---|
| SMS Provider | The SMS gateway provider to use for outgoing messages. Options: No SMS, Vodafone, Unifonic, Epush, SMSmisr, VictoryLink, TekEgy, SmartEgypt. |
| SMS Breakline | The line break character used by your SMS provider. Ask your provider which to use — common values are \r\n or %0a. |
| SMS Sender Name | The name that appears as the sender on outgoing SMS messages. |
| SMS Unifonic AppSid | The AppSid credential for the Unifonic provider (only required if Unifonic is selected). |
Email (SMTP) Configuration
| Setting | Description |
|---|---|
| SMTP Host (Outgoing Server) | The outgoing mail server address (e.g., smtp.gmail.com). |
| Encryption Type | The encryption method for SMTP. Options: No Encryption, SSL, TLS. |
| SMTP Port | The port number for the outgoing mail server (e.g., 465 for SSL, 587 for TLS). |
| Email Address | The email address used to send system emails. |
| Email Password | The password for the email account. |
Notifications & Credentials
| Setting | Description |
|---|---|
| Send User/Password to Client via Email | When ON, the system automatically sends login credentials to clients by email when their profile is created. |
| Send Username/Password to Broker | When ON, the system automatically sends login credentials to broker companies when their profile is created. |
| WaterMark On Media | When ON, a watermark is applied to all media files (images/videos) uploaded to the system. |
Branches
A list of company branches that can be assigned to leads, tickets, and users. When Make Branches Required when create lead is ON, the branch field becomes mandatory on the Add New Lead form.
Client Requests Department
A list of departments used when creating client requests — used to route the request to the correct team (e.g., Sales, Customer Service, Accounting).
Campaign Lookup Values
These values populate dropdowns in the Marketing module when creating campaigns:
| Setting | Used In |
|---|---|
| Campaign Type | The type of marketing campaign. |
| Campaign Purpose | The goal or purpose of the campaign. |
| Campaign Area | The geographic area targeted by the campaign. |
Map Configuration
| Setting | Description |
|---|---|
| Map API Key | The Google Maps API key used to enable map features in the system (e.g., location pinning on units and projects). See the video guide on how to get an API key. |
Backup & Storage
| Setting | Description |
|---|---|
| Backup CRM & Database Every Week | When ON, the system automatically creates a weekly backup. |
| Backup CRM & Database Every Day | When ON, the system automatically creates a daily backup. |
| Dropbox Authorization Token | The Dropbox token used to connect the system to a Dropbox account for cloud backup storage. |
| Backups in Dropbox | When ON, backups are saved to Dropbox instead of locally. Enabling this deletes all existing local backups. |
| Remove Old Backups in Dropbox | When ON, old backups stored in Dropbox are automatically deleted. |
⚠️ Enabling Backups in Dropbox will permanently delete all existing local database backups — make sure you have a copy before switching.
Sync Records
The CRM has a mobile app available on both iOS and Android. The Sync Records feature is specific to Android — it syncs the call log from the Android device and attaches call records to the relevant leads in the CRM.
💡 iOS users have access to the mobile app but call log sync is Android only. If call records are missing on a lead or appear out of date, use Sync Records to force a manual update.