2. Marketing
Marketing Module — Plan and track your marketing efforts across all channels. Manage sources, campaigns, and lead IDs to trace every lead back to its origin. Send bulk SMS and email campaigns, integrate with Facebook Ads, and monitor performance through detailed reports.
Source
Overview
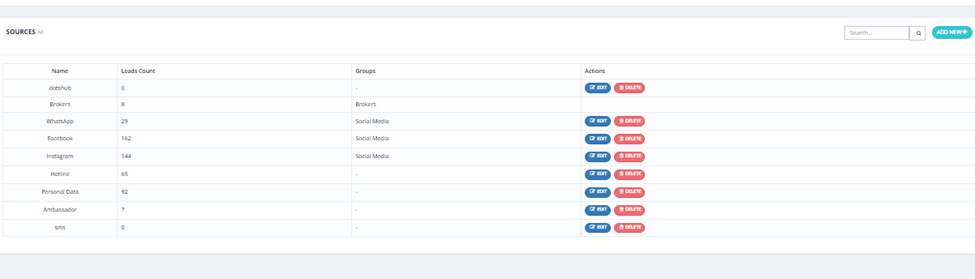
Sources represent where a lead originally came from — for example, Facebook, Instagram, WhatsApp, or a Hotline. Each source shows how many leads it has generated.
Sources List
The sources page displays:
| Column | Description |
|---|---|
| Name | The source name (e.g., Facebook, WhatsApp, Brokers). |
| Leads Count | Total number of leads generated from this source. |
| Groups | The group this source belongs to (e.g., Social Media, Brokers). |
| Actions | Edit or Delete the source. |
How to Add a New Source
- Click Add New.
- Enter the source Name (e.g., TikTok, Snapchat).
- Assign it to a Group if applicable (e.g., Social Media).
- Save.
Key Things to Know
- Sources can be grouped (e.g., Facebook, Instagram, WhatsApp all under "Social Media").
- The Leads Count updates automatically as leads come in from that source.
- Sources are selected when creating a Lead ID.
Campaigns
Overview
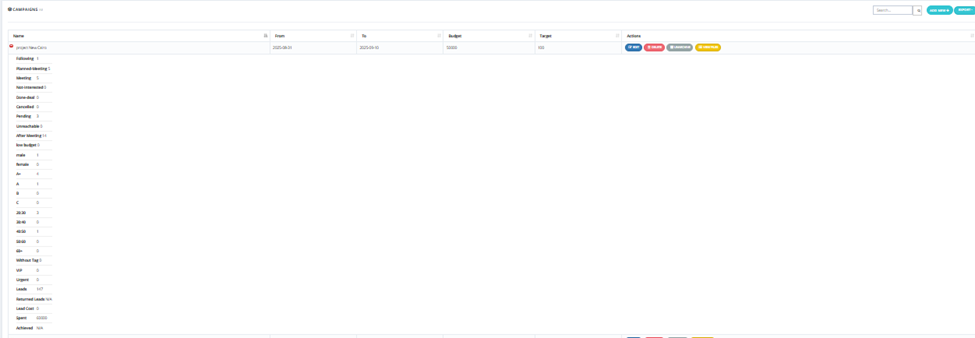
Campaigns represent specific marketing efforts linked to a source. For example, a Facebook campaign running for a specific project during a specific period.
Campaigns List
The campaigns page displays:
| Column | Description |
|---|---|
| Name | Campaign name. |
| From | Campaign start date. |
| To | Campaign end date. |
| Budget | The allocated budget for this campaign. |
| Target | The lead target number. |
| Actions | Edit, Online, Landingpage, or View Leads buttons. |
Clicking into a campaign shows a detailed breakdown including leads per state, gender, segment, age group, tags, lead cost, spent, and achieved.
How to Add a New Campaign
Click Add New and fill in:
| Field | Required | Description |
|---|---|---|
| Name | ✅ | Campaign name. |
| Content | Optional | Description of the campaign. |
| Purpose | Optional | Goal of the campaign. |
| From | ✅ | Start date. |
| To | ✅ | End date. |
| Budget | ✅ | Allocated budget. |
| Target | ✅ | Target number of leads. |
| Campaign Type | Optional | Type of campaign. |
| Campaign Purpose | Optional | Purpose category. |
| Campaign Area | Optional | Geographic area targeted. |
| Target Size | Optional | Size of the target audience. |
| Target Audience | Optional | Description of the target audience. |
| District | Optional | Specific district targeted. |
| Files / Gallery | Optional | Upload supporting files or images. |
Lead ID
Overview
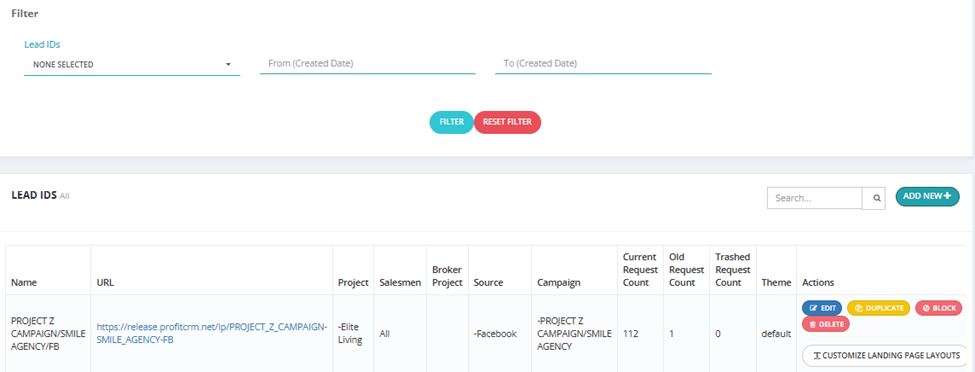
A Lead ID is the unique identifier that links a Source and a Campaign together. When a lead enters the CRM — via landing page, Facebook, upload, or any other channel — the Lead ID tells you exactly which campaign and source it came from.
Lead IDs List
The Lead IDs page displays:
| Column | Description |
|---|---|
| Name | The Lead ID name. |
| URL | The landing page URL linked to this Lead ID. |
| Project | The project this Lead ID is associated with. |
| Salesmen | The salesman(s) assigned to receive leads from this Lead ID. |
| Broker Project | Broker project linked, if any. |
| Source | The source this Lead ID belongs to. |
| Campaign | The campaign this Lead ID belongs to. |
| Current Request Count | Number of active leads from this Lead ID. |
| Old Request Count | Historical lead count. |
| Trashed Request Count | Number of deleted/trashed leads. |
| Theme | The landing page theme used. |
| Actions | Edit, Duplicate, Block, Delete, Customize Landing Page Layouts. |
How to Add a New Lead ID
Click Add New and fill in:
| Field | Required | Description |
|---|---|---|
| Name | ✅ | Lead ID name. |
| URL | Optional | Landing page URL (must include http://). |
| Project | Optional | Select one project only. |
| Thanks URL | Optional | Page shown after form submission. |
| Planned | Optional | Planned number of leads. |
| Source | ✅ | Select one source. |
| Campaign | Optional | Select one campaign. |
| Form Fields | Optional | Select which fields appear on the landing page form. |
| Email Body | Optional | Email content sent after lead submission. |
| Upload Email Attachment | Optional | Attach a file to the email. |
| Landing Page Theme | Optional | Choose the visual theme of the landing page. |
| Pixel Code | Optional | Add a tracking pixel for ads. |
| Salesmen | Optional | If selected, only these salesmen will see this Lead ID. Leave blank to show to all. |
Adding Custom Fields to the Landing Page
You can add custom fields to the landing page form via Setup → Fields Setup:
- Go to Setup → Fields Setup.
- Click Add New.
- Configure the field:
- Landing Page — Set to True to show this field on the landing page form.
- Field Name — Enter a name (e.g., Passport Number).
- Data Type — Select the type (text, number, date, etc.).
- Set as Unique — Enable to prevent duplicates for that value.
- Save — the field will appear on the landing page form.
Filters Available
| Filter | Description |
|---|---|
| Lead IDs | Filter by specific Lead ID. |
| From / To (Created Date) | Filter by when the Lead ID was created. |
Key Things to Know
- The Salesmen field controls who sees this Lead ID when creating or uploading leads. If left blank, all salesmen can see it.
- Use Duplicate to quickly create a similar Lead ID without starting from scratch.
- Use Block to stop new leads from coming in through a specific Lead ID.
- Customize Landing Page Layouts lets you design the visual appearance of the landing page.
SMS Campaign
Overview
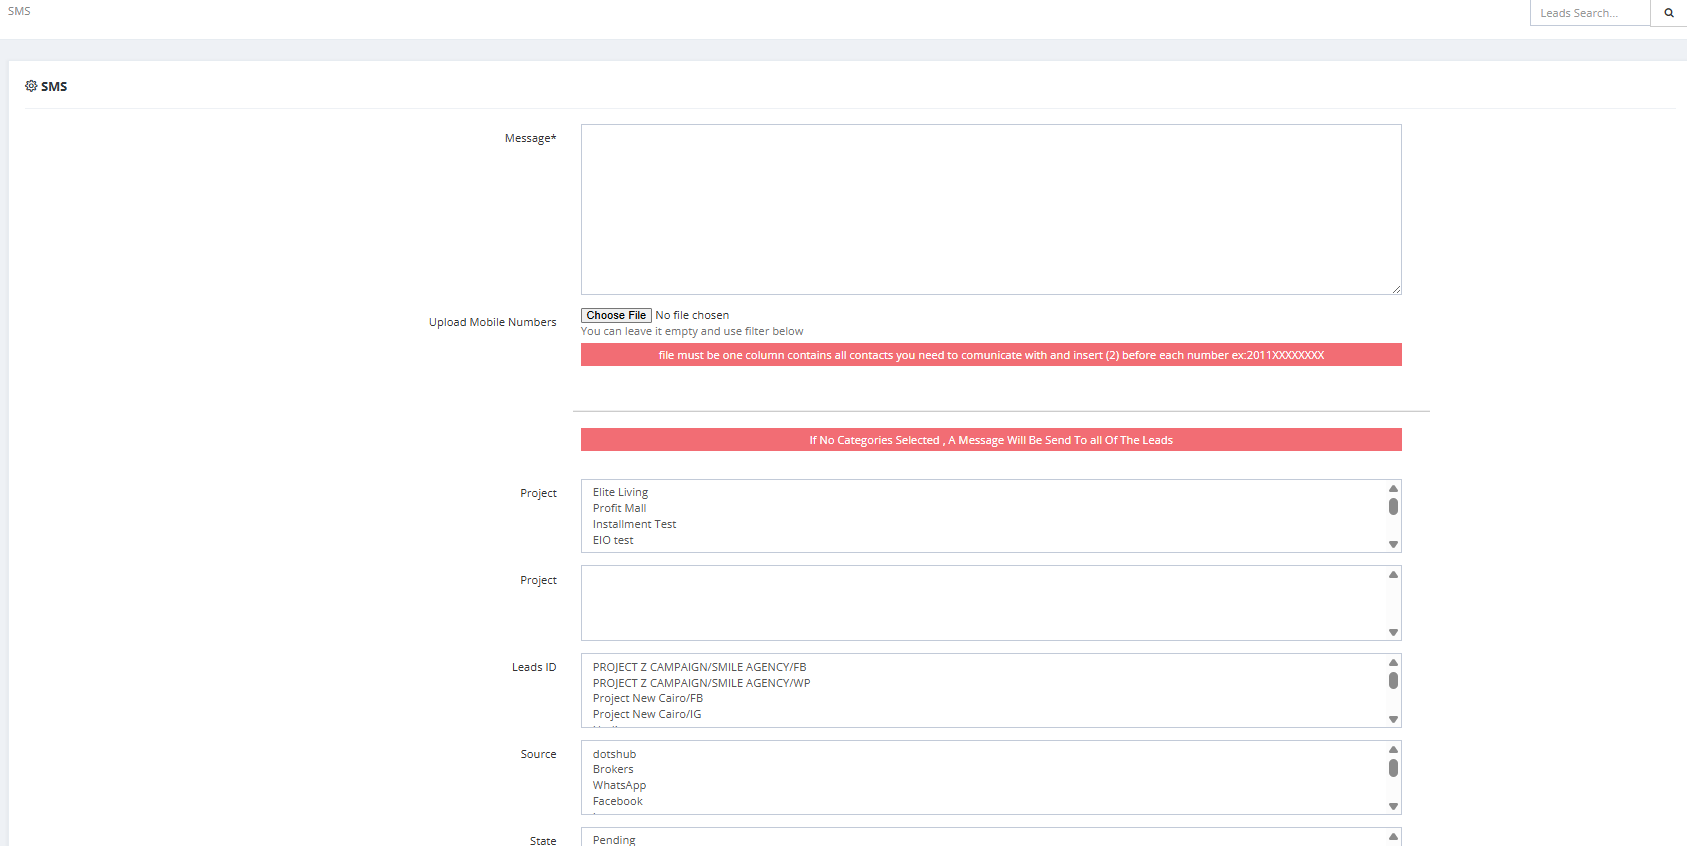
The SMS Campaign feature allows you to send bulk SMS messages to your leads. You can target all leads or filter by specific criteria.
Before You Start
SMS must be configured first in General Settings:
| Setting | Description |
|---|---|
| SMS Provider | Your SMS provider name. |
| SMS Break Line | Ask your provider about this setting. |
| SMS Sender Name | The name that appears as the sender. |
| SMS Unifonic appSid | Your Unifonic App ID (if using Unifonic). |
How to Send an SMS Campaign
- Go to Marketing → SMS Campaign.
- Fill in the Message field — write your SMS content.
- Choose your recipients:
- Upload Mobile Numbers — upload a file with one number per row, with country code (e.g.,
2011XXXXXXXXfor Egypt). - OR use the filters below to select leads automatically.
- Upload Mobile Numbers — upload a file with one number per row, with country code (e.g.,
- If no filter is selected, the SMS will be sent to all leads.
- Send.
Recipient Filters
💡 The filter options shown here correspond to fields collected on the lead profile. For example, filtering by Gender will only work if the Gender field was filled in when the lead was created. Make sure the relevant fields are captured during lead creation or upload to get accurate targeting.
💡 Custom Fields: If you have created custom fields via Setup → Fields Setup and set them to appear on the System Form (e.g., a field called "Counter" or "Preference"), these fields will also appear as filter options here. You can target leads based on a specific value in that custom field — for example, send an SMS only to leads where "Counter = 3".
| Filter | Description |
|---|---|
| Project | Filter leads by project. |
| Leads ID | Filter by specific Lead ID. |
| Source | Filter by lead source. |
| State | Filter by current lead state. |
| Countries | Filter by country. |
| Rank | Filter by lead rank/segment. |
| Campaign | Filter by campaign. |
| Gender | Filter by gender. |
| Purpose | Filter by lead purpose. |
| Salesmen | Filter by assigned salesman. |
Key Things to Know
- The mobile number file must have one column only with numbers including country code (e.g.,
2011XXXXXXXX). - If no category/filter is selected, the SMS goes to all leads in the system.
- Make sure SMS settings are configured in General Settings before sending.
Mail Campaign
Overview
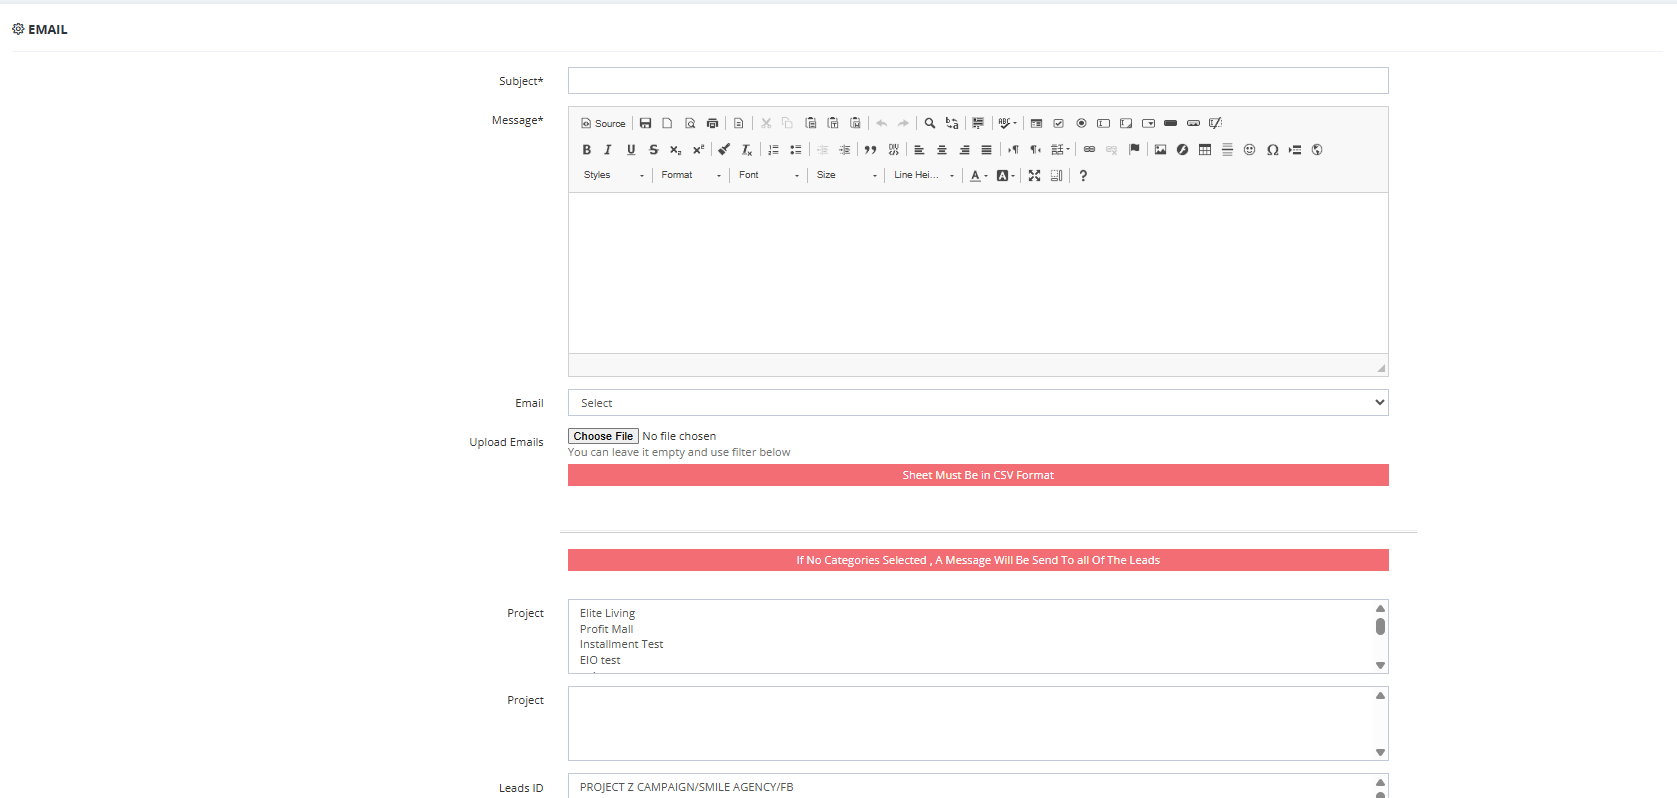
The Mail Campaign feature works the same as SMS Campaign but sends emails instead. It requires SMTP configuration before use.
Before You Start
Email must be configured first in General Settings:
| Setting | Description |
|---|---|
| SMTP Host | Your outgoing mail server (e.g., smtp.gmail.com). |
| Encryption Type | TLS or SSL. |
| SMTP Port | The port used by your mail server. |
| Email Address | The sender email address. |
| Email Password | The password for the sender email. |
How to Send a Mail Campaign
- Go to Marketing → Mail Campaign.
- Compose your email — subject and body.
- Choose your recipients using filters (same as SMS Campaign).
💡 The filter options correspond to fields collected on the lead profile. For example, filtering by Gender will only work if the Gender field was filled in when the lead was created. Make sure the relevant fields are captured during lead creation or upload to get accurate targeting.
💡 Custom Fields: If you have created custom fields via Setup → Fields Setup and set them to appear on the System Form (e.g., a field called "Counter" or "Preference"), these fields will also appear as filter options here. You can target leads based on a specific value in that custom field — for example, send an email only to leads where "Counter = 3".
- Send.
Key Things to Know
- SMTP settings must be configured in General Settings before any emails can be sent.
- The same lead filters available in SMS Campaign apply here.
Facebook Integration
Overview
The Facebook Integration allows leads submitted via Facebook Lead Ads to flow automatically into the CRM — no manual entry needed.
How to Set Up Facebook Integration
Step 1 — Connect via Setup
Go to Setup → Facebook Integration and click Add New Facebook Integration.
⚠️ The user adding the integration must have full access to the Facebook Page being connected.
Step 2 — Login with Facebook
Click Login with Facebook and authenticate with your Facebook account.
Step 3 — Configure the Integration
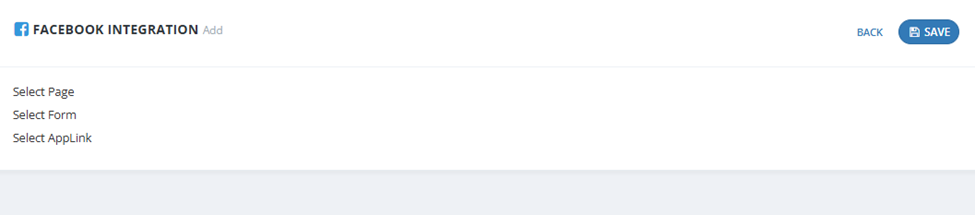
After login, fill in:
| Field | Description |
|---|---|
| Select Page | Choose the Facebook Page you want to connect. |
| Select Form | Choose which lead form on that page to use. |
| Select AppLink | Select the Lead ID that incoming leads from this form will be tagged with. |
Step 4 — Map Fields
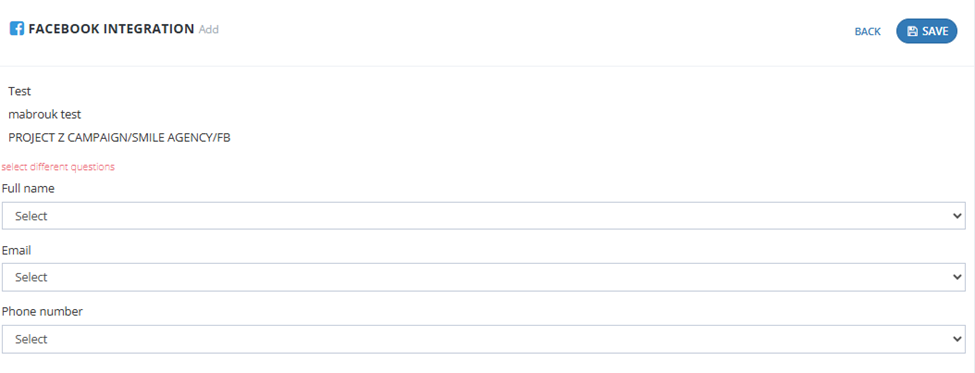
The system will show all fields from the Facebook form. Map each Facebook field to the corresponding CRM field:
| Facebook Form Field | CRM Field |
|---|---|
| Full Name | Name |
| Phone Number | Mobile |
Step 5 — Save
Click Save — the integration is now active. New leads submitted via the Facebook form will automatically appear in the CRM under New Leads.
Facebook Integration List
The integrations page shows:
| Column | Description |
|---|---|
| User | Who set up the integration. |
| Page | The connected Facebook Page ID. |
| Form | The connected form ID. |
| Lead ID | The Lead ID assigned to incoming leads. |
| Actions | Retrieve, Delete, or View Failed Leads. |
Actions
- Retrieve — Manually pull any leads that may have been missed.
- Delete — Remove the integration.
- View Failed Leads — See leads that failed to sync and troubleshoot.

Key Things to Know
- The Facebook user must have full admin access to the Page — limited access will cause the integration to fail.
- Each integration is linked to one specific Facebook form and one Lead ID.
- If leads stop coming in, use Retrieve to manually sync, or check View Failed Leads for errors.
Marketing Reports
Overview
The Marketing Reports section provides visual and tabular data about lead performance across sources, campaigns, and Lead IDs.
Available Reports
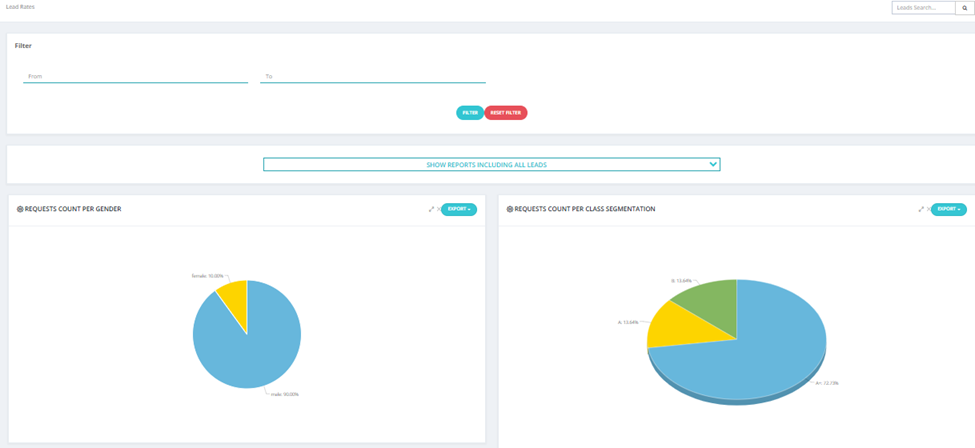
1. Lead Rates
Pie charts showing lead distribution by demographic and behavioral data.
Charts include:
- Requests Count per Gender — Male vs Female breakdown.
- Requests Count per Class Segmentation — A+, A, B, C segments.
- Requests Count per Purpose — Purpose of inquiry (e.g., For Children, Not Determined).
- Requests for Gender According to Sources — Male/Female breakdown per source.
- Age Group According to Requests Count — Leads by age range (20–30, 30–40, 40–50, 50–60, 60+).
- Classes According to Sources Requests — Segment quality per source.
Filter: Date range (From / To). Toggle between All Leads or specific segments using the dropdown.
Export: Each chart can be exported individually.
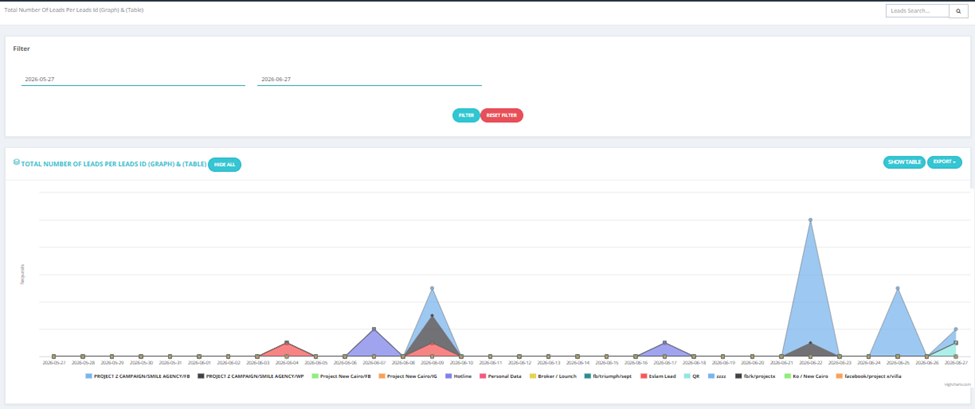
2. Total Number of Leads Per Lead ID (Graph & Table)
A line/area graph showing leads coming in per Lead ID over time.
- X-axis: Date
- Y-axis: Number of leads
- Each Lead ID is color-coded
- Toggle Show Table to see the data in table format
Filter: Date range (From / To).
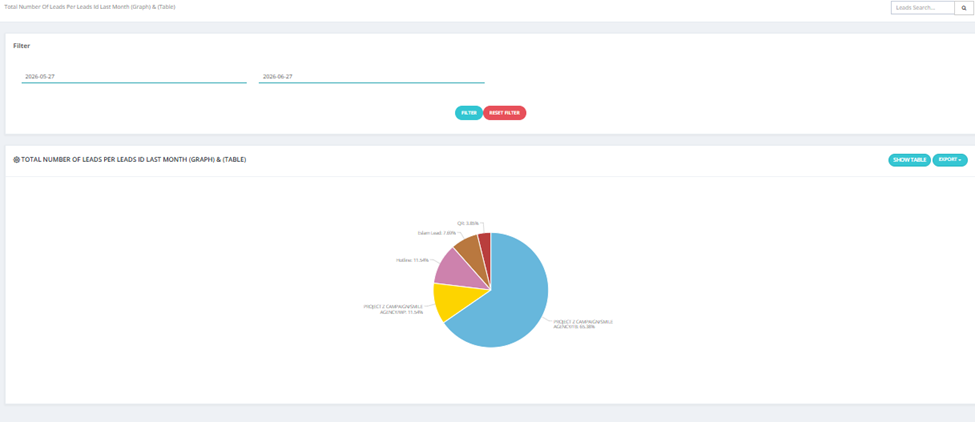
3. Total Number of Leads Per Lead ID Last Month (Graph & Table)
Same as above but defaults to last month's data — shown as a pie chart.
Each slice represents a Lead ID and its percentage of total leads.
Filter: Date range (From / To).
4. Total Number of Leads on Source Per Lead ID and States
A detailed table showing leads broken down by Source → Lead ID → State.
For each Lead ID under a source, shows:
- New, Fresh, Pending, Following, Planned Meeting, Meeting, After Meeting, Not Interested, Unreachable, Done-deal, Cancelled, Low Budget
- Current count vs Re (returned) count per state
Filter: Date range (From / To), Sources.
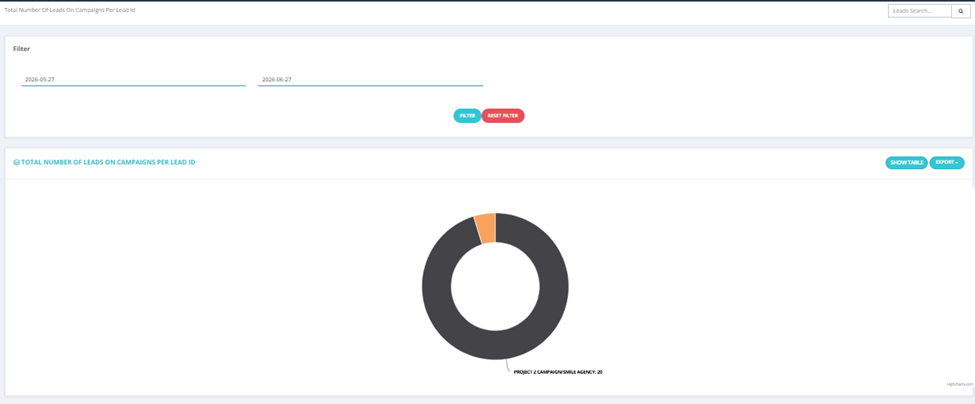
5. Total Number of Leads on Campaigns Per Lead ID
Donut chart showing the distribution of leads across campaigns per Lead ID.
Toggle Show Table for tabular view.
Filter: Date range (From / To).
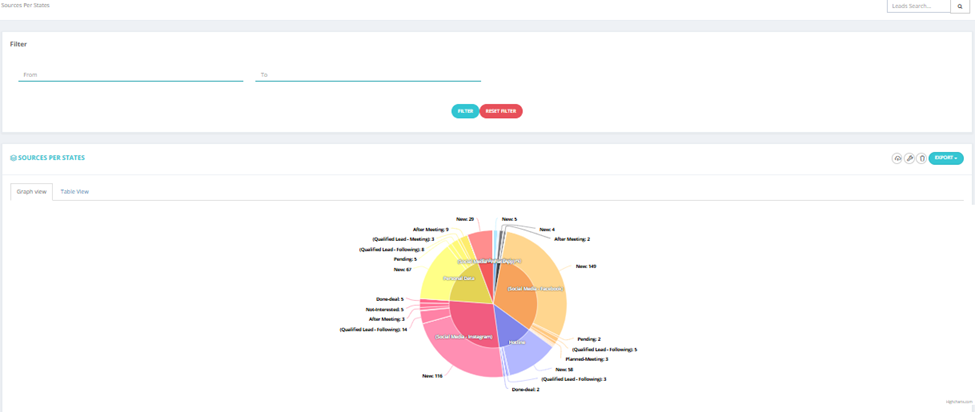
6. Sources Per States
Pie chart showing lead states distribution per source — how many leads from each source are in each state.
Supports both Graph View and Table View.
Filter: Date range (From / To).
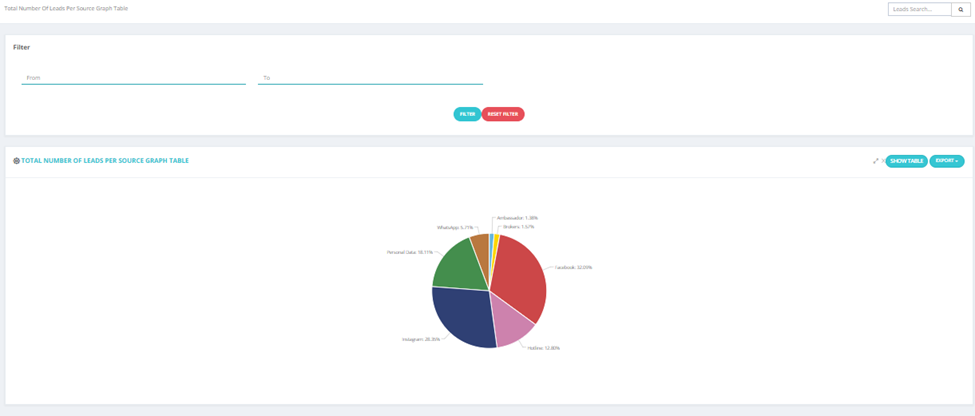
7. Total Number of Leads Per Source (Graph & Table)
Pie chart showing the percentage of total leads coming from each source (e.g., Facebook 32%, Instagram 28%, Hotline 13%).
Toggle Show Table for a breakdown by numbers.
Filter: Date range (From / To).
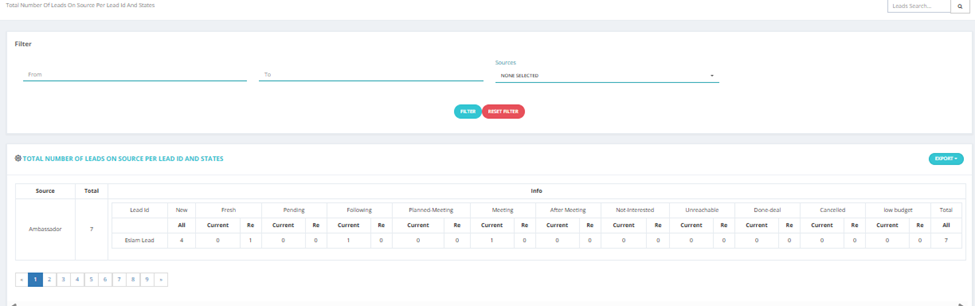
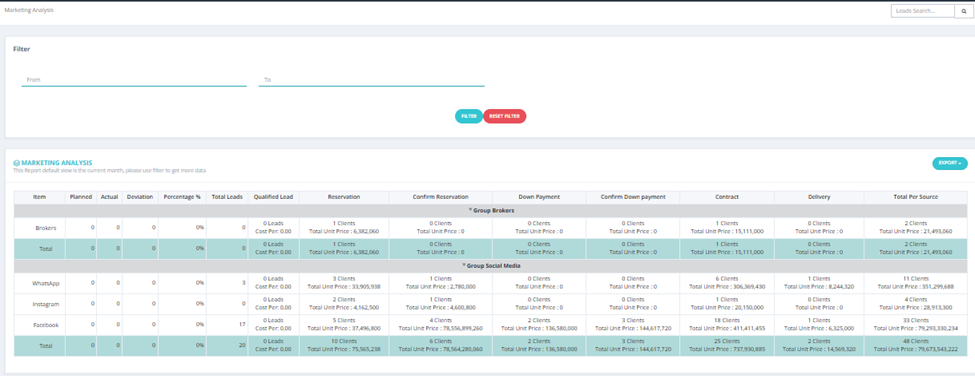
8. Marketing Analysis
A comprehensive financial performance table grouped by source groups (e.g., Brokers, Social Media).
Columns include:
- Item — Source name.
- Planned / Actual / Deviation / Percentage % — Budget tracking.
- Total Leads — Total leads from this source.
- Qualified Lead — Leads that progressed beyond fresh state.
- Reservation / Confirm Reservation / Down Payment / Confirm Down Payment / Contract / Delivery — Units count and total unit price at each stage.
- Total Per Source — Combined clients and unit value.
💡 Default view is the current month. Use filters to extend the date range.
Filter: Date range (From / To).