4. Client
Client Module — View and manage client profiles, track unit sales from show to delivery, handle client requests, and access full payment and interaction history.
Client Details
Overview
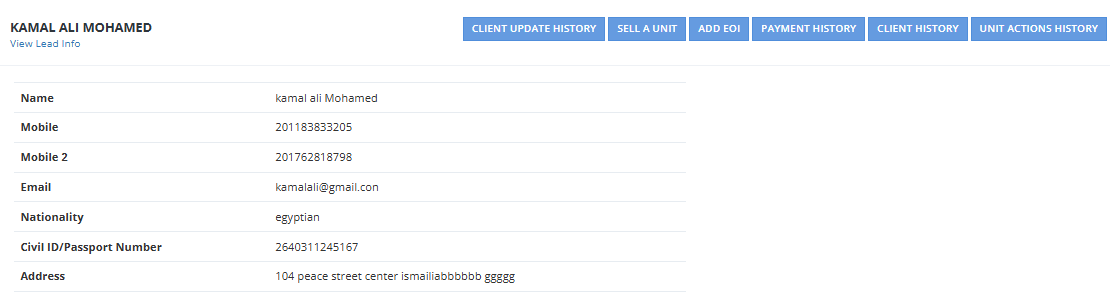
Clicking on a client's name opens the Client Details page — a full view of all information, history, and actions related to that client.
Client Information Fields
| Field | Description |
|---|---|
| Client ID | Unique identifier assigned to the client. |
| Name (Arabic) | Client's name in Arabic. |
| Name (English) | Client's name in English. |
| Mobile | Contact number. |
| Email address. | |
| Broker / Broker Agent | If referred by a broker or agent, their details appear here. |
| Sales Team | The salespeople responsible for this client, with their contact info. |
| Notes | Any notes recorded about the client. |
| Files / Private Files | Upload and view documents related to the client. |
Available Actions from the Client Profile
| Action | Description |
|---|---|
| Client Update History | View a log of all changes made to the client's profile. |
| Sell Unit | Start the unit sale process for this client. |
| Add EOI | Register an Expression of Interest for a unit. |
| Payment History | View all payment transactions linked to this client. |
| Client History | Review the full interaction history with this client. |
| Unit Actions History | Track all updates and interactions related to units the client is interested in. |
| Create Client Requests | Submit a new request on behalf of the client. |
| View Client Tickets | See all support tickets linked to this client. |
| View Client EOIs | See all Expressions of Interest submitted by or for this client. |
Client Tickets
Scrolling down, you'll find a list of all support tickets related to this client, showing:
- Ticket Number
- Type
- Name
- Phone
- Communication Method
Client EOIs (Expression of Interest)
Also visible on this page — all EOIs submitted for this client, showing:
- EOI Serial
- Project
- Creator
- Salesperson
- Broker
- EOI Status

Client
Overview
The Clients module allows users to view, manage, and update client information. Each client is displayed as a card with their key details. The total number of clients is shown at the top of the page.

Client Information
Each client profile includes:
- Client ID — A unique ID assigned to each client.
- Name (Arabic & English)
- Mobile — Contact number.
- Email — Email address.
- Broker / Broker Agent — If the client was referred by a broker or agent.
- Sales Team — The salespeople responsible for this client.
- Notes — Any notes recorded about the client.
- Files & Private Files — Documents related to the client.
Available Actions
- Search Clients — Find a client by name or other details.
- Export Clients — Export the client list in CSV or Excel format.
- Reset & Send New Credentials — Reset a client's login credentials and send the updated info to their email.
- Edit Client — Modify the client's details.
- Delete Client — Remove the client from the system.
When to Create a Client Profile
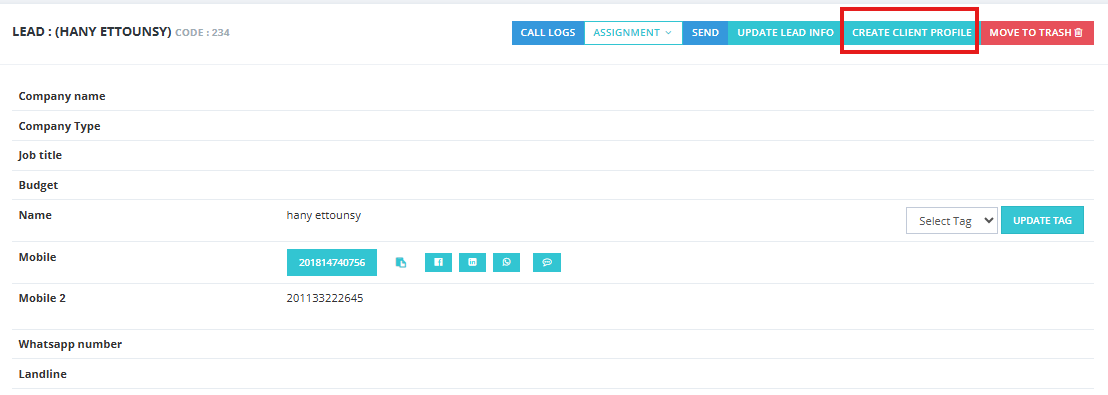
A client profile is created when a lead reaches the Done Deal state and is converted into a client.
How to Create the Profile
- Go to the Leads tab.
- Open the lead that is in Done Deal status.
- Click Convert to Client.
- Fill in the additional required fields for the client profile.
- Click Save — the lead is converted into a client profile and added to the Clients module with all related information.

Adding Custom Fields to the Client Form
You can add custom fields to the Convert to Client screen to capture additional information specific to your business.
Steps to Add Custom Fields
- Go to Setup → Fields Setup.
- Click Add New.
- Configure the field:
- Client Form — Set to True to make this field appear on the Convert to Client form.
- Field Name — Enter a name (e.g., Passport Number, Customer Preferences).
- Data Type — Select the appropriate type (text, number, date, etc.).
- Set as Unique — Enable to prevent duplicate entries for that value (e.g., National ID, Passport Number).
- Save — the field will now appear on the client form for all new conversions.
Units Management
Overview
From the Client Details page, you can manage all unit interactions for a client — from showing them a unit all the way through to delivery.
Unit Sale Workflow
Units move through the following stages:
| Stage | Description |
|---|---|
| Show | Unit has been presented to the client. |
| Hold | Unit is reserved temporarily while waiting for the client's confirmation. |
| Reservation | Client's interest is confirmed — reservation is formalized. |
| Confirm Reservation | Reservation is finalized and confirmed. |
| Down Payment | Client makes a down payment. |
| Confirm Down Payment | Down payment is verified. |
| Contract | Sales contract is prepared and issued. |
| Delivery | Unit is delivered to the client — transaction is complete. |
How to Show a Unit to a Client
- Go to the client's detail page → Units tab.
- Select the unit you want to show.
- Click the Show button.
- Select the client from the dropdown.
- If the client doesn't have a profile yet, click Quick Hold to create a client profile on the spot, fill in their details, then proceed.
- Confirm to move the unit to the Hold tab.
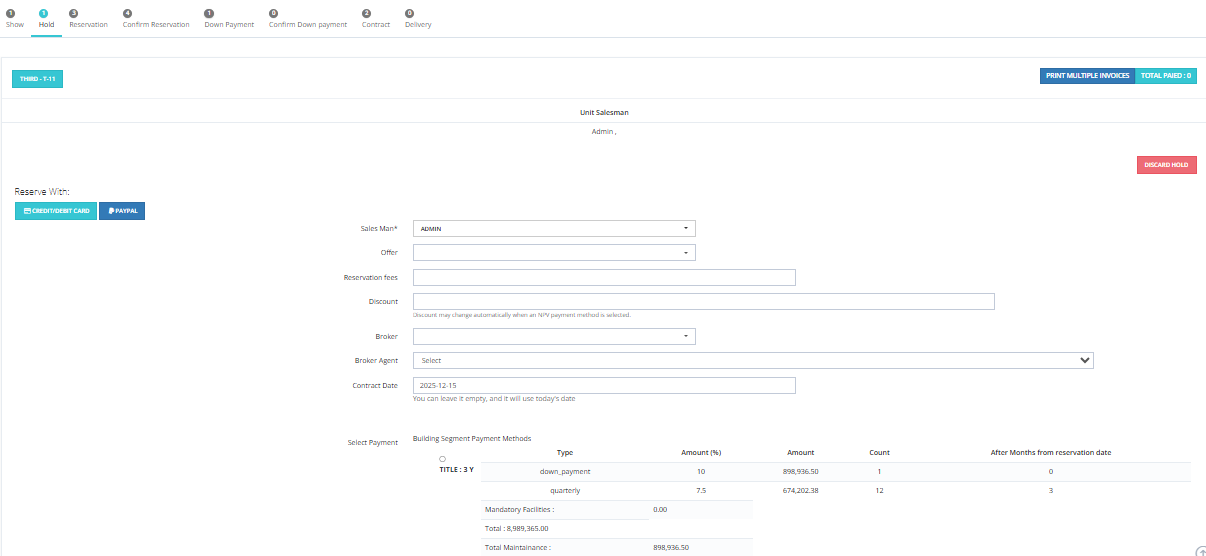
Hold & Reservation — Required Fields
When moving a unit to Hold or Reservation, fill in the following:
| Field | Description |
|---|---|
| Salesman | Choose the salesman responsible for this client. |
| Offer | Select an applicable offer, if any. |
| Reservation Fees | Enter the reservation fee amount. Enter 0 if no fee applies. |
| Discount | Specify the discount percentage, if applicable. |
| Broker | Select the associated broker, if any. |
| Broker Agent | Select the broker's agent, if applicable. |
| Contract Date | Enter the contract date. |
| Payment Method | Choose the appropriate payment method. |
Delivery Updates
The Delivery section tracks the progress of unit delivery for each client. Use it to monitor pending steps and ensure the client receives their unit on time.
Client Requests
Overview
The Client Requests module is used to create and manage requests submitted on behalf of clients. This covers delivery inquiries, financial requests, service issues, and more. Requests are routed to the relevant department for handling.
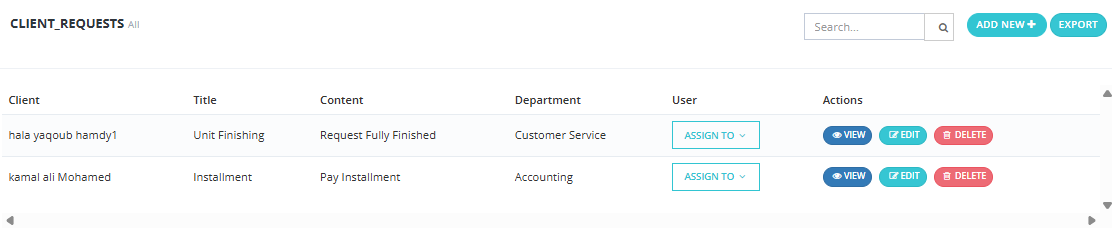
Request Information
All requests are displayed in a table with the following columns:

| Column | Description |
|---|---|
| Client | The client associated with the request. |
| Title | A brief summary of the request. |
| Content | A short description of the request details. |
| Department | The department assigned to handle the request. |
| Assigned User | The team member responsible for managing the request. |
How to Create a New Request
- Click Add New.
- Fill in the required fields:
| Field | Required | Description |
|---|---|---|
| Client | ✅ | Select the client associated with this request. |
| Title | ✅ | A brief, descriptive title for the request. |
| Content | ✅ | Full description of the client's request or issue. |
| Department | ✅ | Choose the department that should handle it. |
| User | ✅ | Assign a team member to manage the request. |
| Files | Optional | Upload supporting documents. |
| Images | Optional | Upload any related images. |
- Click Create to submit the request.
Available Actions
- Search Requests — Find requests by client name, title, or keyword.
- Edit Request — Modify the request's details or status.
- Delete Request — Remove a request if no longer relevant.
- Reassign Request — Move the request to a different department or user.
- Track Request Progress — Monitor the status of each request from the table.