5. Brokerage
Brokerage Module — Manage broker companies and their agents, track broker leads, requests, and CILs, log broker activities, handle broker contracts, and monitor broker performance reports.
- Brokerage Module — Overview
- Add Broker Request / Lead
- Broker CILs
- Active Brokers
- Pending / Blocked Brokers
- Activities Management
- Brokers Emails
- Upload Brokers
- Broker Contract
- Broker Settings
Brokerage Module — Overview
Overview
The Brokerage Module manages broker companies and their agents, tracks broker-submitted leads and CILs, and handles broker contracts and activities.
Module Sections
| Section | Description |
|---|---|
| Add Broker Request / Lead | Add a new broker request or broker lead into the system. |
| Broker CILs | View and manage CILs (Client Information Letters) submitted by broker companies. |
| Active Brokers | List of all active broker companies. |
| Pending / Blocked Brokers | Broker companies pending approval or blocked from the system. |
| Send Mail | Send bulk emails to broker companies. |
| Activities Management | Track and manage activities with broker companies. |
| Upload Brokers | Bulk import broker companies via Excel. |
| Broker Contract | Manage and download broker contracts. |
Add Broker Request / Lead
Overview
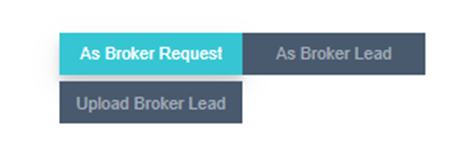
When adding from the Brokerage module, you have two options:
- As Broker Request — A request submitted by a broker company for a specific unit type (e.g., "4-bedroom duplex"). This is not a regular lead — it comes with a specific property requirement.
- As Broker Lead — A standard lead that comes through a broker company and enters the CRM normally.
- Upload Broker Lead — Bulk import broker leads via Excel file.
Broker Request vs Broker Lead
| Broker Request | Broker Lead | |
|---|---|---|
| What it is | A property inquiry from a broker company for a specific unit | A regular lead referred by a broker |
| Fields | Different from standard lead fields — includes property requirements | Similar to standard lead fields |
| Lead ID | Uses a special static source called "Brokers" — the Lead ID only appears in Brokerage tabs, not in the standard Add Lead screen | Standard Lead ID |
How to Add a Broker Request / Lead
- Go to Brokerage Module → Add Broker Request / Lead.
- Choose: As Broker Request or As Broker Lead.
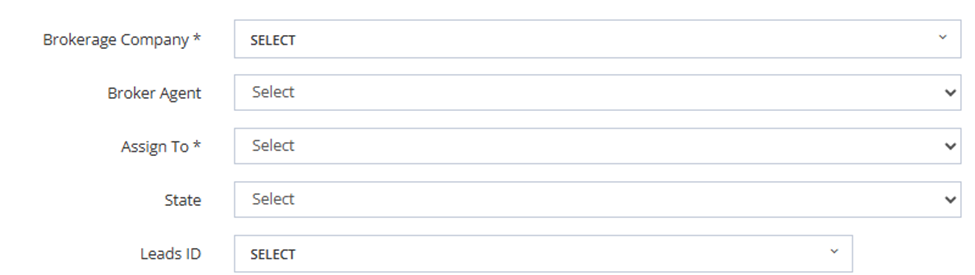
- Fill in the required fields:
| Field | Required | Description |
|---|---|---|
| Brokerage Company | ✅ | Select the broker company. |
| Broker Agent | Optional | Select the agent within that company. |
| Assign To | ✅ | Assign to a salesman. |
| State | Optional | Select the lead state. |
| Leads ID | ✅ | Select the Lead ID for this broker request/lead. The Lead ID must be created under the Brokers source in the Marketing Module — this is a static source dedicated to broker leads. Lead IDs from other sources will not appear here. To create one: go to Marketing → Lead IDs → Add New → set Source to "Brokers" → save. |
Upload Broker Lead
Works the same as the standard Upload Leads feature, with one additional required field:
| Extra Field | Description |
|---|---|
| Broker Company ID | The ID of the broker company. Get this from the broker's profile in Active Brokers. |
💡 To find the Broker Company ID, go to Active Brokers → open the broker's profile → copy the ID.
Adding Custom Fields to the Broker Request Form
- Go to Setup → Fields Setup.
- Click Add New.
- Set Broker Request option to True.
- Configure: Field Name, Data Type, Set as Unique if needed.
- Save — the field will appear on the Broker Request form.
Broker CILs
Overview
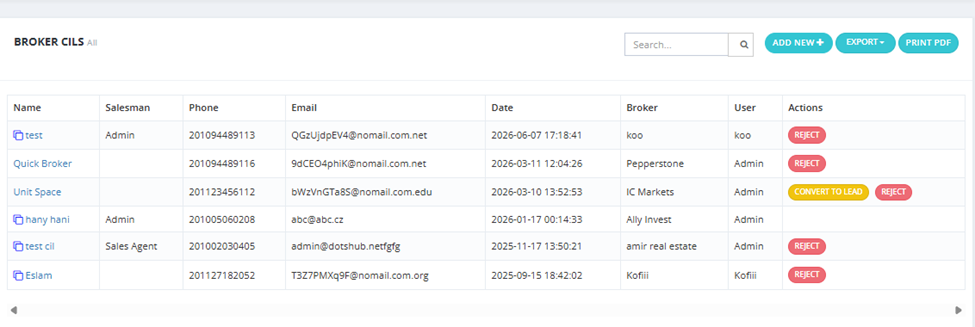
Broker CILs (Client Information Letters) are submitted by broker companies through their own CRM login. This tab shows all CILs received from brokers.
How It Works
- A broker company has a profile in the system and can log in to the CRM.
- They submit CILs for clients they are bringing to you.
- The CIL appears in this tab for review.
Broker CILs List
| Column | Description |
|---|---|
| Name | Client name on the CIL. |
| Salesman | Salesman assigned (if converted). |
| Phone | Client phone number. |
| Client email address. | |
| Date | Date the CIL was submitted. |
| Broker | The broker company that submitted the CIL. |
| User | The user who processed the CIL. |
| Actions | Convert to Lead or Reject. |
Converting a CIL to a Lead
- Review the CIL details.
- Click Convert to Lead.
- Select the salesman to assign the lead to.
- The salesman must be linked to the broker company — otherwise they won't appear in the dropdown.
- Confirm — the CIL becomes a lead in the salesman's pipeline.
⚠️ If the CIL shows Reject instead of Convert to Lead, it means the lead already exists in the system as a duplicate. Check the Duplicated Leads section.
Filters
| Filter | Description |
|---|---|
| Date | Filter by submission date (From / To). |
| Broker | Filter by broker company. |
| Broker Agents | Filter by specific broker agent. |
Adding Custom Fields to the CIL Form
- Go to Setup → Fields Setup.
- Click Add New.
- Set CIL option to True.
- Configure: Field Name, Data Type, Set as Unique if needed.
- Save — the field will appear on the CIL form.
Adding a CIL Manually
You can also add a CIL manually by clicking Add New in this tab and filling in the client details.
Active Brokers
Overview
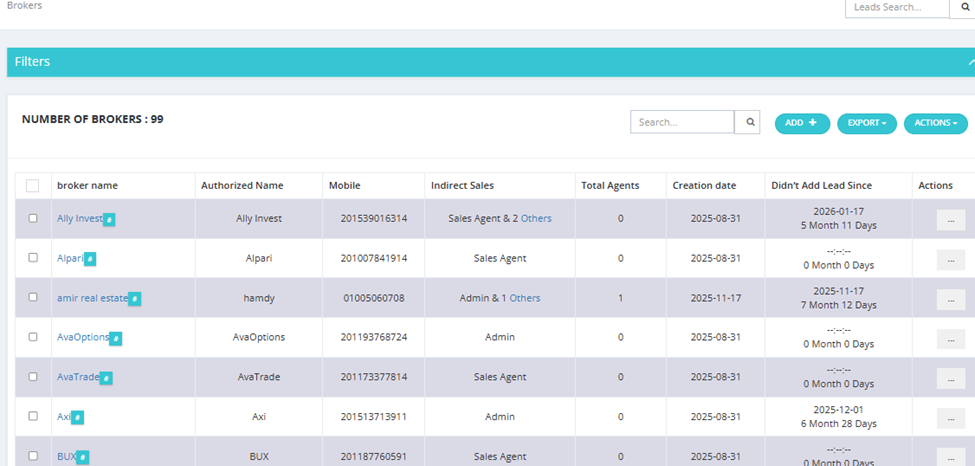
The Active Brokers tab shows all broker companies currently active in the system.
Brokers List
| Column | Description |
|---|---|
| Broker Name | The broker company name. |
| Authorized Name | The authorized representative's name. |
| Mobile | Contact number. |
| Indirect Sales | Which salesmen are assigned as indirect sales for this broker. |
| Total Agents | Number of broker agents under this company. |
| Creation Date | When this broker was added to the system. |
| Didn't Add Lead Since | How long since this broker submitted a lead — useful for identifying inactive brokers. |
| Actions | Options menu (···). |
Available Actions
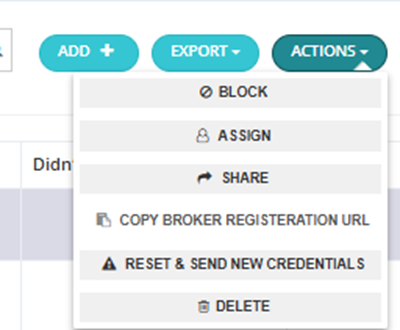
From the Actions dropdown (top right) or the (···) menu on each row:
| Action | Description |
|---|---|
| Block | Block the broker from submitting new leads or CILs. |
| Assign | Assign a salesman to this broker. |
| Share | Share broker information. |
| Copy Broker Registration URL | Copies a registration link to send to the broker company. When the broker opens the link, they fill in their own data directly — no need for you to enter it manually. The registration form includes: Type, Company Name, Authorized Name, Authorized ID Number, CRN, Tax Card, Mobile, Email, Address, Description, Files (e.g., tax card scan, commercial registration), Land Line, Tag, Co. History, Website/Social Media, Branches, Owners, Sales Team, Administrative Contact Person, Finance Team, and Logo. After submitting, the broker also receives their contract automatically — the system generates it based on whichever contract template is configured in Broker Settings. The broker can then print it, sign it physically, and bring it to the company or upload it back. |
| Reset & Send New Credentials | Reset the broker's CRM login and send new credentials to their email. |
| Delete | Remove the broker from the system. |
| Export | Export the broker list. |
Broker Profile
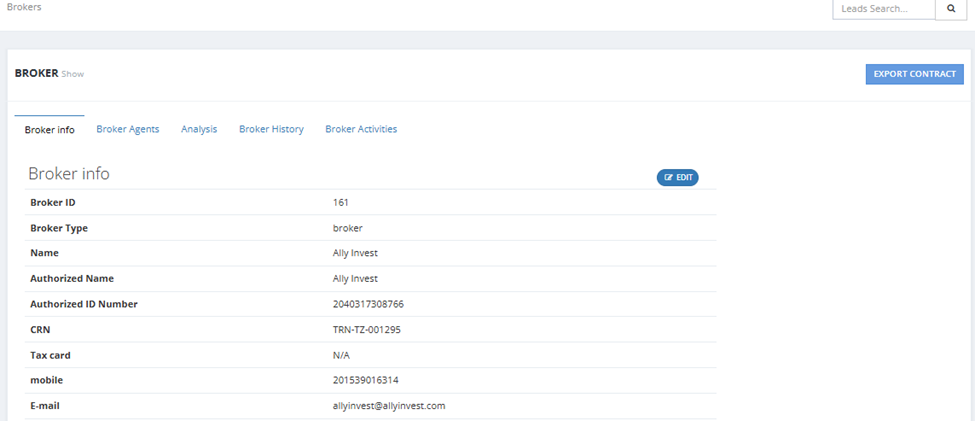
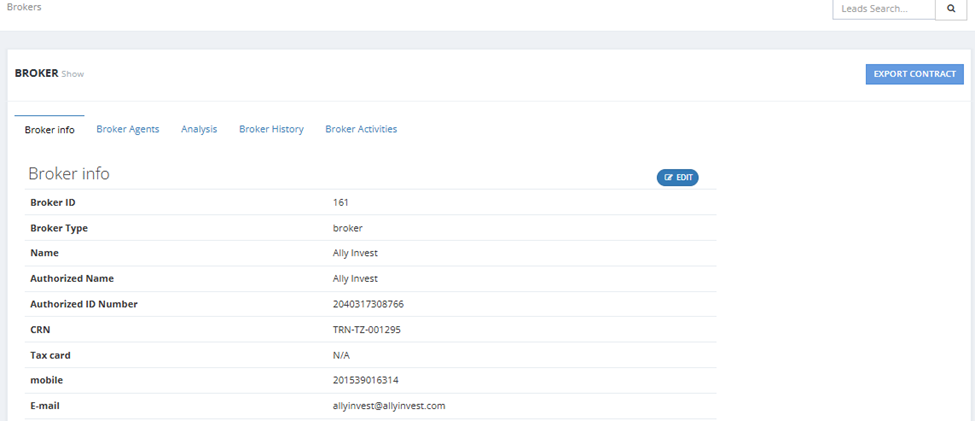
Clicking on a broker company opens their full profile with these tabs:
| Tab | Description |
|---|---|
| Broker Info | Full company details (ID, Type, Name, Authorized Name, CRN, Tax Card, Mobile, Email, Address). |
| Broker Agents | List of agents working under this company. |
| Analysis | Performance data for this broker. |
| Broker History | Log of all interactions and changes. |
| Broker Activities | Activities logged against this broker. |
A Download Broker Contract button is available on the profile page.
How to Add a New Broker
Click Add and choose:
Add Broker (Company)
| Field | Required | Description |
|---|---|---|
| Type | ✅ | Broker type. |
| Company Name | ✅ | Official company name. |
| Authorized Name | Optional | Name of the authorized representative. |
| Authorized ID Number | Optional | ID number of the authorized rep. |
| CRN | Optional | Commercial Registration Number. |
| Tax Card | Optional | Tax card number. |
| Mobile | ✅ | Contact number. |
| ✅ | Email address (changing this affects login credentials). | |
| Address | Optional | Company address. |
| Description | Optional | Notes about the company. |
| Indirect Sale | Optional | Assign indirect sales team members. |
| Files | Optional | Upload documents. |
| Land Line | Optional | Landline number. |
| Tag | Optional | Tags for filtering. |
| Co. History | Optional | Company history notes. |
| Website / Social Media | Optional | Online presence links. |
| Branches | Optional | Branch information. |
| Owners | Optional | Owner details. |
| Sales Team | Optional | Assign sales team members. |
| Administrative Contact Person | Optional | Admin contact details. |
| Finance Team | Optional | Finance team assignment. |
| Logo | Optional | Company logo. |
Add Broker Agent
| Field | Required | Description |
|---|---|---|
| Broker | ✅ | Select the parent broker company. |
| Name | ✅ | Agent's full name. |
| Mobile | ✅ | Agent's mobile number. |
| ID | Optional | Agent's ID number. |
| Bank Account | Optional | Agent's bank account details. |
Pending / Blocked Brokers
Overview
This tab shows broker companies that are either pending approval or have been blocked from the system.

Brokers List
Same columns as Active Brokers: Broker Name, Authorized Name, Mobile, Indirect Sales, Total Agents, Creation Date, Didn't Add Lead Since.
Available Actions
| Action | Description |
|---|---|
| Unblock | Reactivate a blocked broker and move them to Active Brokers. |
| Delete | Permanently remove the broker. |
| Assign | Assign a salesman to the broker. |
Available Filters
| Filter | Description |
|---|---|
| Indirect Sales | Filter by assigned indirect sales team member. |
| Broker Creator | Filter by who added the broker. |
| Type | Filter by broker type. |
| Creation Date | Filter by when the broker was added (From / To). |
| Last Update Date | Filter by when the broker record was last updated (From / To). |
| Didn't Add Lead Since | Filter brokers who haven't submitted leads since a certain date. |
Block New Brokers By Default
If the setting Block New Brokers By Default is enabled in Broker Settings, all newly registered brokers will automatically land in this tab as Pending/Blocked until manually approved.
Go to Settings → Broker Settings to enable or disable this option.
Activities Management
Overview
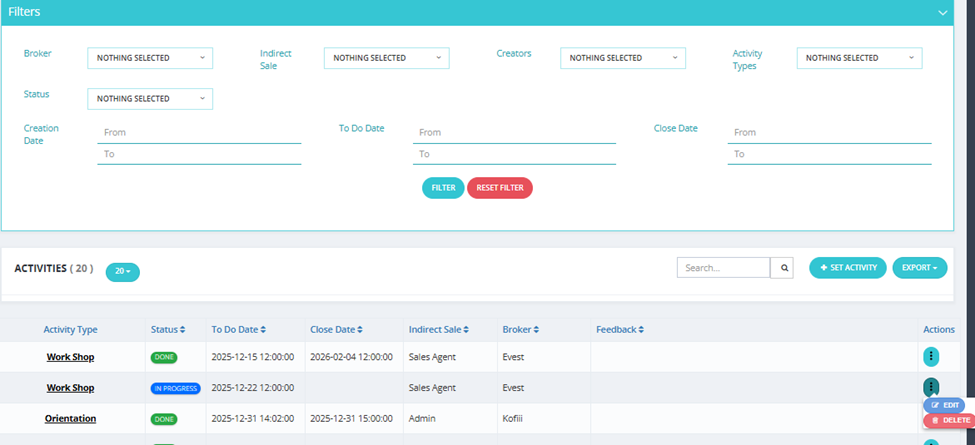
The Activities Management tab lets you log and track activities with broker companies — such as workshops, site visits, orientations, and contract signings.
Activities List
| Column | Description |
|---|---|
| Activity Type | The type of activity (e.g., Work Shop, Orientation, Site Visit, Contract Sign). |
| Status | Current status (Done, In Progress, etc.). |
| To Do Date | Scheduled date for the activity. |
| Close Date | Date the activity was closed/completed. |
| Indirect Sale | The salesman associated with this activity. |
| Broker | The broker company this activity is for. |
| Feedback | Any feedback recorded for this activity. |
| Actions | Edit or Delete the activity. |
Available Filters
| Filter | Description |
|---|---|
| Broker | Filter by broker company. |
| Indirect Sale | Filter by assigned salesman. |
| Creators | Filter by who created the activity. |
| Activity Types | Filter by activity type. |
| Status | Filter by activity status. |
| Creation Date | Filter by when the activity was created (From / To). |
| To Do Date | Filter by scheduled date (From / To). |
| Close Date | Filter by completion date (From / To). |
How to Set a New Activity
Click Set Activity and fill in:
| Field | Required | Description |
|---|---|---|
| Activity Type | ✅ | Select the type (e.g., Workshop, Site Visit, Orientation, Contract Sign). |
| Status | ✅ | Current status of the activity. |
| Todo Date | ✅ | Scheduled date and time. |
| Reminder Date | ✅ | When to send a reminder. |
| Broker | ✅ | Select the broker company. |
| Indirect Sale | ✅ | Select the indirect sales team member. |
| Feedback | Optional | Notes or feedback about the activity. |
| Activity Image | Optional | Upload an image related to the activity. |
| Check-in | Optional | Log a check-in for this activity. |
Activity Types Setup
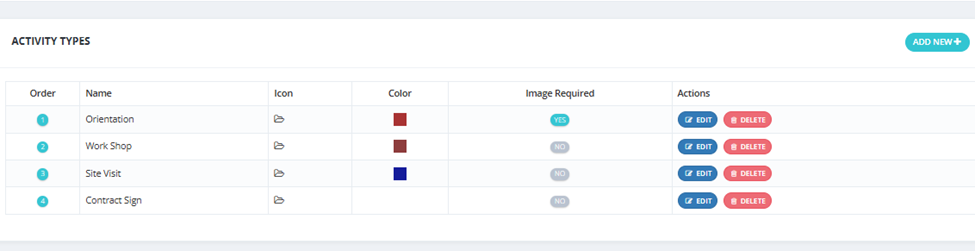
Activity types are configured via Setup → Broker Activity. Each type has:
- Order — Display order.
- Name — Type name (e.g., Orientation, Work Shop, Site Visit, Contract Sign).
- Icon — Visual icon.
- Color — Color label.
- Image Required — Whether an image must be uploaded for this activity type.
Brokers Emails
Overview
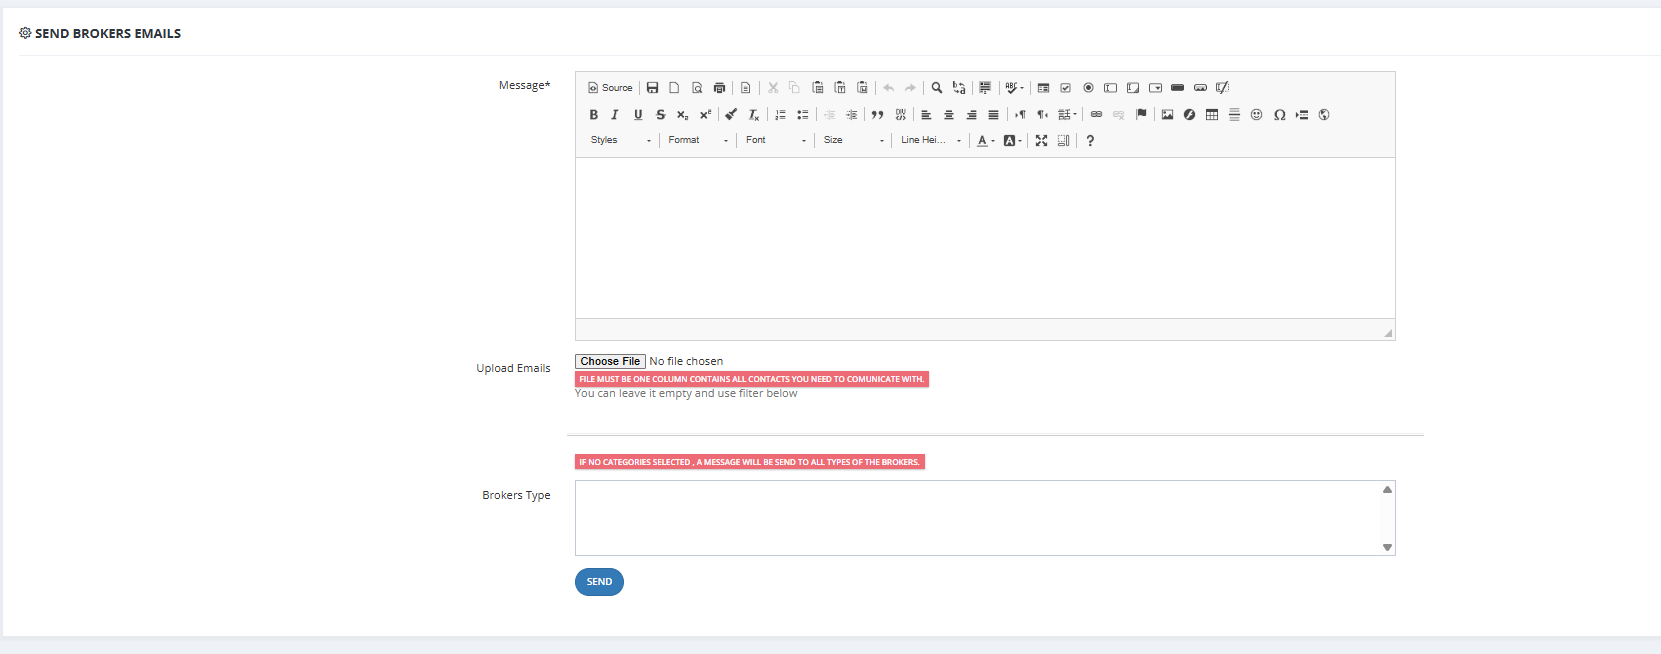
The Send Mail tab allows you to send bulk emails to broker companies.
How to Send a Broker Email
- Go to Brokerage Module → Send Mail.
- Fill in the Message field.
- Choose recipients:
- Upload Emails — upload a file with one email per row.
- OR use the Broker Type filter to target specific broker types.
- If no type is selected, the email goes to all broker types.
- Send.
Key Things to Know
- If no category is selected, the message is sent to all brokers.
- SMTP must be configured in General Settings for emails to work.
Upload Brokers
Overview
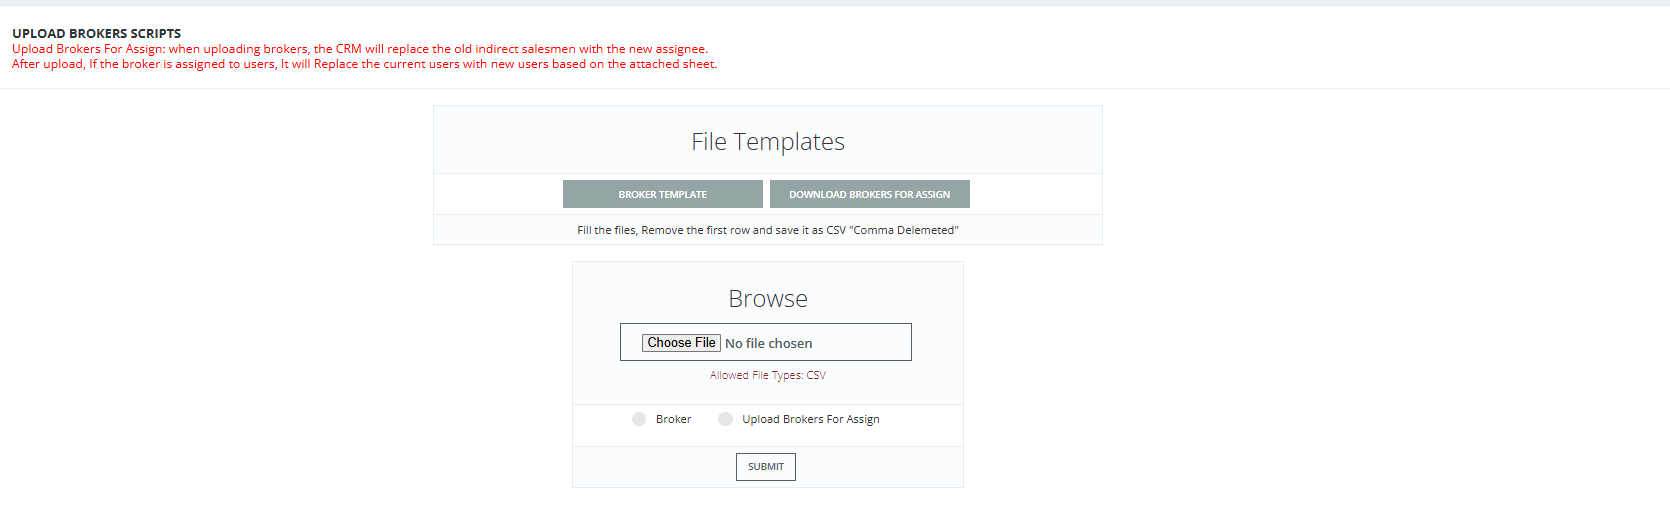
The Upload Brokers feature allows you to bulk import broker companies via Excel. It is accessed via Setup → Broker Upload.
Two Upload Templates
When you open the upload page, two templates are available:
| Template | Purpose |
|---|---|
| Broker Template | For adding new broker companies to the system. |
| Broker for Assign | For updating the assigned salesman for existing broker companies. |
Broker Template — Required Fields
The Excel file must contain the following columns (highlighted in red are required):
| Column | Required | Description |
|---|---|---|
| Company Name | ✅ | Official broker company name. |
| Authorized Name | Optional | Authorized representative name. |
| Country Code | ✅ | Phone country code. |
| Mobile | ✅ | Contact number. |
| ✅ | Email address. | |
| CRN | Optional | Commercial Registration Number. |
| Address | Optional | Company address. |
| Descriptions | Optional | Notes about the company. |
| Type | ✅ | Broker type. |
| Salesman | Optional | Salesman name — must match exactly as it appears in the CRM. |
| Authorized ID Number | Optional | Authorized rep's ID number. |
| Owner | Optional | Owner name. |
| Tag | Optional | Tags. |
| Tax Card | Optional | Tax card number. |
⚠️ The Salesman field must be written exactly as it appears in the CRM — same spelling, capitalization, and spacing. If more than one salesman is assigned, separate names with a comma:
Ahmed,Mohamed,Ali.
Duplication Check
The system checks for duplicate broker companies based on:
- Mobile
- CRN
- Tax Card
If any of these match an existing broker, the row will be rejected.
File Format
- After filling in the data, delete the first row (the example/header row that comes with the template) before uploading.
- Save your Excel file as CSV UTF-8 before uploading.
- The same applies for the Broker for Assign template — delete the first row and save as CSV UTF-8 before uploading.
Broker for Assign Template
Used to update which salesman is assigned to existing broker companies. Download the template, update the Salesman column, and re-upload.
Broker Contract
Overview
The Broker Contract feature allows you to create contract templates that can be auto-filled with broker company data and downloaded as a Word document.
How It Works
Contracts are built using Document Words — placeholder codes that the system replaces automatically with real data from the broker's profile when the contract is generated.
For example, the code -broker-name- in the contract template will be replaced with the actual broker company name when downloaded.
Document Words
Available placeholder codes include:
Broker Information Codes:
| Field | Code |
|---|---|
| Broker Type | -Broker_type- |
| Broker Company Name | -Broker_company_name- |
| Broker Authorized Name | -Broker_authorized_name- |
| Broker Authorized ID Number | -Broker_authorized_id_number- |
| Broker CRN | -Broker_CRN- |
| Broker Tax Card | -Broker_tax_card- |
| Broker Mobile | -Broker_mobile- |
| Broker Email | -Broker_email- |
| Broker Address | -Broker_address- |
| Broker Description | -Broker_description- |
| Broker Indirect Sale | -Broker_indirect_sale- |
| Broker Land Line | -Broker_land_line- |
| Broker Tag | -Broker_tag- |
| Broker Co. History | -Broker_co_history- |
| Broker Website / Social Media | -Broker_website- |
| Broker Branches | -Broker_branches- |
| Broker Owners | -Broker_owners- |
| Broker Sales Team | -Broker_sales_team- |
| Broker Administrative Contact Person | -Broker_administrative- |
| Broker Finance Team | -Broker_finance_team- |
| Code | Description |
|---|---|
-broker-name- |
Broker company name. |
-payments- |
Payment methods. |
-payments_list- |
List of payments. |
-reservation_fees- |
Reservation fees amount. |
-total_paid- |
Total amount paid. |
-total_remaining- |
Total remaining amount. |
-total_amount- |
Total contract amount. |
-maintenance- |
Maintenance fees. |
And many more — view the full list in Setup → Global Contracts → Document Words.
How to Create a Broker Contract Template
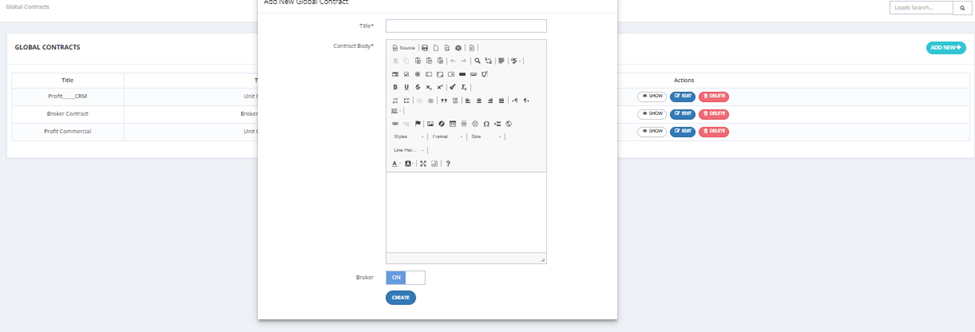
- Go to Setup → Global Contracts.
- Click Add New.
- Fill in:
- Title — Contract name (e.g., "Broker Contract 2025").
- Contract Body — Write the contract text and insert placeholder codes where dynamic data should appear.
- Broker — Toggle ON to mark this as a broker contract.
- Click Create.
How to Download a Broker Contract
- Go to Active Brokers → open the broker's profile.
- Click Download Broker Contract (or Export Contract).
- Select which contract template to use.
- The system generates a Word document with the broker's data filled in automatically.
Broker Settings
Access via Settings → Broker Settings:
| Setting | Description |
|---|---|
| Broker Contract | Upload the default contract file template. |
| Can't Add Duplicated CIL | When ON, prevents duplicate CILs from being added. |
| Can't Add Duplicated CIL to the Same Broker CILs | When ON, prevents the same broker from submitting a duplicate CIL. |
| CIL Duplication Rejection Message | Message shown when a CIL is rejected as duplicate (e.g., "This CIL is Rejected"). |
| CIL Duplication Acceptance Message | Message shown when a CIL is accepted (e.g., "CIL Added Successfully"). |
| CIL Expiration Days | Number of days before a CIL expires. |
| Leads ID | Default Lead ID assigned to broker leads. |
| Block New Brokers By Default | When ON, all new brokers go to Pending/Blocked tab automatically. |
| Activity Todo Date (accept old date) | When ON, allows setting past dates for activity todo dates. |
| Start Contract Serial From | The starting number for contract serial numbering. |
Broker Settings
Broker Settings
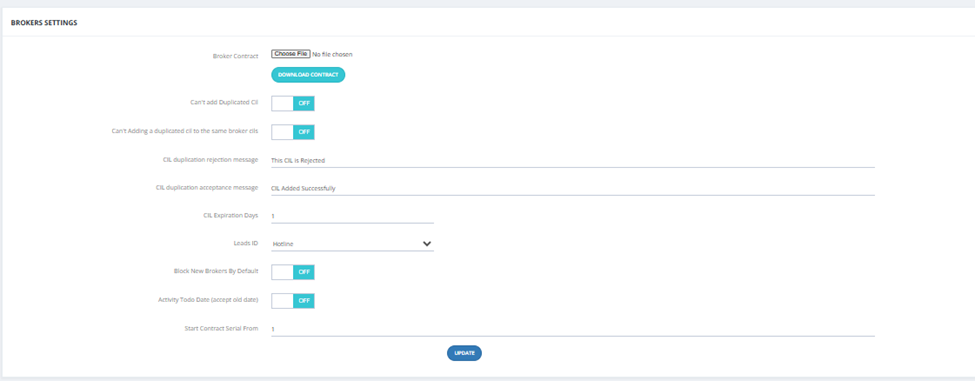
Access via Settings → Broker Settings:
| Setting | Description |
|---|---|
| Broker Contract | Upload the default contract file template. |
| Can't Add Duplicated CIL | When ON, prevents duplicate CILs from being added. |
| Can't Add Duplicated CIL to the Same Broker CILs | When ON, prevents the same broker from submitting a duplicate CIL. |
| CIL Duplication Rejection Message | Message shown when a CIL is rejected as duplicate (e.g., "This CIL is Rejected"). |
| CIL Duplication Acceptance Message | Message shown when a CIL is accepted (e.g., "CIL Added Successfully"). |
| CIL Expiration Days | Number of days before a CIL expires. |
| Leads ID | Default Lead ID assigned to broker leads. |
| Block New Brokers By Default | When ON, all new brokers go to Pending/Blocked tab automatically. |
| Activity Todo Date (accept old date) | When ON, allows setting past dates for activity todo dates. |
| Start Contract Serial From | The starting number for contract serial numbering. |