# 7. Financial Management

Track every unit from first client showing through to final delivery. Manage the full payment lifecycle — installments, collections, delays, penalties, refunds, payment plans, offers, and financial settings — all in one place.

# Payments

## Overview

The **Payments** tab shows all installments that are due to be collected across all units in all projects. This is the main daily working screen for the finance team.

---

## What You See

<table id="bkmrk-column-description-%23"><thead><tr><th>Column</th><th>Description</th></tr></thead><tbody><tr><td>**\#**</td><td>Installment number.</td></tr><tr><td>**Type**</td><td>Payment type (e.g., Down Payment, Quarterly, Monthly, Reservation Fees, Maintenance).</td></tr><tr><td>**Amount**</td><td>Installment amount.</td></tr><tr><td>**Client**</td><td>Client name — clickable to open their profile.</td></tr><tr><td>**Unit Details**</td><td>Unit code, Building, Project.</td></tr><tr><td>**Delivery Date**</td><td>Due date for this installment.</td></tr><tr><td>**Pay Option**</td><td>Payment method used (e.g., Cheque, Cash, Transfer).</td></tr><tr><td>**Cheque**</td><td>Cheque number if applicable.</td></tr><tr><td>**Bank**</td><td>Bank name if applicable.</td></tr><tr><td>**Status &amp; Note**</td><td>Current status of the payment and any notes.</td></tr><tr><td>**Actions**</td><td>PAY or ATTACH buttons.</td></tr></tbody></table>

> 💡 Payments highlighted in **red/pink** are delayed — their due date has passed.

[![image.png](https://knowledge-base.profitcrm.net/uploads/images/gallery/2026-06/scaled-1680-/L5fimage.png)](https://knowledge-base.profitcrm.net/uploads/images/gallery/2026-06/L5fimage.png)

---

## Filters

<table id="bkmrk-filter-description-d"><thead><tr><th>Filter</th><th>Description</th></tr></thead><tbody><tr><td>**Date**</td><td>Filter by payment due date (From / To).</td></tr><tr><td>**Project**</td><td>Filter by project.</td></tr><tr><td>**Client**</td><td>Filter by client name.</td></tr><tr><td>**Paying Option**</td><td>Filter by payment method (Cheque, Cash, Transfer, etc.).</td></tr><tr><td>**Payment Type**</td><td>Filter by installment type.</td></tr><tr><td>**Payment State**</td><td>Filter by payment state (Late Payment Status values from Finance Settings).</td></tr><tr><td>**Payment Status**</td><td>Filter by status.</td></tr></tbody></table>

---

## How to Collect a Payment (PAY)

1. Find the installment in the Payments tab.
2. Click **PAY**.
3. The pay screen shows:

<table id="bkmrk-field-description-pa"><thead><tr><th>Field</th><th>Description</th></tr></thead><tbody><tr><td>**Pay**</td><td>Full payment option (selected by default).</td></tr><tr><td>**Pay Partially**</td><td>Enable to collect a partial amount. Enter the amount in the field next to **Pay Partially**. You can add **multiple partial payments** using the **Add Payment** button — each with its own date and amount. Example: split one installment across two payments on different dates.</td></tr><tr><td>**Total**</td><td>Shows the total being collected.</td></tr><tr><td>**Diff**</td><td>The difference between the installment amount and what's being collected.</td></tr><tr><td>**Is Penalty**</td><td>The **Diff** field shows the difference between the installment amount and what's being collected. If you collected **less** than the installment amount: leave **Is Penalty** unchecked → the difference is recorded as a **Client Benefit** (goes to Client Benefits tab). If you collected **more** and check **Is Penalty** → the extra amount is recorded as a **Penalty** (goes to Penalties tab).</td></tr><tr><td>**Note**</td><td>Free text note.</td></tr><tr><td>**Paying Options**</td><td>Select the payment method (Cheque, Cash, Transfer, Deposit, etc.). These options are configured in **Finance Settings → Paying Options**.</td></tr><tr><td>**Collection Date**</td><td>The date the payment was actually received. Use this when the physical payment (e.g., cheque) was received on a different date than when it's being entered. Example: client gave you a cheque on Thursday at 6PM but you're logging it on Sunday — set Collection Date to Thursday.</td></tr></tbody></table>

4. Click **PAY** to confirm.

[![image.png](https://knowledge-base.profitcrm.net/uploads/images/gallery/2026-06/scaled-1680-/YO4image.png)](https://knowledge-base.profitcrm.net/uploads/images/gallery/2026-06/YO4image.png)

---

## ATTACH Button

Use **ATTACH** to upload a document or file related to a specific payment (e.g., cheque scan, transfer receipt).

# Delayed Payments & Extra Delayed Payments

## Overview

The system automatically moves overdue installments between tabs based on grace periods configured in **Finance Settings**.

---

## How the Flow Works

```
Payments tab
    ↓ (after Delay Payment Grace Period days)
Delayed Payments tab
    ↓ (after Extra Delay Payment Grace Period days)
Extra Delayed Payments tab

```

---

## Delayed Payments

An installment moves from **Payments** to **Delayed Payments** when:

- Its due date has passed **AND**
- The number of days since the due date exceeds the **Delay Payment Grace Period** configured in Finance Settings.

Example: If grace period = 7 days and the installment was due on the 1st, it appears in Delayed Payments on the 8th.

### Late Payment Penalty

If **Delay Payment Fees** is enabled in Finance Settings, a penalty percentage is automatically added to delayed installments:

- **Delay Payment Fees ON/OFF** — enables/disables automatic penalty calculation.
- **Delay Payment Fees Percentage %** — the penalty percentage calculated from the installment amount.

The penalty amount appears in the **Penalties** tab.

[![image.png](https://knowledge-base.profitcrm.net/uploads/images/gallery/2026-06/scaled-1680-/H8Cimage.png)](https://knowledge-base.profitcrm.net/uploads/images/gallery/2026-06/H8Cimage.png)

---

## Extra Delayed Payments

An installment moves from **Delayed Payments** to **Extra Delayed Payments** when:

- The number of days since the due date also exceeds the **Extra Delay Payment Grace Period** configured in Finance Settings.

[![image.png](https://knowledge-base.profitcrm.net/uploads/images/gallery/2026-06/scaled-1680-/MBnimage.png)](https://knowledge-base.profitcrm.net/uploads/images/gallery/2026-06/MBnimage.png)

---

## Both Tabs

Both tabs have the same interface and functionality as the main Payments tab:

- Same filters (Date, Project, Client, Paying Option, Payment Type, Payment State, Payment Status).
- Same PAY, ATTACH actions.
- Same receipt printing capability.

# Collection

## Overview

The **Collection** tab shows all payments that have been **collected** (paid) or **refunded** across all units and projects.

---

## What You See

<table id="bkmrk-column-description-t"><thead><tr><th>Column</th><th>Description</th></tr></thead><tbody><tr><td>**Type**</td><td>Payment type (e.g., Quarterly, Monthly, Reservation Fees).</td></tr><tr><td>**Amount**</td><td>Amount collected or refunded.</td></tr><tr><td>**Client**</td><td>Client name — clickable to open their profile.</td></tr><tr><td>**Project**</td><td>Project name.</td></tr><tr><td>**Unit**</td><td>Unit code.</td></tr><tr><td>**Building**</td><td>Building name.</td></tr><tr><td>**Date**</td><td>Payment due date.</td></tr><tr><td>**Pay Option**</td><td>Payment method used.</td></tr><tr><td>**Collection Date**</td><td>The actual date the payment was received.</td></tr><tr><td>**Action Date**</td><td>When the payment was logged in the system.</td></tr><tr><td>**Serial**</td><td>Invoice serial number. "No Invoice Yet" means the payment was collected but the invoice hasn't been generated yet.</td></tr><tr><td>**Note**</td><td>The "was \[amount\]" note tells you the original installment amount before any adjustment — useful when the collected amount differs from the installment (due to benefits or penalties).</td></tr><tr><td>**Cheque**</td><td>Cheque number if applicable.</td></tr><tr><td>**Bank**</td><td>Bank name if applicable.</td></tr><tr><td>**Action**</td><td>DISCARD button.</td></tr></tbody></table>

[![image.png](https://knowledge-base.profitcrm.net/uploads/images/gallery/2026-06/scaled-1680-/bdqimage.png)](https://knowledge-base.profitcrm.net/uploads/images/gallery/2026-06/bdqimage.png)

---

## Filters

<table id="bkmrk-filter-description-d"><thead><tr><th>Filter</th><th>Description</th></tr></thead><tbody><tr><td>**Date**</td><td>Filter by payment due date (From / To).</td></tr><tr><td>**Collection Date**</td><td>Filter by the actual collection date (From / To).</td></tr><tr><td>**Action Date**</td><td>Filter by when the action was taken (From / To).</td></tr><tr><td>**Project**</td><td>Filter by project.</td></tr><tr><td>**Client**</td><td>Filter by client.</td></tr><tr><td>**Paying Option**</td><td>Filter by payment method.</td></tr><tr><td>**Payment Type**</td><td>Filter by installment type.</td></tr></tbody></table>

---

## Available Actions

- **Export** — Export the collection list.
- **Print PDF** — Print a PDF of the collection report.
- **DISCARD** — Cancel/undo a collected payment and return it to the Payments tab.

---

## Understanding the "was \[amount\]" Note

This note appears when the collected amount is different from the original installment amount. Example: installment was 100,000 but collected 95,000 due to a benefit — the note shows "was 100,000" so you know the original amount. You may see this same installment listed multiple times (once with the original, once with the adjusted amount) due to benefits or penalties applied.

# Penalties & Client Benefits

## Penalties

### Overview

The **Penalties** tab shows all late payment penalties charged to clients — either automatically (via Finance Settings) or manually when marking a payment difference as a penalty during collection.

[![image.png](https://knowledge-base.profitcrm.net/uploads/images/gallery/2026-06/scaled-1680-/sqRimage.png)](https://knowledge-base.profitcrm.net/uploads/images/gallery/2026-06/sqRimage.png)

### What You See

<table id="bkmrk-column-description-c"><thead><tr><th>Column</th><th>Description</th></tr></thead><tbody><tr><td>**Client**</td><td>Client name.</td></tr><tr><td>**Unit**</td><td>Unit code.</td></tr><tr><td>**Salesman**</td><td>Assigned salesman.</td></tr><tr><td>**Amount**</td><td>Penalty amount.</td></tr><tr><td>**Date**</td><td>Date the penalty was recorded.</td></tr><tr><td>**Note**</td><td>Any notes related to the penalty.</td></tr></tbody></table>

**Total** is shown at the top of the page.

### Available Actions

- **Export** — Export the penalties list.
- **Select Sorting Method** — Sort the list.

---

## Client Benefits

### Overview

The **Client Benefits** tab shows all discounts or credits that have been applied to clients' payment plans — for example when a client pays less than the installment amount and the difference is treated as a benefit rather than a penalty.

[![image.png](https://knowledge-base.profitcrm.net/uploads/images/gallery/2026-06/scaled-1680-/Hjwimage.png)](https://knowledge-base.profitcrm.net/uploads/images/gallery/2026-06/Hjwimage.png)

### What You See

<table id="bkmrk-column-description-c-1"><thead><tr><th>Column</th><th>Description</th></tr></thead><tbody><tr><td>**Client**</td><td>Client name.</td></tr><tr><td>**Unit**</td><td>Unit code.</td></tr><tr><td>**Salesman**</td><td>Assigned salesman.</td></tr><tr><td>**Amount**</td><td>Benefit amount (shown as negative since it reduces what's owed).</td></tr><tr><td>**Date**</td><td>Date the benefit was recorded.</td></tr><tr><td>**Note**</td><td>Any notes.</td></tr></tbody></table>

**Total** is shown at the top (negative value = total credits given).

### Available Actions

- **Export** — Export the benefits list.
- **Select Sorting Method** — Sort the list.

# Price Change

## Overview

The **Price Change** tool allows you to bulk update prices for units across a project by a percentage — increasing or decreasing all selected units' prices at once.

[![image.png](https://knowledge-base.profitcrm.net/uploads/images/gallery/2026-06/scaled-1680-/id4image.png)](https://knowledge-base.profitcrm.net/uploads/images/gallery/2026-06/id4image.png)

---

## How It Works

1. Go to **Financial Module → Price Change**.
2. Use the **Filters** to select which units to apply the price change to (by project, building, segment, type, etc.).
3. Enter a **percentage** in the % field: 
    - Positive number (e.g., `10`) = increase prices by 10%.
    - Negative number (e.g., `-10`) = decrease prices by 10%.
4. Click **Change Price**.
5. A confirmation dialog appears: *"Warning, The Selected or Filtered Units prices will be Changed!"*
6. Click **OK** to confirm.

> ⚠️ **Important Note:** If a unit is currently priced at 10 EGP and you increase by 10%, it becomes 11 EGP. If you then want to go back to 10 EGP, you **cannot** use -10% — because -10% of 11 EGP is not the same as -10% of 10 EGP. Plan your percentage changes carefully.

> 💡 If **no Unit is selected**, the price change applies to **all units in filter** in the system.

---

## Available Filters

Same as the Units tab filters: Unit Name, Delivery Date, Position, Bedroom, Type, Unit Code, View, Finishing, Project, Floor, Building, Building Segments, Project Type, Status, Salesman, Phase, Unit Delivery Date, Space, Price, Meter Price, Bathroom, State.

# Manage Discount

## Overview

The **Manage Discount** tab lets you set the **maximum discount percentage** that each user role can give when selling a unit. This prevents salesmen from offering discounts beyond their authority.

[![image.png](https://knowledge-base.profitcrm.net/uploads/images/gallery/2026-06/scaled-1680-/4kaimage.png)](https://knowledge-base.profitcrm.net/uploads/images/gallery/2026-06/4kaimage.png)

---

## How It Works

Each role in the system has a **Limit %** field. The value entered is the maximum discount percentage that role can apply when making a Hold.

<table id="bkmrk-role-limit-super-adm"><thead><tr><th>Role</th><th>Limit</th></tr></thead><tbody><tr><td>Super Admin</td><td>100% (no restriction)</td></tr><tr><td>Sales Agent</td><td>3%</td></tr><tr><td>Sales Manager</td><td>24%</td></tr><tr><td>Sales Director</td><td>4%</td></tr><tr><td>CCO</td><td>4%</td></tr><tr><td>Call Center</td><td>43%</td></tr><tr><td>...</td><td>...</td></tr></tbody></table>

> 💡 These limits are enforced during the Hold step — when the salesman enters a discount, the system checks it against their role's limit.

---

## How to Update

1. Go to **Financial Module → Manage Discount**.
2. Edit the **Limit %** for each role.
3. Click **Update** to save.

# Manage Offers

## Overview

The **Manage Offers** tab allows you to create promotional offers that can be applied to units during the Hold step — for example, a Ramadan offer or a facility-free promotion.

[![image.png](https://knowledge-base.profitcrm.net/uploads/images/gallery/2026-06/scaled-1680-/e8fimage.png)](https://knowledge-base.profitcrm.net/uploads/images/gallery/2026-06/e8fimage.png)

---

## Offers List

<table id="bkmrk-column-description-n"><thead><tr><th>Column</th><th>Description</th></tr></thead><tbody><tr><td>**Name**</td><td>Offer name (e.g., "Fac Free", "Ramadan").</td></tr><tr><td>**Value**</td><td>Discount value.</td></tr><tr><td>**Start Date**</td><td>When the offer becomes active.</td></tr><tr><td>**Discount Type**</td><td>`amount` (fixed amount discount) or `%` (percentage discount).</td></tr><tr><td>**End Date**</td><td>When the offer expires.</td></tr><tr><td>**Count**</td><td>How many times this offer can be used.</td></tr><tr><td>**Actions**</td><td>Edit or Delete.</td></tr></tbody></table>

---

## How to Create a New Offer

Click **New Offer** and fill in:

<table id="bkmrk-field-required-descr"><thead><tr><th>Field</th><th>Required</th><th>Description</th></tr></thead><tbody><tr><td>**Name**</td><td>✅</td><td>Offer name.</td></tr><tr><td>**Value**</td><td>✅</td><td>Discount value.</td></tr><tr><td>**Discount Type**</td><td>✅</td><td>`amount` — fixed discount, or `%` — percentage discount.</td></tr><tr><td>**Amount**</td><td>✅</td><td>The discount amount or percentage.</td></tr><tr><td>**Start Date**</td><td>✅</td><td>Offer start date.</td></tr><tr><td>**Count**</td><td>Optional</td><td>Maximum number of times this offer can be used. Leave blank for unlimited.</td></tr><tr><td>**End Date**</td><td>✅</td><td>Offer expiry date.</td></tr></tbody></table>

---

## How Offers Are Applied

When a salesman is in the **Hold** step, they see an **Offer** dropdown. Available offers (within their active date range) will appear. Selecting an offer applies the discount automatically to the unit price.

# Create Payment Plans

## Overview

Payment plans define how a unit's price is split into installments. They can be created at multiple levels — Global, Project, Building Segment, and Unit — and are applied during the Hold/Reservation step when the salesman selects a payment plan for the client.

---

## Payment Plan Hierarchy

Payment plans can exist at 4 levels. The system always shows **all available plans** from all levels, and the salesman selects the one that applies. If a plan is created at the building segment level, it only appears for units in that segment. If at the unit level, only for that specific unit.

```
Global Payment Methods (Setup → Payment Methods)
    ↓ can be used by
Project level plans
    ↓ can be used by
Building Segment level plans
    ↓ can be used by
Unit level plans

```

---

## How to Create a Global Payment Plan

Go to **Setup → Payment Methods → Add**:

<table id="bkmrk-field-required-descr"><thead><tr><th>Field</th><th>Required</th><th>Description</th></tr></thead><tbody><tr><td>**Title**</td><td>✅</td><td>Plan name (e.g., "3Y", "5Y", "7Y").</td></tr><tr><td>**Minimum Down Payment Percentage %**</td><td>Optional</td><td>Minimum down payment percentage allowed.</td></tr><tr><td>**Add Phase**</td><td>—</td><td>Add installment phases to the plan.</td></tr></tbody></table>

[![image.png](https://knowledge-base.profitcrm.net/uploads/images/gallery/2026-06/scaled-1680-/kkVimage.png)](https://knowledge-base.profitcrm.net/uploads/images/gallery/2026-06/kkVimage.png)

### Adding Phases

Each phase has:

<table id="bkmrk-field-description-pa"><thead><tr><th>Field</th><th>Description</th></tr></thead><tbody><tr><td>**Payment Type**</td><td>Type of installment (Down Payment, Quarterly, Monthly, Biannual, Delivery, Cash, etc.).</td></tr><tr><td>**Amount**</td><td>Percentage of the unit price for this phase.</td></tr><tr><td>**Count**</td><td>Number of installments of this type.</td></tr><tr><td>**After Months**</td><td>How many months after the contract date the first installment of this phase starts.</td></tr></tbody></table>

> 💡 The **calculator icon** (🖩) on the last phase auto-fills the remaining percentage to reach 100% — so you don't have to calculate it manually.

> 💡 The total of all phases must equal or exceed 100%. It can exceed 100% but not be below.

**TOTAL** shows the running percentage total as you add phases. Click **Add Phase** to add more rows. Click **Save** when done.

---

## How to Create a Plan at Project / Building Segment / Unit Level

Same fields as the Global plan, but at the **Building Segment** and **Unit** level you can create a payment plan using a fixed **Amount** instead of a percentage — useful when you know the exact monetary value rather than a percentage of the unit price.

[![image.png](https://knowledge-base.profitcrm.net/uploads/images/gallery/2026-06/scaled-1680-/13Wimage.png)](https://knowledge-base.profitcrm.net/uploads/images/gallery/2026-06/13Wimage.png)

> 💡 If creating a plan by Amount at the Building Segment or Unit level, the total amount across all phases must equal or exceed the unit price.

Go to the relevant level (Project edit, Building Segment edit, or Unit edit) and use the **Select Payment** section to either:

- **Select from existing global plans** — choose one or more to make available for this project/segment/unit. [![image.png](https://knowledge-base.profitcrm.net/uploads/images/gallery/2026-06/scaled-1680-/GAjimage.png)](https://knowledge-base.profitcrm.net/uploads/images/gallery/2026-06/GAjimage.png)
- **Add a new plan** — create a plan specific to this level.

---

## Maintenance

Maintenance works the same way as payment plans — same fields, same hierarchy levels (Global, Project, Building Segment, Unit).

### Maintenance Fields

<table id="bkmrk-field-description-na"><thead><tr><th>Field</th><th>Description</th></tr></thead><tbody><tr><td>**Name**</td><td>Maintenance name (e.g., Maintenance, Annual Maintenance).</td></tr><tr><td>**Amount**</td><td>Can be a fixed **amount** or a **percentage (%)** — if %, it's calculated from the **unit price**.</td></tr><tr><td>**Payment Method**</td><td>Select which **Global Payment Method** to use for collecting this maintenance. The dropdown shows all plans created in **Setup → Payment Methods** — for example, if you created a plan called "Maintenance 4 Installments", select it here and the maintenance amount will be split across 4 installments automatically.</td></tr><tr><td>**Payment Type**</td><td>`%` — maintenance is calculated as a percentage of the unit price. `Amount` — maintenance is a fixed monetary value.</td></tr></tbody></table>

[![image.png](https://knowledge-base.profitcrm.net/uploads/images/gallery/2026-06/scaled-1680-/Bcuimage.png)](https://knowledge-base.profitcrm.net/uploads/images/gallery/2026-06/Bcuimage.png)

### Maintenance Priority Rule

If maintenance exists at multiple levels simultaneously (Project + Building Segment + Unit), the **unit-level maintenance takes priority** — only the unit-level maintenance is applied.

### Maintenance in the Payment Plan

When a payment plan is created, the maintenance amount is shown separately as **Total Maintenance** — it's not included in the unit price total but is a separate obligation for the client.

---

## Facilities

Facilities are optional add-ons to a unit's sale (e.g., Garage, Parking Slot, Club Membership). They can be added at the Project, Building Segment, or Unit level.

### Facility Fields

<table id="bkmrk-field-description-na-1" style="width:100%;"><thead><tr><th style="width:15.4966%;">Field</th><th style="width:84.5431%;">Description</th></tr></thead><tbody><tr><td style="width:15.4966%;">**Name**</td><td style="width:84.5431%;">Facility name (e.g., Club, Parking Slot, Garage).</td></tr><tr><td style="width:15.4966%;">**Amount**</td><td style="width:84.5431%;">Facility price.</td></tr><tr><td style="width:15.4966%;">**Payment Method**</td><td style="width:84.5431%;">Select which **Global Payment Method** to use for collecting this facility's cost. Same as maintenance — the dropdown shows all plans from **Setup → Payment Methods**. For example, select "4 Installments" to split the facility cost across 4 payments.</td></tr><tr><td style="width:15.4966%;">**Added to Total Unit Price?**</td><td style="width:84.5431%;">✅ = facility price is added to the unit's total price. ☐ = facility is a separate charge not included in the unit price.</td></tr><tr><td style="width:15.4966%;">**Calculated in Maintenance?**</td><td style="width:84.5431%;">✅ = the facility price is included when calculating maintenance fees.</td></tr></tbody></table>

[![image.png](https://knowledge-base.profitcrm.net/uploads/images/gallery/2026-06/scaled-1680-/n8Uimage.png)](https://knowledge-base.profitcrm.net/uploads/images/gallery/2026-06/n8Uimage.png)

### Facility Priority Rule

Same as payment plans — if facilities exist at multiple levels, **all of them are shown** to the salesman during the Hold step and they select which ones apply. If a facility is set at the Building Segment level, it only appears for units in that segment. If set at the Unit level, only for that specific unit.

### Facility Merge Options (selected during Confirm Reservation step)

When confirming a reservation that includes a facility, you choose how to merge the facility cost into the payment plan:

<table id="bkmrk-option-description-m"><thead><tr><th>Option</th><th>Description</th></tr></thead><tbody><tr><td>**Merge Facility on Payment Plan with Down Payment**</td><td>Facility cost is split across ALL installments including the down payment.</td></tr><tr><td>**Merge Facility on Payment Plan without Down Payment**</td><td>Facility cost is split across all installments EXCEPT the down payment.</td></tr><tr><td>**No selection**</td><td>Facility appears as a completely separate standalone installment — not merged with any payment phase.</td></tr></tbody></table>

[![image.png](https://knowledge-base.profitcrm.net/uploads/images/gallery/2026-06/scaled-1680-/FSIimage.png)](https://knowledge-base.profitcrm.net/uploads/images/gallery/2026-06/FSIimage.png)

### Adding a Facility After Contract Stage

If a client buys a unit without a facility and later (e.g., after a year) decides they want one — you can add it from the **Contract step** using the **Add Facilities** button. The facility's installments are automatically added to the existing payment plan.

[![image.png](https://knowledge-base.profitcrm.net/uploads/images/gallery/2026-06/scaled-1680-/Tlzimage.png)](https://knowledge-base.profitcrm.net/uploads/images/gallery/2026-06/Tlzimage.png)

---

## How the Payment Plan Appears in the Hold Step

When a salesman clicks Hold on a unit, the **Select Payment** section shows all available payment plans for that unit. Each plan is shown with:

- **Title** (e.g., TITLE: 3Y)
- **Type** breakdown (Down Payment, Quarterly, etc.)
- **Amount %** and calculated **Amount**
- **Count** (number of installments)
- **After Months from Contract date**
- **Mandatory Facilities** total
- **Total** unit price
- **Total Maintenance**

The salesman selects one plan using the radio button.

# Unit Sales Pipeline

## Overview

The **Unit Sales Pipeline** tracks a unit from the moment it's shown to a client all the way through to delivery. Each step must be completed in order before moving to the next.

```
Show → Hold → Reservation → Confirm Reservation → Down Payment → Confirm Down Payment → Contract → Delivery

```

At the top of each unit's page, you can see all 8 steps with a counter showing how many units are at each stage.

---

## Step 1 — Show

**Who does it:** Salesman

The salesman shows the unit to a client using the **View to Client** button in the Units tab. Multiple salesmen can show the same unit to multiple clients simultaneously — this step does not reserve the unit for anyone yet.

[![image.png](https://knowledge-base.profitcrm.net/uploads/images/gallery/2026-06/scaled-1680-/Gygimage.png)](https://knowledge-base.profitcrm.net/uploads/images/gallery/2026-06/Gygimage.png)

[![image.png](https://knowledge-base.profitcrm.net/uploads/images/gallery/2026-06/scaled-1680-/ZIzimage.png)](https://knowledge-base.profitcrm.net/uploads/images/gallery/2026-06/ZIzimage.png)

### Fields

<table id="bkmrk-field-description-cl"><thead><tr><th>Field</th><th>Description</th></tr></thead><tbody><tr><td>**Client**</td><td>Select the client to show the unit to.</td></tr><tr><td>**Reserve With**</td><td>Optional online payment option (Credit/Debit Card or PayPal) if configured.</td></tr><tr><td>**Hold Time in Hours**</td><td>Override the default hold timer for this specific show.</td></tr><tr><td>**Add Comment**</td><td>Optional note.</td></tr></tbody></table>

### Actions

<table id="bkmrk-button-description-c"><thead><tr><th>Button</th><th>Description</th></tr></thead><tbody><tr><td>**Confirm &amp; Move to Hold**</td><td>Moves the unit to the Hold step for this client.</td></tr><tr><td>**Discard Show**</td><td>Cancels the show — unit goes back to available.</td></tr></tbody></table>

> 💡 Once any salesman confirms a hold on a unit, it disappears from all other clients' show views automatically.

---

## Step 2 — Hold

**Who does it:** Salesman / Operations

The client has confirmed interest — the unit is temporarily reserved. The salesman fills in the sale details here.

[![image.png](https://knowledge-base.profitcrm.net/uploads/images/gallery/2026-06/scaled-1680-/qrRimage.png)](https://knowledge-base.profitcrm.net/uploads/images/gallery/2026-06/qrRimage.png)

### Fields

<table id="bkmrk-field-required-descr" style="width:100%;"><thead><tr><th style="width:11.3266%;">Field</th><th style="width:8.46676%;">Required</th><th style="width:80.2464%;">Description</th></tr></thead><tbody><tr><td style="width:11.3266%;">**Salesman**</td><td style="width:8.46676%;">✅</td><td style="width:80.2464%;">The salesman(s) responsible for this sale.</td></tr><tr><td style="width:11.3266%;">**Offer**</td><td style="width:8.46676%;">Optional</td><td style="width:80.2464%;">Select a promotional offer to apply — only active offers (within their date range) appear here. Configured in **Financial Module → Manage Offers**.</td></tr><tr><td style="width:11.3266%;">**Reservation Fees**</td><td style="width:8.46676%;">✅</td><td style="width:80.2464%;">Amount paid as reservation fee. Enter `0` if no fee applies. If **Allow Select Reservation Fees Values** is ON in Finance Settings, this becomes a dropdown with pre-configured values.</td></tr><tr><td style="width:11.3266%;">**EOI Amount**</td><td style="width:8.46676%;">—</td><td style="width:80.2464%;">If an EOI was previously submitted for this unit, the EOI amount is shown automatically here.</td></tr><tr><td style="width:11.3266%;">**Discount**</td><td style="width:8.46676%;">Optional</td><td style="width:80.2464%;">Discount percentage. Limited by the salesman's role discount limit (see **Manage Discount**). Note: *"Discount may change automatically when an NPV payment method is selected."*</td></tr><tr><td style="width:11.3266%;">**Broker**</td><td style="width:8.46676%;">Optional</td><td style="width:80.2464%;">Select the broker if this sale came through a broker.</td></tr><tr><td style="width:11.3266%;">**Broker Agent**</td><td style="width:8.46676%;">Optional</td><td style="width:80.2464%;">Select the broker's agent.</td></tr><tr><td style="width:11.3266%;">**Contract Date**</td><td style="width:8.46676%;">Optional</td><td style="width:80.2464%;">Can be left empty — system will use today's date.</td></tr><tr><td style="width:11.3266%;">**Reservation Form**</td><td style="width:8.46676%;">✅</td><td style="width:80.2464%;">Choose which Reservation template to use (from **Setup → Global Contracts**).</td></tr><tr><td style="width:11.3266%;">**Select Payment**</td><td style="width:8.46676%;">✅</td><td style="width:80.2464%;">Choose the payment plan for this unit. All available plans from all levels (Global, Project, Building Segment, Unit) are shown. Select one using the radio button. Each plan shows: Type breakdown, Amount %, calculated Amount, Count (number of installments), After Months from reservation date, Mandatory Facilities total, Total unit price, Total Maintenance.</td></tr><tr><td style="width:11.3266%;">**Reserve With**</td><td style="width:8.46676%;">Optional</td><td style="width:80.2464%;">Online payment option (Credit/Debit Card, PayPal).</td></tr></tbody></table>

### Actions

<table id="bkmrk-button-description-c-1"><thead><tr><th>Button</th><th>Description</th></tr></thead><tbody><tr><td>**Confirm &amp; Move to Reservation**</td><td>Moves the unit to Reservation. A **notification is automatically sent to Finance** to check if reservation fees were collected.</td></tr><tr><td>**Discard Hold**</td><td>Cancels the hold — unit goes back to available.</td></tr></tbody></table>

---

## Step 3 — Reservation

**Who does it:** Finance Team

Finance reviews the reservation and verifies that fees have been received.

[![image.png](https://knowledge-base.profitcrm.net/uploads/images/gallery/2026-06/scaled-1680-/VbWimage.png)](https://knowledge-base.profitcrm.net/uploads/images/gallery/2026-06/VbWimage.png)

### Fields

<table id="bkmrk-field-description-re"><thead><tr><th>Field</th><th>Description</th></tr></thead><tbody><tr><td>**Refund Percentage**</td><td>If discarding the reservation, enter the refund % to return to the client.</td></tr><tr><td>**Contract Date**</td><td>Can still be changed at this stage.</td></tr><tr><td>**Select Payment**</td><td>Payment plan can still be changed at this stage.</td></tr></tbody></table>

### Actions

<table id="bkmrk-button-description-c-2"><thead><tr><th>Button</th><th>Description</th></tr></thead><tbody><tr><td>**Confirm &amp; Move to Confirm Reservation**</td><td>Moves to the next step after verifying fees are collected.</td></tr><tr><td>**Discard Reservation**</td><td>Cancels — unit returns to available. Refund percentage applies if fees were paid.</td></tr><tr><td>**Download Reservation Form**</td><td>Download the reservation form.</td></tr><tr><td>**View Payment Details**</td><td>Shows only the **Reservation Fees** installment at this stage. [![image.png](https://knowledge-base.profitcrm.net/uploads/images/gallery/2026-06/scaled-1680-/ug6image.png)](https://knowledge-base.profitcrm.net/uploads/images/gallery/2026-06/ug6image.png)

</td></tr><tr><td>**Edit Payments**</td><td>Modify payment plan — still editable at this stage. Only the **Reservation Fees** installment is visible in the payments section at this step. [![image.png](https://knowledge-base.profitcrm.net/uploads/images/gallery/2026-06/scaled-1680-/Qxlimage.png)](https://knowledge-base.profitcrm.net/uploads/images/gallery/2026-06/Qxlimage.png)

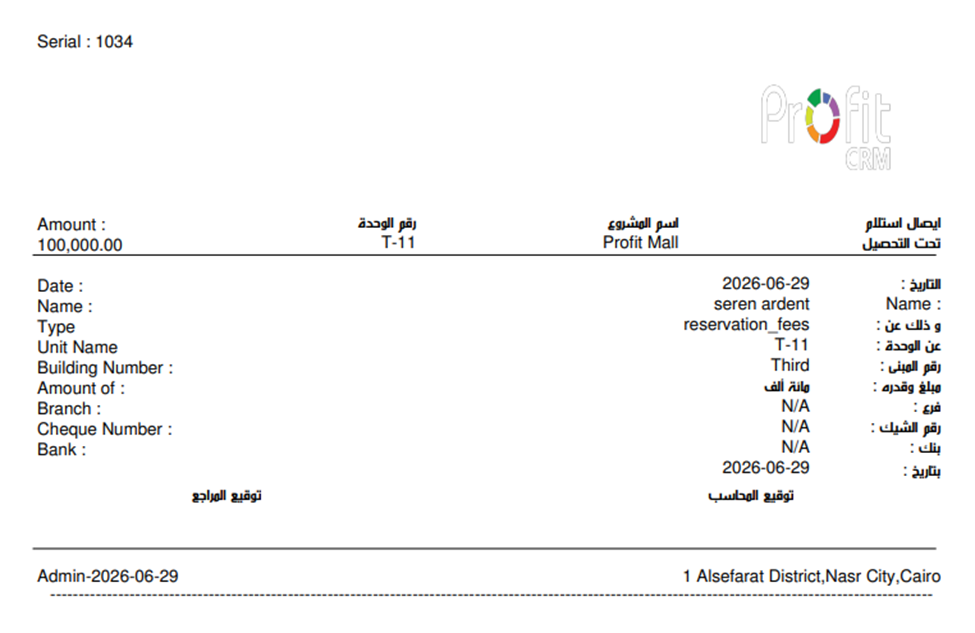
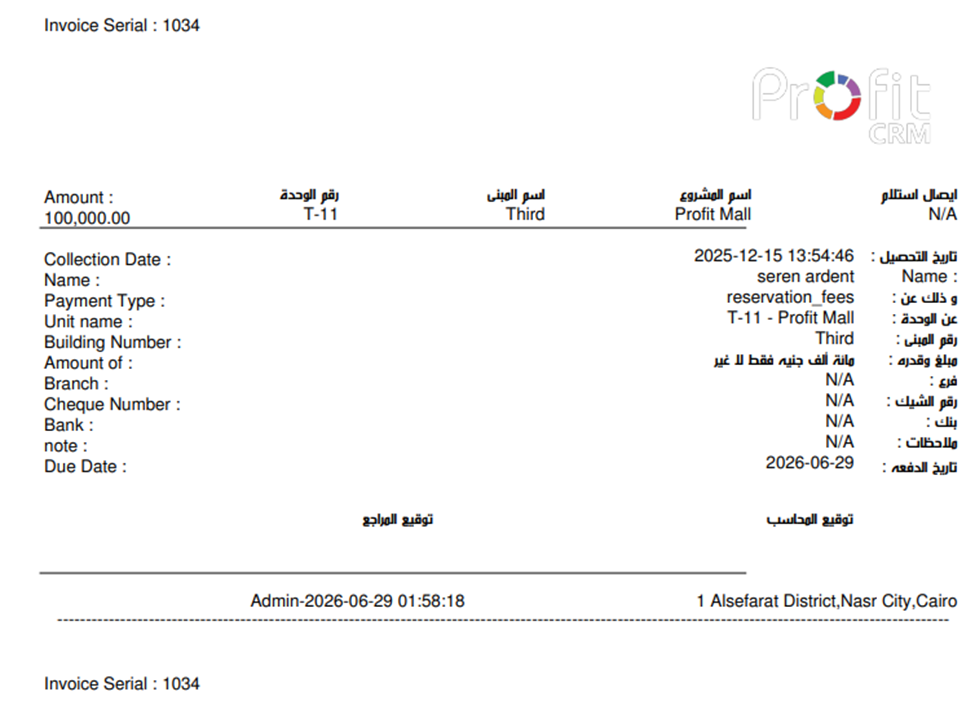
</td></tr><tr><td>**Print Multiple Invoices**</td><td>Print invoices for Reservation fees. [![image.png](https://knowledge-base.profitcrm.net/uploads/images/gallery/2026-06/scaled-1680-/FiTimage.png)](https://knowledge-base.profitcrm.net/uploads/images/gallery/2026-06/FiTimage.png)

</td></tr></tbody></table>

---

## Step 4 — Confirm Reservation

**Who does it:** Finance Team

Finance confirms that reservation fees have been fully received. **This is the last step where the payment plan and facilities can be changed.**

[![image.png](https://knowledge-base.profitcrm.net/uploads/images/gallery/2026-06/scaled-1680-/h2pimage.png)](https://knowledge-base.profitcrm.net/uploads/images/gallery/2026-06/h2pimage.png)

### Fields

<table id="bkmrk-field-description-co"><thead><tr><th>Field</th><th>Description</th></tr></thead><tbody><tr><td>**Contract Date**</td><td>Can still be changed here.</td></tr><tr><td>**Select Payment**</td><td>Payment plan can still be changed here — **last chance before locking**.</td></tr><tr><td>**Select Facilities**</td><td>Choose which facilities to add to this unit's sale (e.g., Garage, Parking). For each selected facility, choose how to merge its cost into the payment plan:  
</td></tr></tbody></table>

**Facility merge options:**

<table id="bkmrk-option-description-m"><thead><tr><th>Option</th><th>Description</th></tr></thead><tbody><tr><td>**Merge Facility on Payment Plan with Down Payment**</td><td>Facility cost is split across ALL installments including the down payment.</td></tr><tr><td>**Merge Facility on Payment Plan without Down Payment**</td><td>Facility cost is split across all installments EXCEPT the down payment.</td></tr><tr><td>**No selection**</td><td>Facility appears as a standalone separate installment on its own.</td></tr></tbody></table>

### [![image.png](https://knowledge-base.profitcrm.net/uploads/images/gallery/2026-06/scaled-1680-/MbRimage.png)](https://knowledge-base.profitcrm.net/uploads/images/gallery/2026-06/MbRimage.png)

### Payments Section

The full payment schedule appears below the form — you can review all installments before confirming.

### Actions

<table id="bkmrk-button-description-c-3"><thead><tr><th>Button</th><th>Description</th></tr></thead><tbody><tr><td>**Confirm &amp; Move to Down Payment**</td><td>Moves to Down Payment. Finance gets a notification. facilities are now **locked**.</td></tr><tr><td>**Discard Confirm Reservation**</td><td>Steps back to Reservation.</td></tr><tr><td>**Download Reservation Form**</td><td>Download reservation form.</td></tr><tr><td>**View Payment Details**</td><td>Shows only the **Reservation Fees** installment at this stage.</td></tr><tr><td>**Edit Payments**</td><td>Modify payment plan — **last chance**. Only the **Reservation Fees** installment is visible in the payments section at this step.</td></tr><tr><td>**Print Multiple Invoices**</td><td>Print invoices for Reservation fees.

[![image.png](https://knowledge-base.profitcrm.net/uploads/images/gallery/2026-06/scaled-1680-/ymGimage.png)](https://knowledge-base.profitcrm.net/uploads/images/gallery/2026-06/ymGimage.png)

</td></tr></tbody></table>

> ⚠️ After confirming and moving to Down Payment, the **facilities cannot be changed** — the facility selection disappears from this point on. The payment plan can still be changed in the Down Payment step. Only paying option, date, cheque number, bank, and notes can be edited on individual installments from the Contract step onwards.

> 💡 To print a receipt for a payment: click **View Payment Details** → find the payment row → click **Receipt**.

> 💡 To add custom fields to the receipt, go to **Setup → Fields Setup → edit a field → set Receipt to True**.

---

## Step 5 — Down Payment

**Who does it:** Finance Team

The down payment phase begins. Finance collects the down payment installment.

> ⚠️ **This is the last step where you can change the payment plan.** Once you confirm and move to Confirm Down Payment, the payment plan is locked and cannot be changed.

[![image.png](https://knowledge-base.profitcrm.net/uploads/images/gallery/2026-06/scaled-1680-/whuimage.png)](https://knowledge-base.profitcrm.net/uploads/images/gallery/2026-06/whuimage.png)

### Fields

<table id="bkmrk-field-description-re-1"><thead><tr><th>Field</th><th>Description</th></tr></thead><tbody><tr><td>**Refund Percentage**</td><td>Refund % applied if discarding.</td></tr><tr><td>**Contract Date**</td><td>Shown for reference — still editable at this stage.</td></tr><tr><td>**Select Payment**</td><td>Payment plan shown — can still be changed at this stage (but facilities are already locked).</td></tr></tbody></table>

### Payments Section

Only the **Down Payment** installment is visible at this stage — the full payment schedule (all installments) only becomes visible once the unit reaches the **Contract** step.

### Actions

<table id="bkmrk-button-description-e"><thead><tr><th>Button</th><th>Description</th></tr></thead><tbody><tr><td>**Edit Payments**</td><td>Modify paying option, date, cheque/bank details on individual installments.</td></tr><tr><td>**View Payment Details**</td><td>Shows only the **Down Payment** installment at this stage.</td></tr><tr><td>**Add Payment**</td><td>Add an extra payment not in the original plan. Fields: Payment Date, Type, Amount, Count, Duration per month. Example: client bought a semi-finished unit and later wants fully finished — the price difference is added here as a new payment.</td></tr><tr><td>**Permanent Refund**</td><td>Initiate a full permanent refund. Enter: Amount (% to refund from total paid) and Type. Click Refund. The unit returns to **Available** or **Hidden** depending on the **Return Refunded and Discarded Units to Hide** setting in Finance Settings.</td></tr><tr><td>**Discard Down Payment**</td><td>Steps back to Confirm Reservation.</td></tr><tr><td>**Print Multiple Invoices**</td><td>Print invoices for Down payment.

[![image.png](https://knowledge-base.profitcrm.net/uploads/images/gallery/2026-06/scaled-1680-/Tmwimage.png)](https://knowledge-base.profitcrm.net/uploads/images/gallery/2026-06/Tmwimage.png)

</td></tr></tbody></table>

> 💡 A **Finance notification** is triggered when the unit first enters this step.

---

## Step 6 — Confirm Down Payment

**Who does it:** Finance Team

Finance confirms the down payment has been received. The contract template is selected here.

[![image.png](https://knowledge-base.profitcrm.net/uploads/images/gallery/2026-06/scaled-1680-/9ktimage.png)](https://knowledge-base.profitcrm.net/uploads/images/gallery/2026-06/9ktimage.png)

### Fields

<table id="bkmrk-field-description-co-1"><thead><tr><th>Field</th><th>Description</th></tr></thead><tbody><tr><td>**Contract Date**</td><td>Shown for reference.</td></tr><tr><td>**Unit Maintenance**</td><td>Maintenance fees and schedule are shown here.</td></tr><tr><td>**Broker**</td><td>Broker associated with this sale.</td></tr><tr><td>**Select Contract**</td><td>Choose which contract template to use (from **Setup → Global Contracts**).</td></tr></tbody></table>

### Actions

<table id="bkmrk-button-description-c-4"><thead><tr><th>Button</th><th>Description</th></tr></thead><tbody><tr><td>**Confirm &amp; Move to Contract**</td><td>Moves to Contract step.</td></tr><tr><td>**Discard Confirm Down Payment**</td><td>Steps back to Down Payment.</td></tr><tr><td>**Permanent Refund**</td><td>Full permanent refund option.</td></tr><tr><td>**Add Payment**</td><td>Add extra payment.</td></tr><tr><td>**View Payment Details**</td><td>Shows only the **Down Payment** installment at this stage.

</td></tr><tr><td>**Edit Payments**</td><td>Limited editing only — only the **Down Payment** installment is visible at this step.</td></tr></tbody></table>

---

## Step 7 — Contract

**Who does it:** Finance Team

The contract is active. This is the main payment collection stage — the finance team collects installments as they come due throughout the entire contract duration.

### Top Bar

Shows: **Total Paid** | **Total Remaining** | **Total Amount** — color-coded for quick visibility.

[![image.png](https://knowledge-base.profitcrm.net/uploads/images/gallery/2026-06/scaled-1680-/rgQimage.png)](https://knowledge-base.profitcrm.net/uploads/images/gallery/2026-06/rgQimage.png)

### Payment Row Colors

<table id="bkmrk-color-meaning-teal-%28"><thead><tr><th>Color</th><th>Meaning</th></tr></thead><tbody><tr><td>**Teal (collected)**</td><td>Payment has been collected — Export button available.</td></tr><tr><td>**Pink/Red (delayed)**</td><td>Due date passed, not yet paid — PAY, ATTACH, Update Payment Status available.</td></tr><tr><td>**White (upcoming)**</td><td>Future installment not yet due — PAY, ATTACH available.</td></tr></tbody></table>

> 💡 Payments shown in **red/pink** = delayed. Finance should follow up on these.

### Collecting a Payment (PAY)

Click **PAY** on any installment row. The Pay screen shows:

<table id="bkmrk-field-description-pa" style="width:100%;height:338.292px;"><thead><tr style="height:30.125px;"><th style="width:11.5624%;height:30.125px;">Field</th><th style="width:88.4774%;height:30.125px;">Description</th></tr></thead><tbody><tr style="height:30.125px;"><td style="width:11.5624%;height:30.125px;">**Pay**</td><td style="width:88.4774%;height:30.125px;">Full payment (default).</td></tr><tr style="height:46.9167px;"><td style="width:11.5624%;height:46.9167px;">**Pay Partially**</td><td style="width:88.4774%;height:46.9167px;">Enable to collect a partial amount. Enter the amount. You can add multiple partial payments using **Add Payment** — each with its own date and amount.</td></tr><tr style="height:30.125px;"><td style="width:11.5624%;height:30.125px;">**Total**</td><td style="width:88.4774%;height:30.125px;">Total being collected.</td></tr><tr style="height:30.125px;"><td style="width:11.5624%;height:30.125px;">**Diff**</td><td style="width:88.4774%;height:30.125px;">The difference between installment amount and what's being collected.</td></tr><tr style="height:46.9167px;"><td style="width:11.5624%;height:46.9167px;">**Is Penalty or client benefit**</td><td style="width:88.4774%;height:46.9167px;">Check this if the Diff should be recorded as a **penalty** — it moves to the Penalties tab. If unchecked, the Diff is recorded as a **client benefit** — it moves to the Client Benefits tab.</td></tr><tr style="height:30.125px;"><td style="width:11.5624%;height:30.125px;">**Note**</td><td style="width:88.4774%;height:30.125px;">Free text note.</td></tr><tr style="height:46.9167px;"><td style="width:11.5624%;height:46.9167px;">**Paying Options**</td><td style="width:88.4774%;height:46.9167px;">Payment method (Cheque, Cash, Transfer, Deposit, etc.). Configured in Finance Settings → Paying Options.</td></tr><tr style="height:46.9167px;"><td style="width:11.5624%;height:46.9167px;">**Collection Date**</td><td style="width:88.4774%;height:46.9167px;">The actual date the payment was physically received — different from the logging date. Example: client gave a cheque on Thursday at 6PM but bank is closed, you'll process it Sunday. Set Collection Date to Thursday.</td></tr></tbody></table>

[![image.png](https://knowledge-base.profitcrm.net/uploads/images/gallery/2026-06/scaled-1680-/qoWimage.png)](https://knowledge-base.profitcrm.net/uploads/images/gallery/2026-06/qoWimage.png)

### Actions

<table id="bkmrk-button-description-p" style="width:100%;"><thead><tr><th style="width:15.7359%;">Button</th><th style="width:84.3039%;">Description</th></tr></thead><tbody><tr><td style="width:15.7359%;">**PAY**</td><td style="width:84.3039%;">Collect an installment.</td></tr><tr><td style="width:15.7359%;">**ATTACH**</td><td style="width:84.3039%;">Upload a document for a specific payment (e.g., cheque scan, transfer receipt).</td></tr><tr><td style="width:15.7359%;">**EXPORT**</td><td style="width:84.3039%;">Export collected payments.</td></tr><tr><td style="width:15.7359%;">**Update Payment Status**</td><td style="width:84.3039%;">Set a status (e.g., "contacted", "in progress", "pending") and note on a pending payment. Statuses configured in Finance Settings → Late Payment Status.</td></tr><tr><td style="width:15.7359%;">**Download Contract Form**</td><td style="width:84.3039%;">Download the signed contract document.</td></tr><tr><td style="width:15.7359%;">**Add Facilities**</td><td style="width:84.3039%;">Add a new facility after contract stage. Example: client bought without a garage then decided they want one — add it here. The facility's installments are automatically added to the payment plan. [![image.png](https://knowledge-base.profitcrm.net/uploads/images/gallery/2026-06/scaled-1680-/W5Vimage.png)](https://knowledge-base.profitcrm.net/uploads/images/gallery/2026-06/W5Vimage.png)
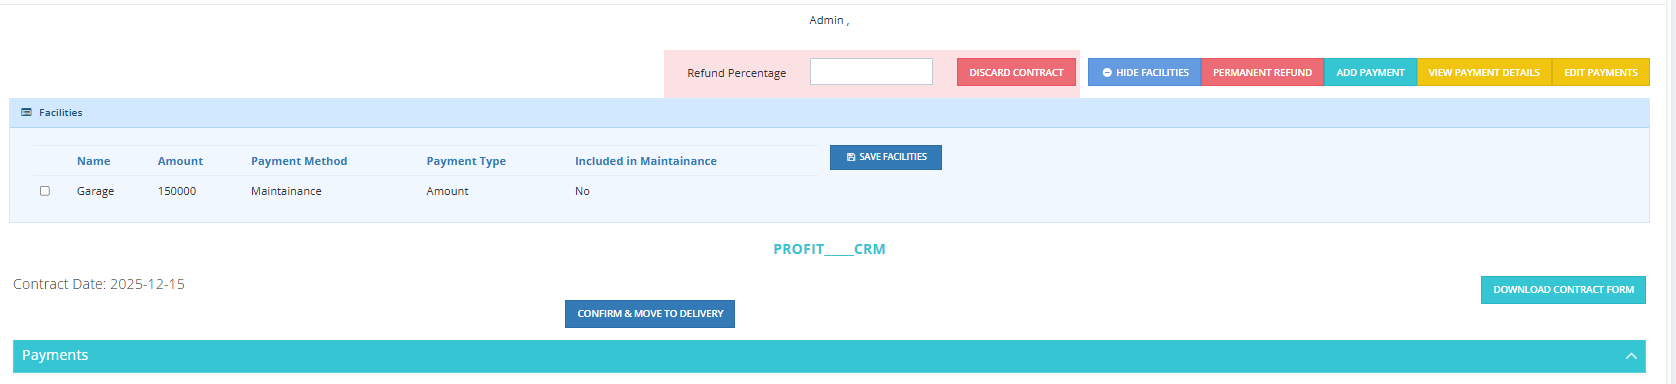
</td></tr><tr><td style="width:15.7359%;">**Add Payment**</td><td style="width:84.3039%;">Add an extra payment to the plan.

[![image.png](https://knowledge-base.profitcrm.net/uploads/images/gallery/2026-06/scaled-1680-/Gmtimage.png)](https://knowledge-base.profitcrm.net/uploads/images/gallery/2026-06/Gmtimage.png)

</td></tr><tr><td style="width:15.7359%;">**Permanent Refund**</td><td style="width:84.3039%;">Full permanent refund — returns unit to available or hidden.

[![image.png](https://knowledge-base.profitcrm.net/uploads/images/gallery/2026-06/scaled-1680-/EYrimage.png)](https://knowledge-base.profitcrm.net/uploads/images/gallery/2026-06/EYrimage.png)

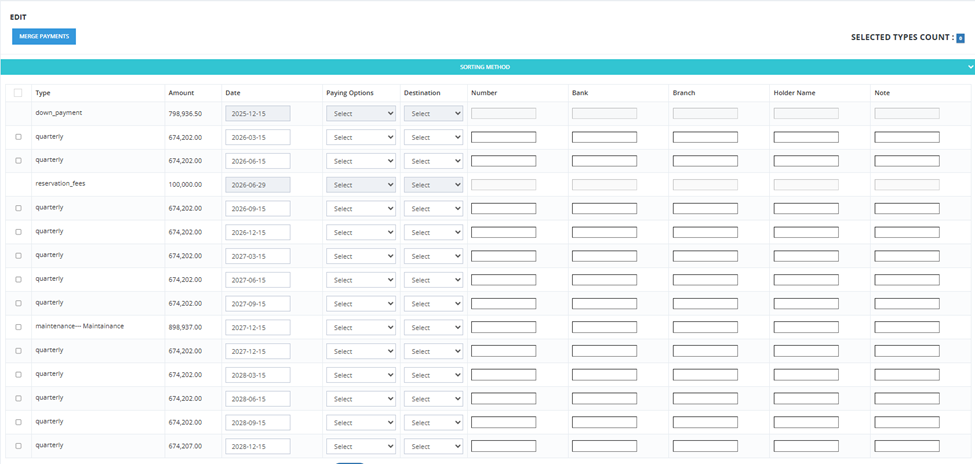
</td></tr><tr><td style="width:15.7359%;">**View Payment Details**</td><td style="width:84.3039%;">Full payment schedule — click Receipt on any collected payment to print its receipt.</td></tr><tr><td style="width:15.7359%;">**Edit Payments**</td><td style="width:84.3039%;">Limited editing — paying option, date, cheque/bank/branch/holder name/note only. **Merge Payments** button available to merge selected installments of the same type.

[![image.png](https://knowledge-base.profitcrm.net/uploads/images/gallery/2026-06/scaled-1680-/Nx6image.png)](https://knowledge-base.profitcrm.net/uploads/images/gallery/2026-06/Nx6image.png)
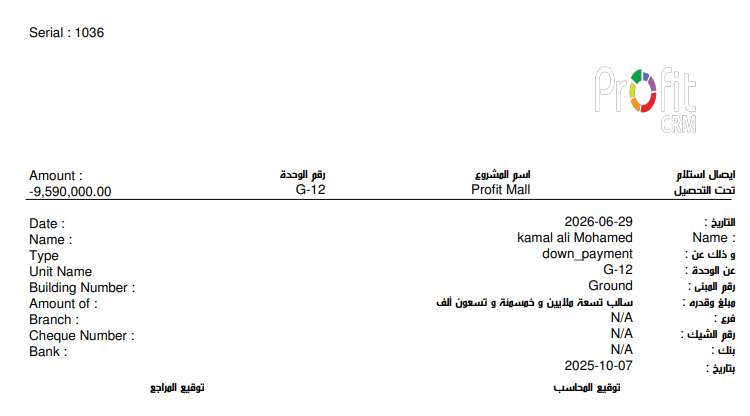
</td></tr><tr><td style="width:15.7359%;">**Discard Contract**</td><td style="width:84.3039%;">Steps back to Confirm Down Payment.</td></tr><tr><td style="width:15.7359%;">**Print Multiple Invoices**</td><td style="width:84.3039%;">Print invoices for multiple selected payments at once.</td></tr></tbody></table>

---

## Step 8 — Delivery

**Who does it:** Finance Team

The unit has been delivered to the client. This is the final stage. Any remaining installments continue to be collected normally from this screen.

### Top Bar

Shows: **Total Paid** | **Total Remaining** | **Total Amount**.

[![image.png](https://knowledge-base.profitcrm.net/uploads/images/gallery/2026-06/scaled-1680-/C8pimage.png)](https://knowledge-base.profitcrm.net/uploads/images/gallery/2026-06/C8pimage.png)

### Available Actions

Same as Contract step — PAY, ATTACH, EXPORT, Update Payment Status, Edit Payments, View Payment Details, Print Multiple Invoices.

<table id="bkmrk-button-description-d"><thead><tr><th>Button</th><th>Description</th></tr></thead><tbody><tr><td>**Discard Delivery**</td><td>Steps back to Contract.</td></tr></tbody></table>

> 💡 After Delivery, the client has officially received their unit. The finance team continues to collect any remaining installments from this screen exactly as they did in the Contract step.

---

## Key Notes Across All Steps

- **Print Multiple Invoices** — Available from Confirm Reservation onwards.
- **Total Paid counter** — Always visible at the top right showing cumulative collected amount.
- **Unit Salesman** — Shown at the top of every step page.
- **Pipeline Progress Bar** — Shows all 8 steps at the top with a count of units at each stage — click any step to jump to it.
- **Red/Pink payments** = delayed installments that need follow-up.

# Finance Settings

## Overview

Finance Settings controls all financial rules — delay periods, penalties, notifications, payment options, and more.

---

## Settings Reference

<table id="bkmrk-setting-description-"><thead><tr><th>Setting</th><th>Description</th></tr></thead><tbody><tr><td>**Notify On Which Unit Steps**</td><td>Select which unit pipeline steps trigger a finance notification (e.g., Confirm Reservation, Down Payment).</td></tr><tr><td>**Notify On Selected Unit Steps After (in days)**</td><td>How many days after reaching a step before the notification is sent.</td></tr><tr><td>**Currency**</td><td>Set the system currency (e.g., EGP, USD).</td></tr><tr><td>**Paying Options**</td><td>Add the payment methods available in the system (e.g., Cheque, Cash, Deposit, Transfer). These appear in the Pay screen and Edit Payments.</td></tr><tr><td>**Paying Destination**</td><td>Add bank accounts or destinations (e.g., CIB, NBE). These appear in the Destination dropdown in Edit Payments.</td></tr><tr><td>**Late Payment Status**</td><td>Add custom status labels for overdue payments (e.g., "contacted", "in progress", "pending"). Used in the Update Payment Status section.</td></tr><tr><td>**Selected Unit Steps To Notify - SMS Content**</td><td>The SMS template sent to clients when a unit step notification fires. Supports placeholders: `[delayed step]`, `[number of days]`, `[units names]`.</td></tr><tr><td>**Number To Words**</td><td>Select the language for converting amounts to words on receipts and invoices. Two Arabic types available.</td></tr><tr><td>**Delay Payment Grace Period (In Days)**</td><td>Number of days after a payment's due date before it moves to Delayed Payments.</td></tr><tr><td>**Delay Payment Fees ON/OFF**</td><td>When ON, automatically calculates a penalty on delayed payments.</td></tr><tr><td>**Delay Payment Fees Percentage %**</td><td>The penalty percentage calculated from the delayed installment amount.</td></tr><tr><td>**Remind Client with payment before (days)**</td><td>Number of days before a payment is due to send a reminder notification to the client.</td></tr><tr><td>**Notify Payments**</td><td>When ON, sends payment notifications only to users who have payment permission.</td></tr><tr><td>**Extra Delay Payment ON/OFF**</td><td>When ON, enables the extra delay period and Extra Delayed Payments tab.</td></tr><tr><td>**Extra Delay Payment Timer**</td><td>Number of days after the regular delay grace period before an installment moves to Extra Delayed Payments.</td></tr><tr><td>**Hide Units Section On Client Profile**</td><td>When ON, hides the units section from the client's profile view.</td></tr><tr><td>**Return Refunded and Discarded Units to Hide**</td><td>When ON, units returned after a permanent refund go to Hidden status instead of Available.</td></tr><tr><td>**Invoice Additional Note**</td><td>Custom text added to the bottom of all invoices/receipts.</td></tr><tr><td>**Payments Export Validation Hour (In Hours)**</td><td>The time window (in hours) during which a payment export can be validated.</td></tr></tbody></table>