Unit Sales Pipeline
Overview
The Unit Sales Pipeline tracks a unit from the moment it's shown to a client all the way through to delivery. Each step must be completed in order before moving to the next.
Show → Hold → Reservation → Confirm Reservation → Down Payment → Confirm Down Payment → Contract → Delivery
At the top of each unit's page, you can see all 8 steps with a counter showing how many units are at each stage.
Step 1 — Show
Who does it: Salesman
The salesman shows the unit to a client using the View to Client button in the Units tab. Multiple salesmen can show the same unit to multiple clients simultaneously — this step does not reserve the unit for anyone yet.

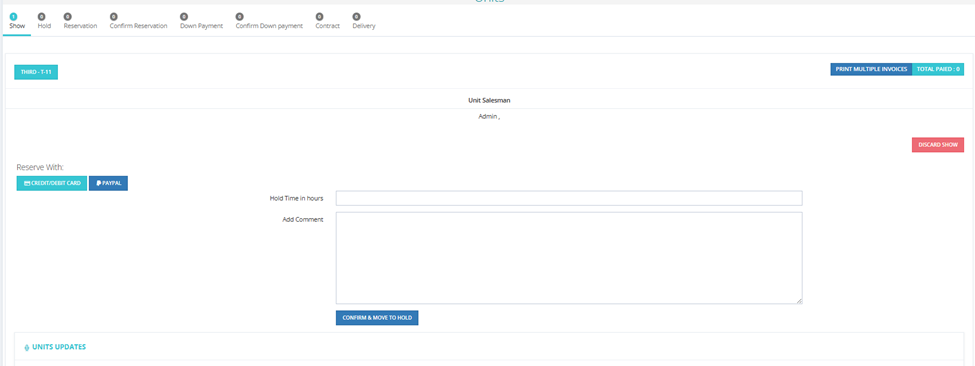
Fields
| Field | Description |
|---|---|
| Client | Select the client to show the unit to. |
| Reserve With | Optional online payment option (Credit/Debit Card or PayPal) if configured. |
| Hold Time in Hours | Override the default hold timer for this specific show. |
| Add Comment | Optional note. |
Actions
| Button | Description |
|---|---|
| Confirm & Move to Hold | Moves the unit to the Hold step for this client. |
| Discard Show | Cancels the show — unit goes back to available. |
💡 Once any salesman confirms a hold on a unit, it disappears from all other clients' show views automatically.
Step 2 — Hold
Who does it: Salesman / Operations
The client has confirmed interest — the unit is temporarily reserved. The salesman fills in the sale details here.
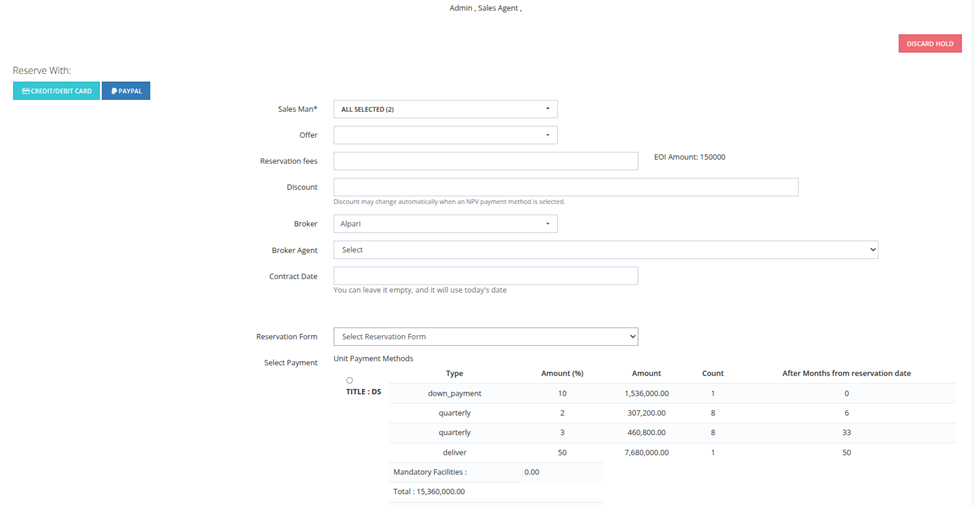
Fields
| Field | Required | Description |
|---|---|---|
| Salesman | ✅ | The salesman(s) responsible for this sale. |
| Offer | Optional | Select a promotional offer to apply — only active offers (within their date range) appear here. Configured in Financial Module → Manage Offers. |
| Reservation Fees | ✅ | Amount paid as reservation fee. Enter 0 if no fee applies. If Allow Select Reservation Fees Values is ON in Finance Settings, this becomes a dropdown with pre-configured values. |
| EOI Amount | — | If an EOI was previously submitted for this unit, the EOI amount is shown automatically here. |
| Discount | Optional | Discount percentage. Limited by the salesman's role discount limit (see Manage Discount). Note: "Discount may change automatically when an NPV payment method is selected." |
| Broker | Optional | Select the broker if this sale came through a broker. |
| Broker Agent | Optional | Select the broker's agent. |
| Contract Date | Optional | Can be left empty — system will use today's date. |
| Reservation Form | ✅ | Choose which Reservation template to use (from Setup → Global Contracts). |
| Select Payment | ✅ | Choose the payment plan for this unit. All available plans from all levels (Global, Project, Building Segment, Unit) are shown. Select one using the radio button. Each plan shows: Type breakdown, Amount %, calculated Amount, Count (number of installments), After Months from reservation date, Mandatory Facilities total, Total unit price, Total Maintenance. |
| Reserve With | Optional | Online payment option (Credit/Debit Card, PayPal). |
Actions
| Button | Description |
|---|---|
| Confirm & Move to Reservation | Moves the unit to Reservation. A notification is automatically sent to Finance to check if reservation fees were collected. |
| Discard Hold | Cancels the hold — unit goes back to available. |
Step 3 — Reservation
Who does it: Finance Team
Finance reviews the reservation and verifies that fees have been received.
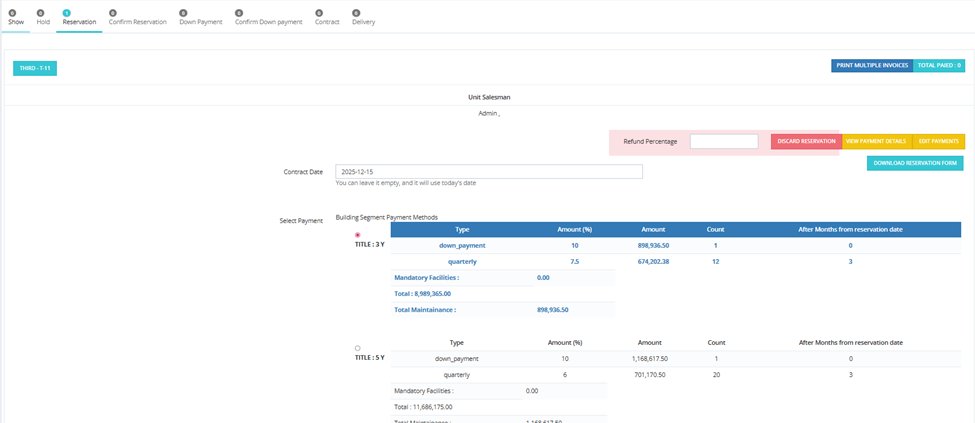
Fields
| Field | Description |
|---|---|
| Refund Percentage | If discarding the reservation, enter the refund % to return to the client. |
| Contract Date | Can still be changed at this stage. |
| Select Payment | Payment plan can still be changed at this stage. |
Actions
| Button | Description |
|---|---|
| Confirm & Move to Confirm Reservation | Moves to the next step after verifying fees are collected. |
| Discard Reservation | Cancels — unit returns to available. Refund percentage applies if fees were paid. |
| Download Reservation Form | Download the reservation form. |
| View Payment Details | Shows only the Reservation Fees installment at this stage.
|
| Edit Payments | Modify payment plan — still editable at this stage. Only the Reservation Fees installment is visible in the payments section at this step.
|
| Print Multiple Invoices | Print invoices for Reservation fees.
|


Step 4 — Confirm Reservation
Who does it: Finance Team
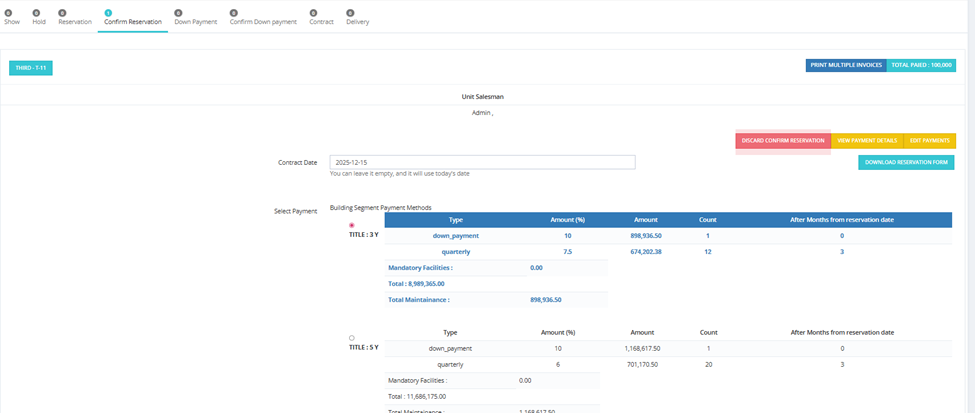
Finance confirms that reservation fees have been fully received. This is the last step where the payment plan and facilities can be changed.
Fields
| Field | Description |
|---|---|
| Contract Date | Can still be changed here. |
| Select Payment | Payment plan can still be changed here — last chance before locking. |
| Select Facilities | Choose which facilities to add to this unit's sale (e.g., Garage, Parking). For each selected facility, choose how to merge its cost into the payment plan: |
Facility merge options:
| Option | Description |
|---|---|
| Merge Facility on Payment Plan with Down Payment | Facility cost is split across ALL installments including the down payment. |
| Merge Facility on Payment Plan without Down Payment | Facility cost is split across all installments EXCEPT the down payment. |
| No selection | Facility appears as a standalone separate installment on its own. |

Payments Section
The full payment schedule appears below the form — you can review all installments before confirming.
Actions
| Button | Description |
|---|---|
| Confirm & Move to Down Payment | Moves to Down Payment. Finance gets a notification. facilities are now locked. |
| Discard Confirm Reservation | Steps back to Reservation. |
| Download Reservation Form | Download reservation form. |
| View Payment Details | Shows only the Reservation Fees installment at this stage. |
| Edit Payments | Modify payment plan — last chance. Only the Reservation Fees installment is visible in the payments section at this step. |
| Print Multiple Invoices |
Print invoices for Reservation fees.
|
⚠️ After confirming and moving to Down Payment, the facilities cannot be changed — the facility selection disappears from this point on. The payment plan can still be changed in the Down Payment step. Only paying option, date, cheque number, bank, and notes can be edited on individual installments from the Contract step onwards.
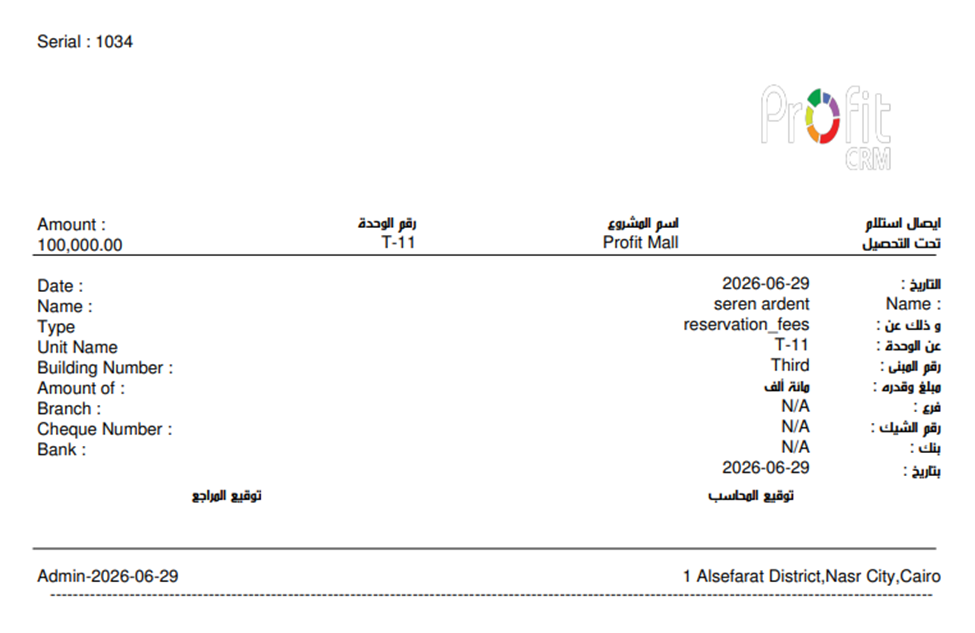
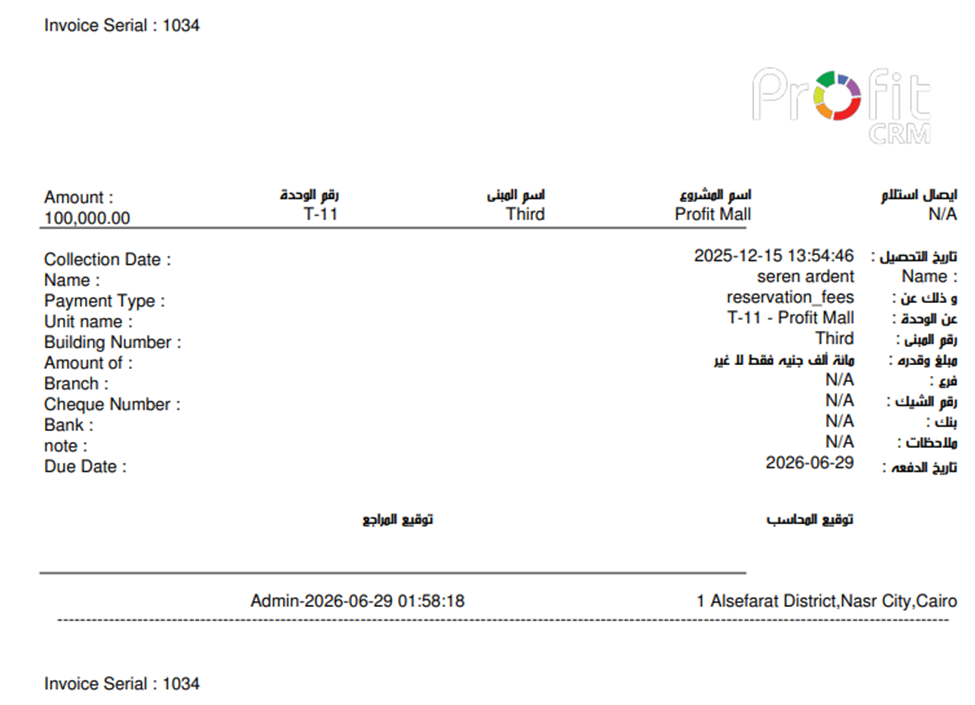
💡 To print a receipt for a payment: click View Payment Details → find the payment row → click Receipt.
💡 To add custom fields to the receipt, go to Setup → Fields Setup → edit a field → set Receipt to True.
Step 5 — Down Payment
Who does it: Finance Team
The down payment phase begins. Finance collects the down payment installment.
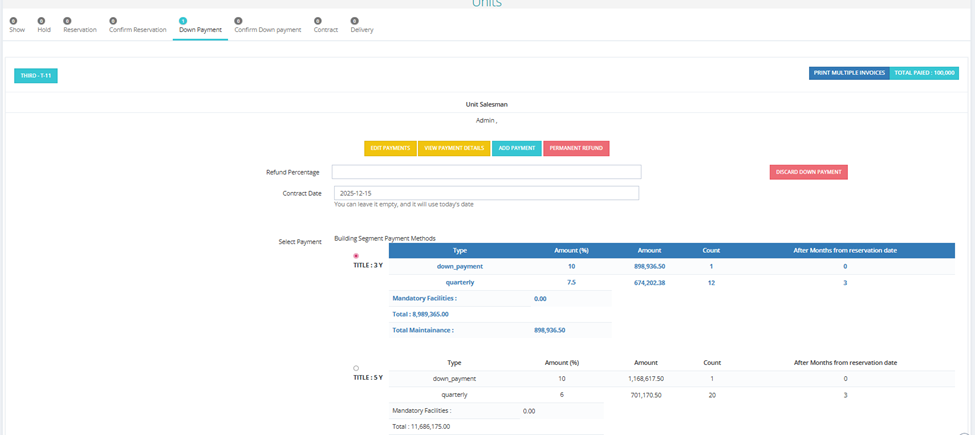
⚠️ This is the last step where you can change the payment plan. Once you confirm and move to Confirm Down Payment, the payment plan is locked and cannot be changed.
Fields
| Field | Description |
|---|---|
| Refund Percentage | Refund % applied if discarding. |
| Contract Date | Shown for reference — still editable at this stage. |
| Select Payment | Payment plan shown — can still be changed at this stage (but facilities are already locked). |
Payments Section
Only the Down Payment installment is visible at this stage — the full payment schedule (all installments) only becomes visible once the unit reaches the Contract step.
Actions
| Button | Description |
|---|---|
| Edit Payments | Modify paying option, date, cheque/bank details on individual installments. |
| View Payment Details | Shows only the Down Payment installment at this stage. |
| Add Payment | Add an extra payment not in the original plan. Fields: Payment Date, Type, Amount, Count, Duration per month. Example: client bought a semi-finished unit and later wants fully finished — the price difference is added here as a new payment. |
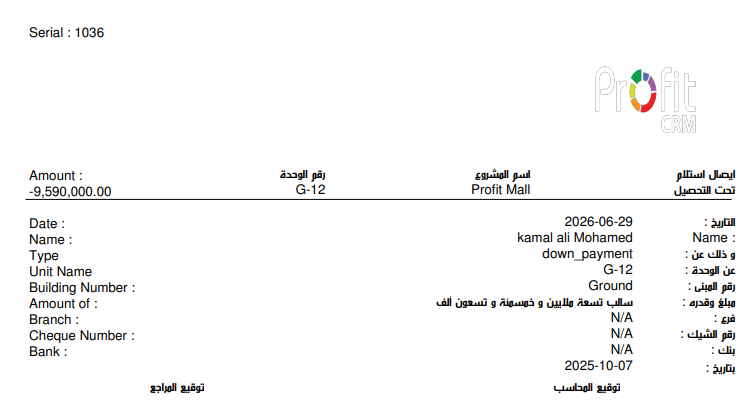
| Permanent Refund | Initiate a full permanent refund. Enter: Amount (% to refund from total paid) and Type. Click Refund. The unit returns to Available or Hidden depending on the Return Refunded and Discarded Units to Hide setting in Finance Settings. |
| Discard Down Payment | Steps back to Confirm Reservation. |
| Print Multiple Invoices |
Print invoices for Down payment.
|
💡 A Finance notification is triggered when the unit first enters this step.
Step 6 — Confirm Down Payment
Who does it: Finance Team
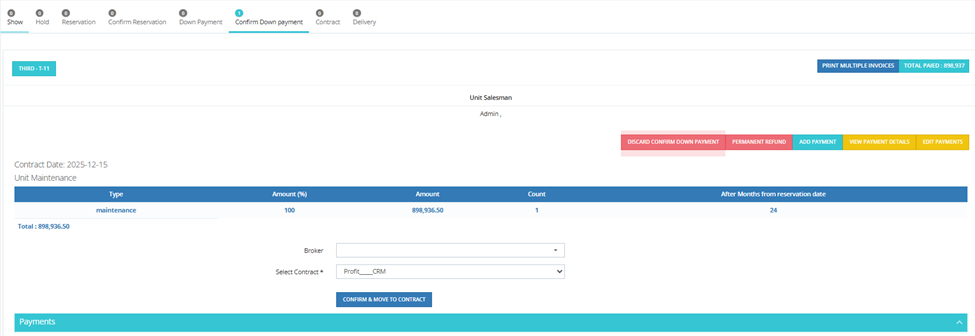
Finance confirms the down payment has been received. The contract template is selected here.
Fields
| Field | Description |
|---|---|
| Contract Date | Shown for reference. |
| Unit Maintenance | Maintenance fees and schedule are shown here. |
| Broker | Broker associated with this sale. |
| Select Contract | Choose which contract template to use (from Setup → Global Contracts). |
Actions
| Button | Description |
|---|---|
| Confirm & Move to Contract | Moves to Contract step. |
| Discard Confirm Down Payment | Steps back to Down Payment. |
| Permanent Refund | Full permanent refund option. |
| Add Payment | Add extra payment. |
| View Payment Details |
Shows only the Down Payment installment at this stage.
|
| Edit Payments | Limited editing only — only the Down Payment installment is visible at this step. |
Step 7 — Contract
Who does it: Finance Team
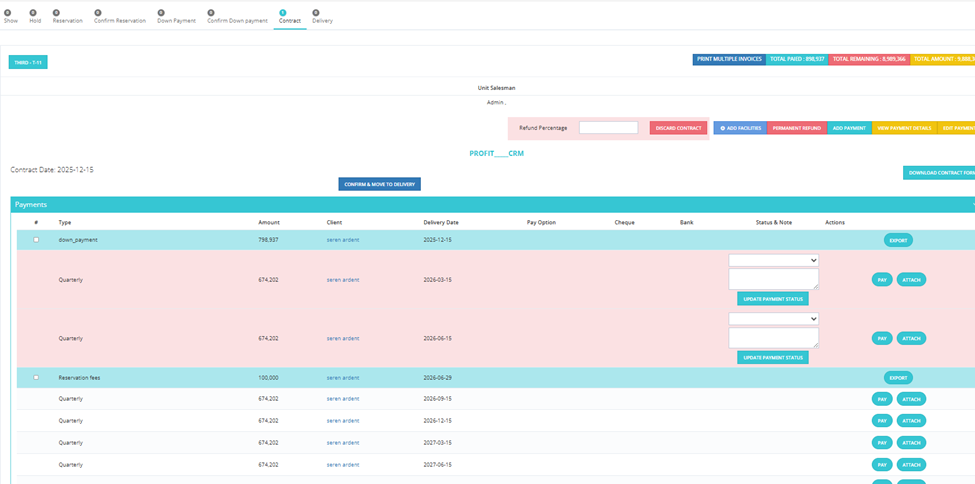
The contract is active. This is the main payment collection stage — the finance team collects installments as they come due throughout the entire contract duration.
Top Bar
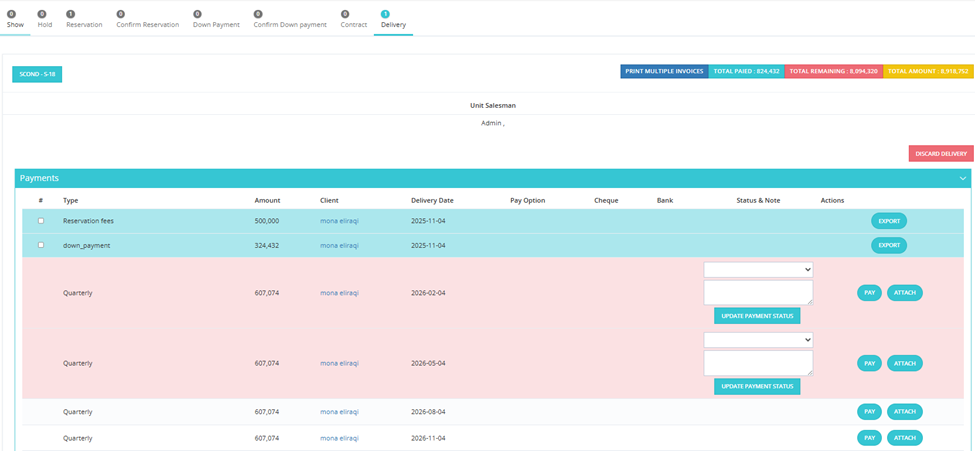
Shows: Total Paid | Total Remaining | Total Amount — color-coded for quick visibility.
Payment Row Colors
| Color | Meaning |
|---|---|
| Teal (collected) | Payment has been collected — Export button available. |
| Pink/Red (delayed) | Due date passed, not yet paid — PAY, ATTACH, Update Payment Status available. |
| White (upcoming) | Future installment not yet due — PAY, ATTACH available. |
💡 Payments shown in red/pink = delayed. Finance should follow up on these.
Collecting a Payment (PAY)
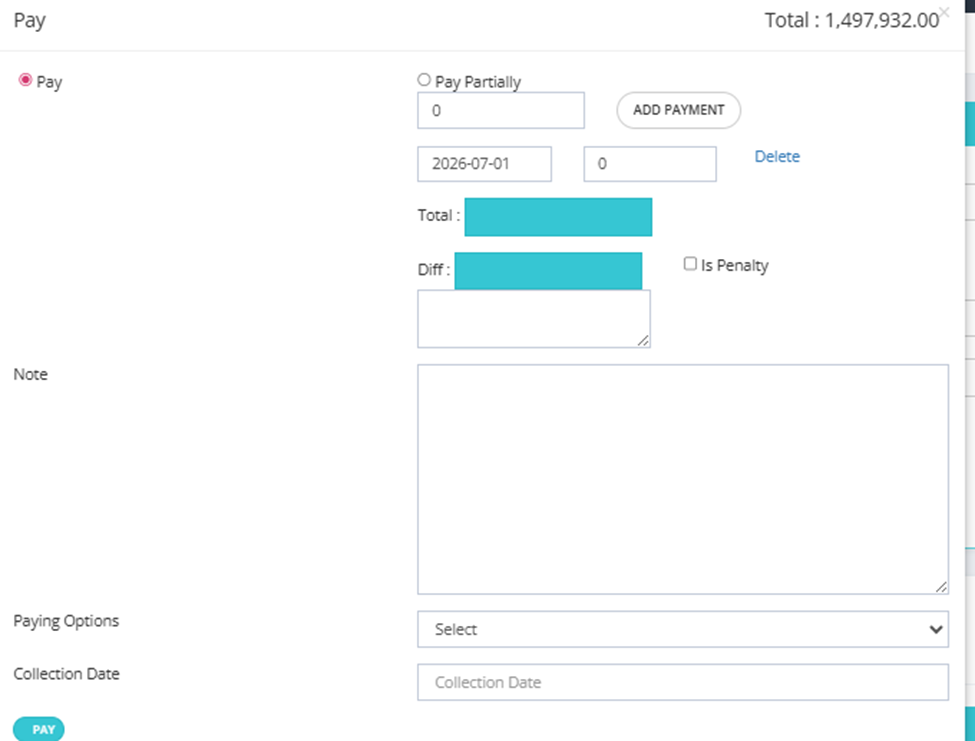
Click PAY on any installment row. The Pay screen shows:
| Field | Description |
|---|---|
| Pay | Full payment (default). |
| Pay Partially | Enable to collect a partial amount. Enter the amount. You can add multiple partial payments using Add Payment — each with its own date and amount. |
| Total | Total being collected. |
| Diff | The difference between installment amount and what's being collected. |
| Is Penalty or client benefit | Check this if the Diff should be recorded as a penalty — it moves to the Penalties tab. If unchecked, the Diff is recorded as a client benefit — it moves to the Client Benefits tab. |
| Note | Free text note. |
| Paying Options | Payment method (Cheque, Cash, Transfer, Deposit, etc.). Configured in Finance Settings → Paying Options. |
| Collection Date | The actual date the payment was physically received — different from the logging date. Example: client gave a cheque on Thursday at 6PM but bank is closed, you'll process it Sunday. Set Collection Date to Thursday. |
Actions
| Button | Description |
|---|---|
| PAY | Collect an installment. |
| ATTACH | Upload a document for a specific payment (e.g., cheque scan, transfer receipt). |
| EXPORT | Export collected payments. |
| Update Payment Status | Set a status (e.g., "contacted", "in progress", "pending") and note on a pending payment. Statuses configured in Finance Settings → Late Payment Status. |
| Download Contract Form | Download the signed contract document. |
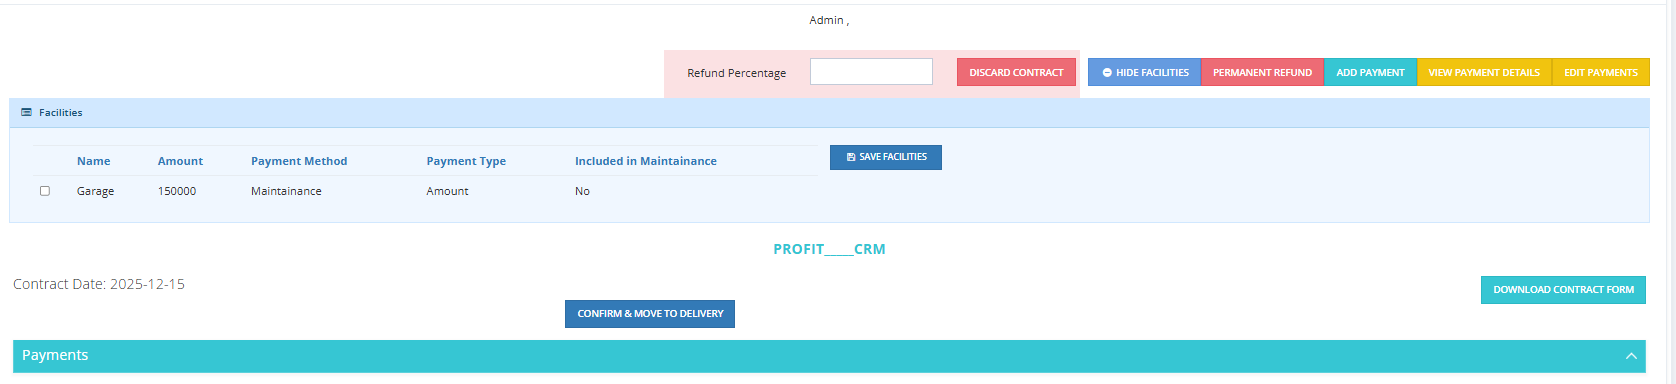
| Add Facilities | Add a new facility after contract stage. Example: client bought without a garage then decided they want one — add it here. The facility's installments are automatically added to the payment plan.
|
| Add Payment |
Add an extra payment to the plan.
|
| Permanent Refund |
Full permanent refund — returns unit to available or hidden.
|
| View Payment Details | Full payment schedule — click Receipt on any collected payment to print its receipt. |
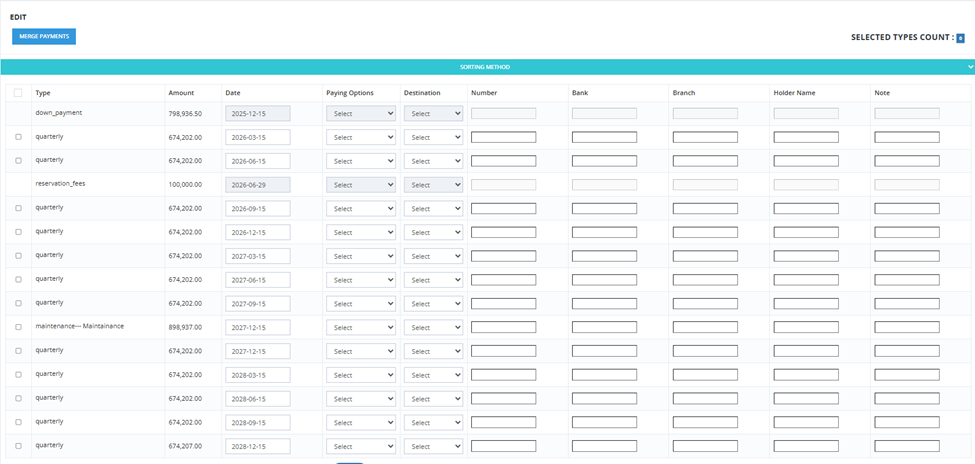
| Edit Payments |
Limited editing — paying option, date, cheque/bank/branch/holder name/note only. Merge Payments button available to merge selected installments of the same type.
|
| Discard Contract | Steps back to Confirm Down Payment. |
| Print Multiple Invoices | Print invoices for multiple selected payments at once. |


Step 8 — Delivery
Who does it: Finance Team
The unit has been delivered to the client. This is the final stage. Any remaining installments continue to be collected normally from this screen.
Top Bar
Shows: Total Paid | Total Remaining | Total Amount.
Available Actions
Same as Contract step — PAY, ATTACH, EXPORT, Update Payment Status, Edit Payments, View Payment Details, Print Multiple Invoices.
| Button | Description |
|---|---|
| Discard Delivery | Steps back to Contract. |
💡 After Delivery, the client has officially received their unit. The finance team continues to collect any remaining installments from this screen exactly as they did in the Contract step.
Key Notes Across All Steps
- Print Multiple Invoices — Available from Confirm Reservation onwards.
- Total Paid counter — Always visible at the top right showing cumulative collected amount.
- Unit Salesman — Shown at the top of every step page.
- Pipeline Progress Bar — Shows all 8 steps at the top with a count of units at each stage — click any step to jump to it.
- Red/Pink payments = delayed installments that need follow-up.