
Tickets
Overview
The Tickets screen is used to log and manage client support requests. Any issue a client faces — whether it's a payment delay request, a legal concern, a maintenance issue, or any other type of request — is created here as a ticket, then assigned to the relevant team member to handle and resolve.
💡 Examples of how tickets are used:
- A client wants to delay an installment payment → ticket created and assigned to a Finance team member.
- A client has a contract dispute → ticket assigned to the Legal team.
- A client has a maintenance complaint → ticket assigned to the relevant operations person.
What You See
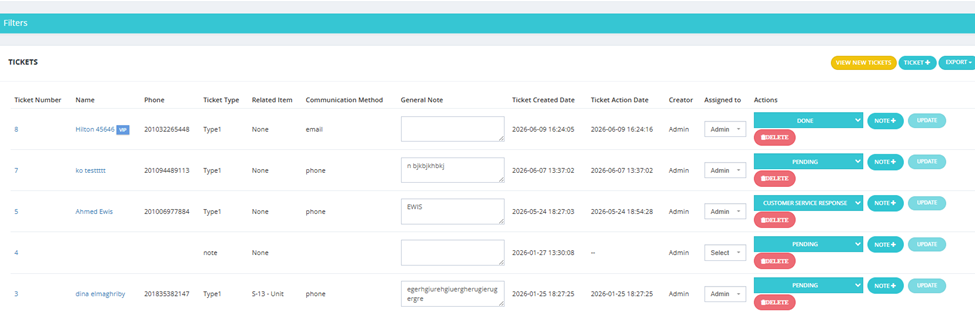
Each ticket row shows the following columns:
| Column | Description |
|---|---|
| Ticket Number | Unique identifier for the ticket. |
| Name | Client's name associated with the ticket. |
| Phone | Client's contact phone number. |
| Ticket Type | Category of the support request (configured in Customer Service Settings). |
| Related Item | The associated property, unit, or project, if any. |
| Communication Method | The client's preferred method of communication (e.g., Phone, Email). |
| General Note | A description of the issue or request. |
| Ticket Created Date | When the ticket was created. |
| Ticket Action Date | The date of the last activity or update on the ticket. |
| Creator | The user who created the ticket. |
| Assigned to | The team member responsible for handling this ticket. |
| Actions | Status dropdown, Note, Update, and Delete — see below. |
Actions on a Ticket
| Action | Description |
|---|---|
| Status dropdown | Change the ticket's current state (e.g., Pending, Done, Customer Service Response, Follow Up). |
| Note + | Add a note or update to the ticket log. |
| Update | Edit the ticket's details. |
| Delete | Remove the ticket. |
Available Actions (Top Bar)
| Button | Description |
|---|---|
| View New Tickets | Shows tickets that have not yet been assigned to any user — review and assign them to the appropriate team member. |
| Ticket + | Create a new ticket. |
| Export | Export the ticket list. |
💡 View New Tickets is the key starting point — any ticket that comes in without an assigned user lands here. From this view, you can assign each ticket to the right person so it gets handled.
Creating a New Ticket
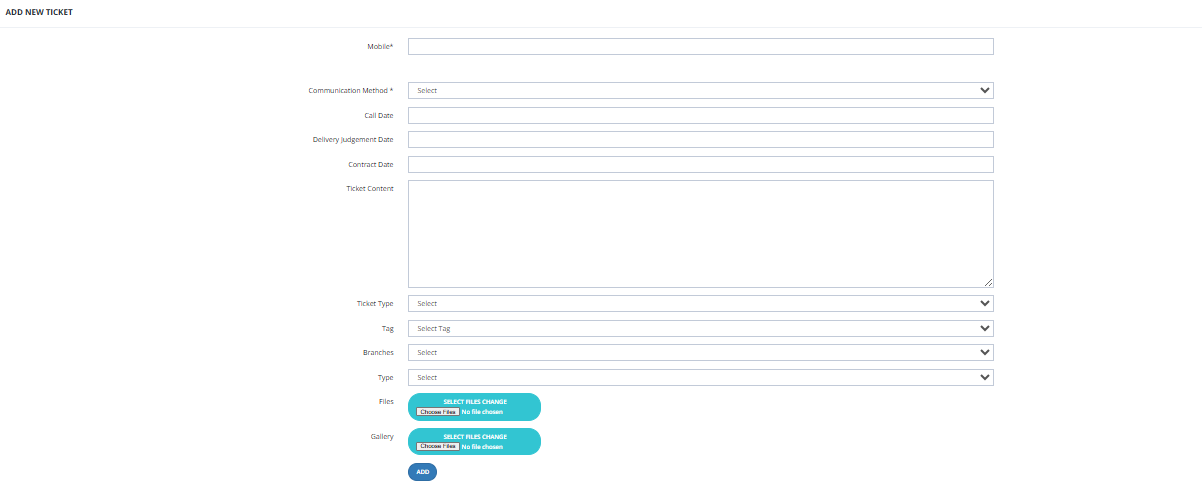
Click Ticket + to open the Add New Ticket form. Fill in the fields below, then click Add.
Fields
| Field | Required | Description |
|---|---|---|
| Mobile | ✅ | The client's mobile number. |
| Communication Method | ✅ | The client's preferred communication method (e.g., Phone, Email). |
| Call Date | Optional | The date the client was called or contacted. |
| Delivery Judgement Date | Optional | The agreed or expected delivery judgement date. |
| Contract Date | Optional | The client's contract date. |
| Ticket Content | Optional | Full description of the issue or request. |
| Ticket Type | ✅ | Category of the ticket (configured in Customer Service Settings → Ticket Types). |
| Tag | Optional | Tag to label the ticket. |
| Branches | Optional | The company branch this ticket is related to. |
| Type | Optional | Additional type classification. |
| Files | Optional | Attach supporting files. |
| Gallery | Optional | Attach images. |
Available Filters
| Filter | Description |
|---|---|
| Date | Filter by creation date (From / To). |
| Name | Search by client name. |
| Tag | Filter by tag. |
| User | Filter by assigned user. |
| Unit | Filter by related unit. |
| Condition | Filter by a condition. |
| Ticket Type | Filter by ticket category. |
| Ticket Number | Search by ticket number. |
| Project | Filter by project. |