
Broker CILs
Overview
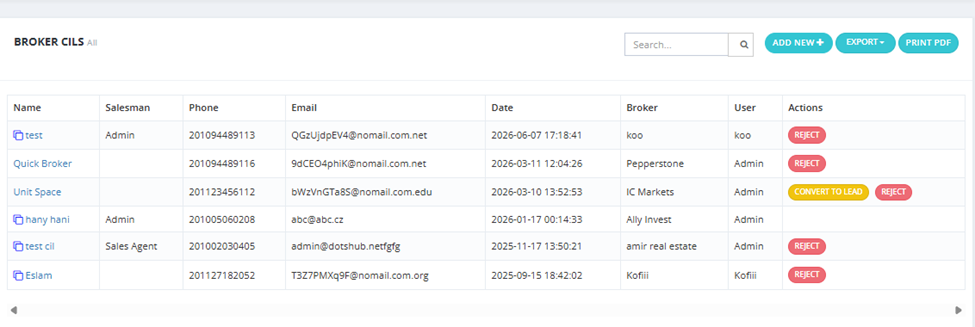
Broker CILs (Client Information Letters) are submitted by broker companies through their own CRM login. This tab shows all CILs received from brokers.
How It Works
- A broker company has a profile in the system and can log in to the CRM.
- They submit CILs for clients they are bringing to you.
- The CIL appears in this tab for review.
Broker CILs List
| Column | Description |
|---|---|
| Name | Client name on the CIL. |
| Salesman | Salesman assigned (if converted). |
| Phone | Client phone number. |
| Client email address. | |
| Date | Date the CIL was submitted. |
| Broker | The broker company that submitted the CIL. |
| User | The user who processed the CIL. |
| Actions | Convert to Lead or Reject. |
Converting a CIL to a Lead
- Review the CIL details.
- Click Convert to Lead.
- Select the salesman to assign the lead to.
- The salesman must be linked to the broker company — otherwise they won't appear in the dropdown.
- Confirm — the CIL becomes a lead in the salesman's pipeline.
⚠️ If the CIL shows Reject instead of Convert to Lead, it means the lead already exists in the system as a duplicate. Check the Duplicated Leads section.
Filters
| Filter | Description |
|---|---|
| Date | Filter by submission date (From / To). |
| Broker | Filter by broker company. |
| Broker Agents | Filter by specific broker agent. |
Adding Custom Fields to the CIL Form
- Go to Setup → Fields Setup.
- Click Add New.
- Set CIL option to True.
- Configure: Field Name, Data Type, Set as Unique if needed.
- Save — the field will appear on the CIL form.
Adding a CIL Manually
You can also add a CIL manually by clicking Add New in this tab and filling in the client details.