
Inventory Upload
Overview
The Inventory Upload section allows you to bulk import units via an Excel/CSV template, and to reprice existing units in bulk.
How to Access
Go to Setup → Inventory Upload.
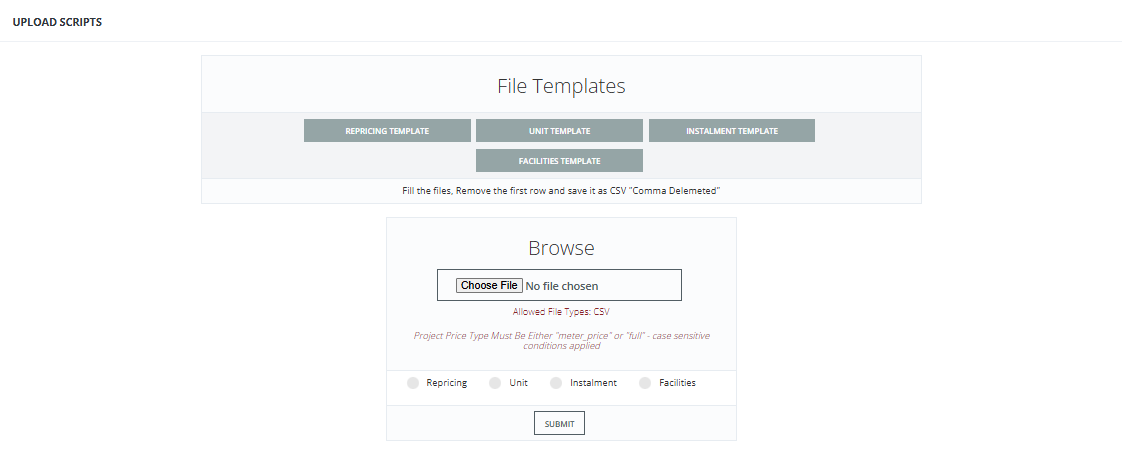
Two Templates Available
| Template | Purpose |
|---|---|
| Inventory Template | Bulk upload new units into the CRM. |
| Repricing Template | Update prices of existing project units in bulk — download, update the green columns only, delete first row, save as CSV UTF-8, and upload. Only affects available and hidden units. |
Before You Upload — Set Up Inventory Settings First
Before filling in the template, configure these values in Inventory Settings — the upload will fail if template values don't match exactly:
| Setting | Description | Example Values |
|---|---|---|
| Segment Positions | Position values used in the template. | Open Air, Sunny Side |
| Segment View | View values used in the template. | Pool View, Garden View, CityScape, Panorama, Pyramid View |
| Finishing | Finishing values used in the template. | Fully Finished, Core & Shell, Not Finished |
| Phase | Phase values used in the template. | Phase 1, Phase 2 |
| Unit's Contents | Room types (comma-separated). | Hall, Bedroom, Bathroom, Kitchen, Reception, Garage, Pool |
| Units Type | Unit types (comma-separated). | Villa, Twin, Apartment, Duplex, Roof, 1 Bedroom, 2 Bedroom |
| Units Code | Unit codes (comma-separated). | A, B, C |
| Additional Meter Prices | Extra meter names (comma-separated). | outdoor dining, garden, roof |
Inventory Template — Column Reference
| Column | Required | Notes |
|---|---|---|
| Unit Name | ✅ | Unit name. |
| Unit Floor | ✅ | Floor number or name. |
| Unit Price | ✅ | Unit price (full price or meter price depending on project type). |
| Unit Details | ✅ | Unit description. |
| Unit Status | ✅ | Must be exactly one of: Pending, Under Construction, Completed, Resale. |
| View | Write any view value — must be added to Inventory Settings first. | |
| Segment Name | ✅ | Segment name. |
| Segment Type | ✅ | Unit type (e.g., Apartment, Villa) — must be added to Inventory Settings first. |
| Segment Space | ✅ | Space in sqm. |
| Segment Desc | Segment description. | |
| Segment View | Must be added to Inventory Settings first. | |
| Segment Finishing | Must be added to Inventory Settings first. | |
| Building Name | ✅ | Building name. |
| Building Desc | Building description. | |
| Building Details | Building details. | |
| Project Name | ✅ | Must match existing project name exactly. |
| Project Desc | Project description. | |
| Project Code | Can be left blank. | |
| Project Location Name | ✅ | Project location. |
| Project Price Type | ✅ | Either full or meter_price. |
| Garden Space | Garden space in sqm. | |
| Roof Space | Roof space in sqm. | |
| Position | Must be added to Inventory Settings first. | |
| Premium % | Price premium percentage. | |
| Garden Price % | Only used if Project Price Type is meter_price. Enter 0 if not applicable. |
|
| Roof Price % | Only used if Project Price Type is meter_price. Enter 0 if not applicable. |
|
| Unit Code | Can be left blank. | |
| Hall | Enter count if exists, 0 if not. |
|
| Bedroom | Enter count if exists, 0 if not. |
|
| Bathroom | Enter count if exists, 0 if not. |
|
| Kitchen | Enter count if exists, 0 if not. |
|
| Reception | Enter count if exists, 0 if not. |
|
| Pool | Enter count if exists, 0 if not. |
|
| Segment Phase | Must be added to Inventory Settings first. | |
| Unit Delivery Date | Can be left blank. | |
| Additional Meter Name | Must be added to Inventory Settings first. | |
| Additional Meter Area | Area in sqm. | |
| Additional Meter Price | Price per meter for this additional area. |
Price Type Logic
Full Price: The Unit Price column is the total unit price as-is.
Meter Price:
- Unit total price = Unit Price × Segment Space
- Garden price = Garden Price % × Meter Price × Garden Space
- Roof price = Roof Price % × Meter Price × Roof Space
- Enter
0for Garden Price % and Roof Price % if not applicable.
Adding Units to an Existing Project
If you want to add more units to an existing project via upload, all project/building/segment values in the file must exactly match the existing values already in the CRM.
File Preparation Steps
- Go to Setup → Inventory Upload and download the template.
- Fill in the data following the column reference above.
- Delete the first row (the example row that comes with the template).
- Save as CSV UTF-8.
- Upload the file.
Repricing Template
Use this when you have an existing project and want to update the prices of all units at once.
How to Download
Go to Setup → Inventory Upload — the system will ask you to select which project you want to download the repricing template for. After selecting the project, the template downloads pre-filled with all that project's existing units.
Steps
- Download the Repricing Template from Setup → Inventory Upload.
- The template comes pre-filled with your existing units.
- Update only the columns highlighted in green — these are the editable price fields.
- Delete the first row (the example row).
- Save as CSV UTF-8.
- Upload the file.
Editable Fields (Green Columns)
The green columns are the only ones you can edit:
| Column | Description |
|---|---|
| Price | Updated unit price. |
| Space | Updated unit space in sqm. |
| Floor | Updated floor number or name. |
| Roof Space | Updated roof space in sqm. |
| Garden Space | Updated garden space in sqm. |
| View | Updated view type — must exist in Inventory Settings. |
| Bedroom | Updated bedroom count. |
| Bathroom | Updated bathroom count. |
| Finishing | Updated finishing type — must exist in Inventory Settings. |
| Unit Delivery Date | Updated delivery date. |
| State | Updated unit state. |
The following columns are read-only (grey) and must not be changed:
- Unit Id, Name, Segment Name, Segment Type, Building, Project
⚠️ Only the columns highlighted in green can be edited — do not modify any other columns or the upload will fail.
💡 The repricing template only affects available and hidden units — sold or reserved units are never modified.
Inventory Template — File Preparation
💡 Same process applies to both the Inventory Template and the Repricing Template:
- Fill in the data.
- Delete the first row (the example row that comes with the template).
- Save as CSV UTF-8.
- Upload.