
Add / Upload New Lead
Overview
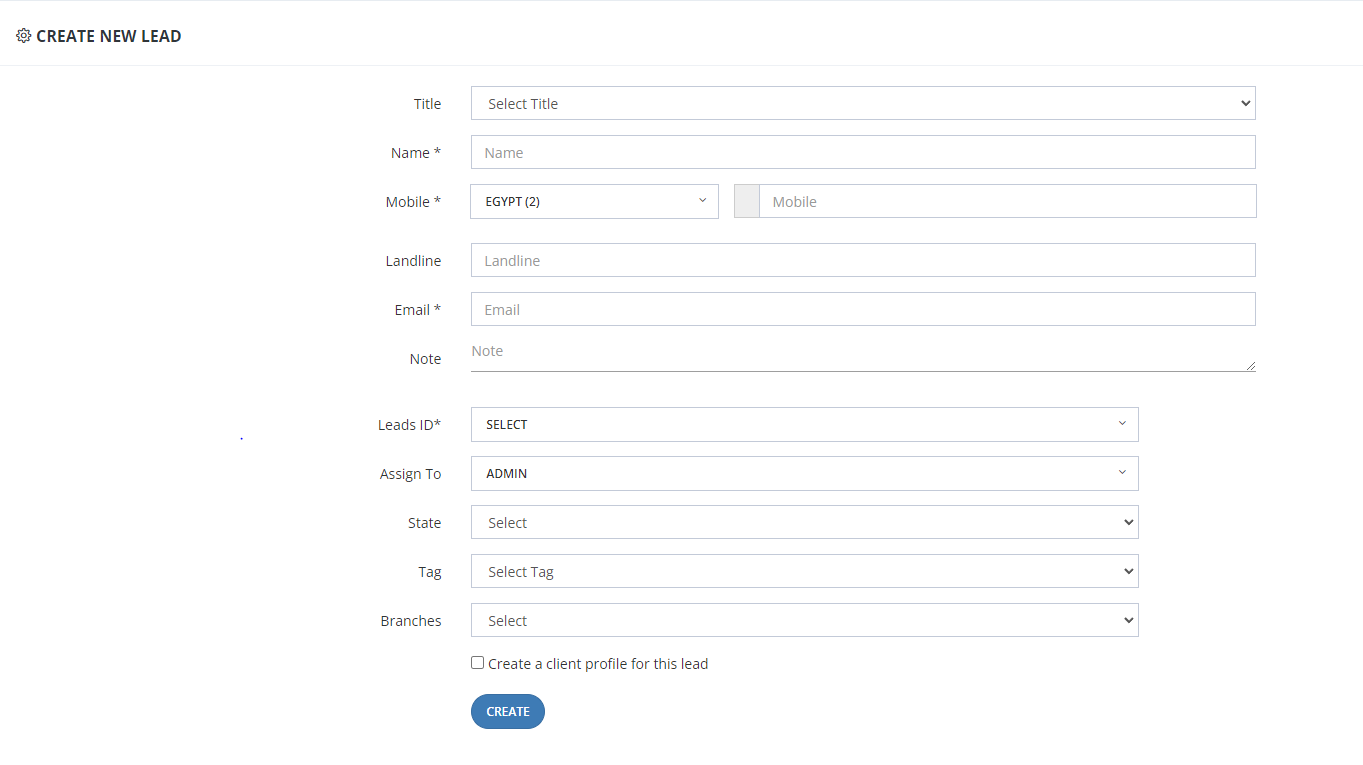
Use this to add a single lead manually into the CRM.
How to Add a New Lead
- Go to Sales Module → New Leads → Add New Lead.
- Fill in the lead details:
- Name — Full name of the lead. (Required)
- Mobile — Must include the country code. Example:
201017601513for Egypt. (Required) - Email — If the lead has no email, the system can generate a fake one automatically (see tip below). (Required)
- Lead ID — Select from the dropdown list. You can also add Lead IDs from the Marketing Module. (Required)
- Fill in any additional optional or custom fields as needed.
- Click Add.
💡 No email? Go to Sales Settings → Add Lead & Duplication and enable Generate Fake Email. Set a fake domain (e.g.,
company.com) so the system auto-fills the email field. This helps distinguish real emails from system-generated ones.
Submission
Once all required fields are completed:
- Click Submit to save the lead.
- If the Create a Client Profile option is selected, a complete client profile will be created alongside the lead entry.
- If the mobile number is flagged as a duplicate and duplication settings are enabled, the lead will not be saved — it will be sent to the Duplicated Leads screen instead.
- If no email is provided, a fake email will be generated automatically upon submission to ensure the lead entry is complete.
Adding Custom Fields to the Lead Form
You can add custom fields to the Add New Lead screen to capture additional information specific to your business.
Steps to Add Custom Fields
- Go to Setup → Fields Setup.
- Click Add New.
- Configure the field:
- System Form — Set to True to make this field appear on the Add New Lead form.
- Field Name — Enter a name (e.g., Passport Number, Customer Preferences).
- Data Type — Select the appropriate type (text, number, date, etc.).
- Set as Unique — Enable this to prevent duplicate entries for that value (e.g., National ID, Passport Number).
- Save the field. It will now appear on the Add New Lead form for all new entries.
Field Options
- Required Fields — Configure whether the custom field is mandatory before the lead can be submitted.
- Field Behavior — Control whether the field is visible, editable, or used for reporting purposes.
Key Things to Know
- The Lead ID is selected from a dropdown — the values come from the Marketing Module.
- The mobile number must include the country code .
- After saving, the lead appears in New Leads and can be assigned to a salesman.
Upload Leads
Overview
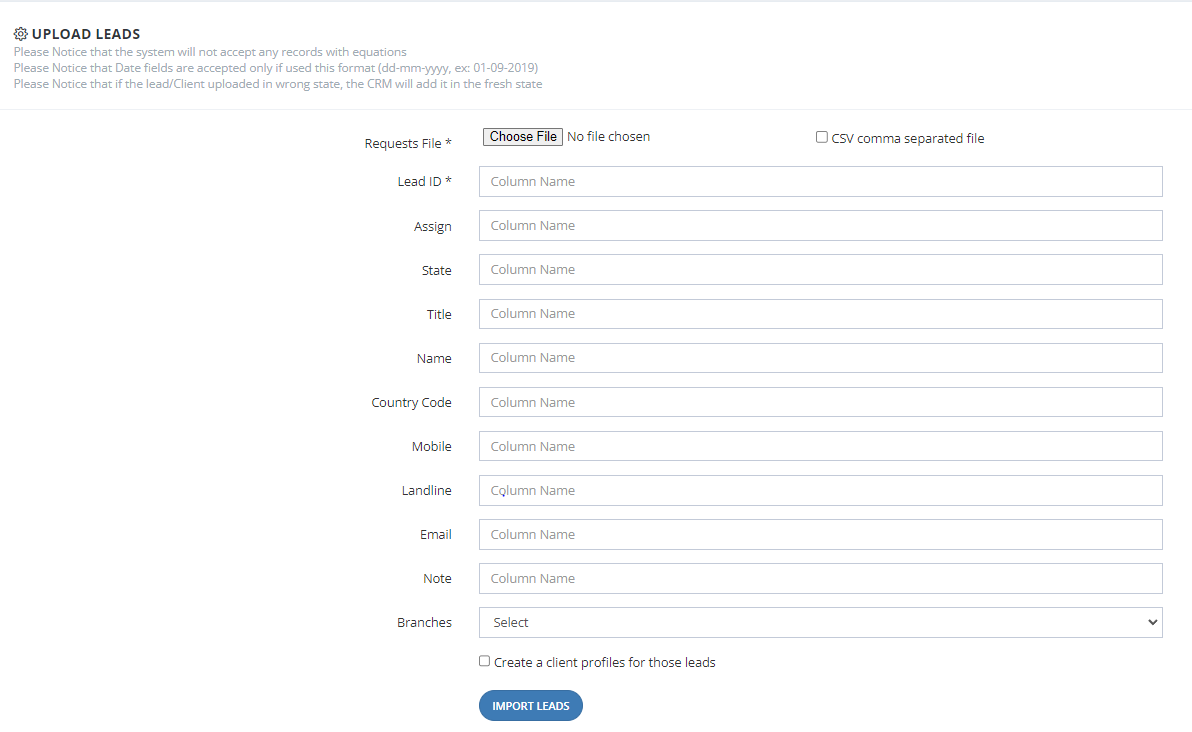
Use this to import multiple leads at once using an Excel (.xlsx) or CSV file. This is the most common method when receiving bulk leads from marketing campaigns.
How to Upload Leads
- Go to Sales Module → New Leads → Upload Leads.
- You will see the CRM's field mapping screen — it lists all available CRM fields.
- Prepare your Excel or CSV file and map each column to the correct CRM field. For example:
- Your column
Client Name→ CRM fieldName - Your column
Sales→ CRM fieldAssign
- Your column
- Upload the file.
- The system will process the file and either confirm success or generate an error sheet.
Critical Field Requirements
These two fields cause the most upload failures — pay close attention:
Salesman Name (Assign field)
- Must be written exactly as it appears in the CRM — same spelling, same capitalization, same spacing.
- Do not use nicknames, abbreviations, or extra spaces.
- How to find the correct name: Check the CRM user list before filling this column.
| ❌ Wrong | ✅ Correct |
|---|---|
ahmed |
Ahmed Mohamed |
Ahmed M. |
Ahmed Mohamed |
ahmed mohamed (trailing space) |
Ahmed Mohamed |
Lead ID (Marketing Info)
- This value is generated in the Marketing Module — copy it from there directly.
- The Lead ID is always required — the upload will fail if this column is missing or incorrect.
- How to get it: Go to Marketing Module → find your campaign → copy the Lead ID.
Mobile Number
- Must include the country code with no spaces or symbols.
- Example for Egypt:
201017601513
Reading the Error Sheet
If your upload has errors, the system automatically downloads an error sheet showing exactly which rows failed and why.
| Error | Cause | Fix |
|---|---|---|
| Salesman not found | Name doesn't match CRM exactly | Copy name from CRM user list |
| Lead ID not recognized | Wrong or missing ID | Copy correct ID from Marketing Module |
| Invalid mobile number | Missing country code or wrong format | Use format: 20XXXXXXXXXX for Egypt |
| Missing required field | A mandatory column is empty | Fill in all required fields |
⚠️ Fix all errors in the file before re-uploading — not just the first one.
Tips to Avoid Errors
- ✅ Copy the Salesman Name directly from the CRM user list — never type it manually.
- ✅ Get the Lead ID from the Marketing Module and type it exactly as it appears — never guess it.
- ✅ Always include the country code in the mobile number column.
- ✅ Review the full error sheet after each upload and fix everything before re-uploading.
What Happens After a Successful Upload
- Leads are created in the system and appear in New Leads.
- If a mobile number already exists in the system and duplication settings are enabled, that row will be sent to the Duplicated Leads screen instead of being created as a new lead.
- If no email is provided for a lead, a fake email will be generated automatically if that setting is enabled in Sales Settings.
Custom Fields in the Upload File
If your admin has added custom fields to the lead form (via Setup → Fields Setup), these fields may also be available as columns in the upload mapping screen. Map them the same way as standard fields — match your Excel column to the correct CRM field name.